
Quoting the legendary French Grandmaster André Philidor, “pawns are the soul of chess”: as you might already know from your chess practice and study, pawn structures really are the backbone of chess strategy, as they define the main characteristics of a position.
While it is not always true that same pawn structures should be played in the same way regardless of anything else, by analyzing the arrangement of the pawns on the board you can gather a lot of information about how play should generally follow.
That way, you will be able to carry out the most accurate plans in the position, and fight your opponent’s most dangerous ideas with effectiveness.
In this article, we are going to continue our journey through pawn structures and study one of the richest and most flexible ones: the King’s Indian – Rauzer Formation structure.
What does the King’s Indian – Rauzer Formation pawn structure look like?

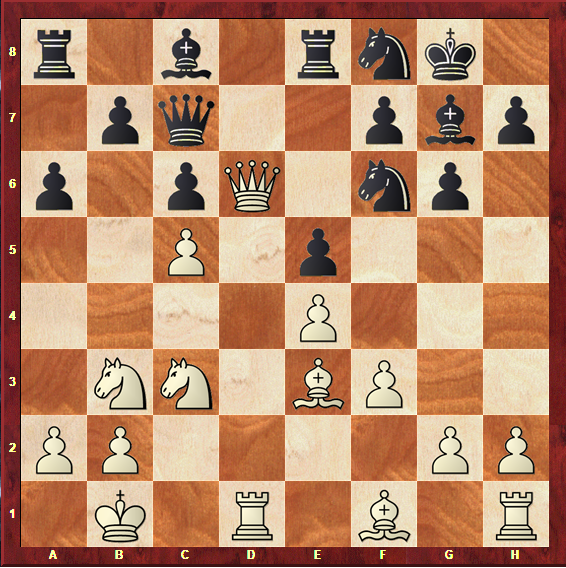
As you can see from the diagram 1a, this structure is characterized by the placement of the White pawns on a2, b2, c4, e4, f2, g2 and h2, whereas Black’s pawns are placed on a7, b7, c6, e5, f7, g7 and h7.
By glancing at this position, at first sight you might be inclined to say it is fairly symmetrical: both d-pawns are missing, and the rest of the pawns are placed in the same files. That’s correct. But a closer look will make you realize there is a clear imbalance in this position.
And where can we see that imbalance? Clearly, in the placement of the c-pawn.
Unlike all of the other pawns on the board, who stand in symmetrical positions, White’s pawn stands on c4, further advanced than Black’s, standing on the c6 square.
This seemingly small difference shapes the character of the position to a great extent, as we will see when we discuss plans for both sides.
How do you reach this pawn structure?
This is the question you might be asking yourself as of now: sure, pawns stand like that and that’s called the King’s Indian – Rauzer formation structure. But how do I get there?
Even though this pawn structure arises mostly from the King’s Indian and Old Indian openings, it can also, even if rarely, come from a Ruy Lopez/Spanish opening; in fact, it was named after Rauzer, the chess player who introduced it in the Ruy Lopez.
The most common way to reach it, by far, is with the King’s Indian Exchange variation, a theoretical line that White can use against the much feared King’s Indian defense.
- d4 Nf6
- c4 g6
- Nc3 Bg7
- e4 d6
- Nf3 0-0
- Be2 e5
- dxe5 dxe5
- Qxd8 Rxd8
- Bg5 c6
The exact same position can also be reached with the Modern defense, an opening that at times bears a great amount of similarities with the King’s Indian. When White plays an early c4, a direct transposition is achieved with the following move order:
- e4 g6
- d4 Bg7
- c4 d6
- Nc3 Nf6
- Nf3 0-0
- Be2 e5
- dxe5 dxe5
- Qxd8 Rxd8
- Bg5 c6

Another possibility, and the main move for Black, is to play 9…Re8 instead of 9…c6; but c6 is quite a typical move, which will come sooner or later in these lines of the King’s Indian.
That happens because Black has the need to control the d5 square from early on, to stop a White Knight from landing there and achieving a very strong position.
From the following move order, we see the exact same structure arising from the Old Indian defense:
- d4 Nf6
- c4 d6
- Nc3 e5
- Nf3 Nbd7
- e4 Be7
- Be2 0-0
- 0-0 c6
- dxe5 dxe5

after 8…dxe5.
A rather rare, but possible way to reach this pawn structure with the Ruy Lopez opening is after this move order:
- e4 e5
- Nf3 Nc6
- Bb5 Nf6
- Nc3 Bb4
- 0-0 0-0
- d3 d6
- Ne2 Ne7
- Ng3 c6
- Ba4 Ng6
- c4 Bc5
- d4 Bb6
- dxe5 dxe5
As you can see, diagrams 1b, 1c and 1d have many distinct features, but also a lot of similarities can be found: and that’s what a pawn structure is all about.
In these diagrams, the pieces greatly differ in placement. Some have not even been exchanged yet, like the Queens, which remain on the board on diagrams 1c and 1d but not on diagram 1b. White’s Bishop is on the e2 square on diagrams 1b and 1c, while it stands all the way around on the a4 square on diagram 1d.
However, the shared pawn structure says a lot about the position, and many of the plans will be common to these diagrams despite the distinct placement of the pieces.
So, you can conclude that there are many distinct paths to reach this specific destination: the King’s Indian – Rauzer formation pawn structure.
Besides this, you have learned that it can happen on the board even coming from openings that are fundamentally different from one another: both starting with 1.e4 and 1.d4, which means both open and closed games.
This comes to show that even if the King’s Indian is not a part of your opening repertoire, you can come to face it in unexpected ways during your games – so it’s better to study it and be aware of its unique characteristics.
In addition to this, even if it does not actually occur on the board very often, you can be certain that by studying many different pawn structures, your strategic “vocabulary” will increase significantly.
And what does this mean?
It basically means that you will have greater understanding of many different positions, including some that are not a part of your opening repertoire.
That knowledge will help you become a more consistent and wise player, ready for all types of positions at all times.
What are the characteristics of this pawn structure?
Now that you’ve heard all about what the King’s Indian – Rauzer formation pawn structure looks like, and know the possible ways to come to finding it on the board, it’s time to dig deeper and discuss the position in greater detail.
You probably have a huge amount of questions at this point: who stands better in this pawn structure? Does it really affect the position so much that pawns are placed this way and not in any other? How do I play it with White? And what should I do if I have the black pieces?
It’s obviously impossible to define who stands better in a given position just by looking at its pawn structure: it’s an important part of the process, but it’s not all there is to it.
That being said, in this structure, at the most basic of levels, Black has a certain positional advantage – that happens because, as you read earlier, there is an imbalance in this position.
This imbalance, which is the distinct placement of the c-pawns, generally favors Black.
And why?
Well, mostly because White’s pawn on c4 is weakening the d4 square in a significant way. As pawns are the only pieces in a chess board that can’t make their way backwards, this square will forever be weakened: pawns are on c4 and e4, and none can retreat to defend it if needed.

In addition to this, Black’s strong pawn on e5 increases control over this square; and the pawn on c6 effectively controls d5, which would be as much of a critical square for White as d4 is for Black.
These are the reasons that show why this pawn structure is generically known to offer Black excellent chances to claim an advantage and even play for a win.
At this point you might be thinking: am I simply better with the Black pieces in this position? Why does White even play variations that lead to this bad structure?
The answer is no, Black is not automatically much better in this structure. What we have just seen is a basic structural element, but it does not define the position entirely: it’s a critical factor, but it isn’t all there is to this structure.
As in every single chess position you can find, the following elements are extremely important:
- The placement of the pieces;
- The lead in development;
- Space;
- The King’s safety;
And that’s where it gets tricky: to compensate for the slightly worse structure, in this type of positions White generally enjoys a good lead in development. Also, the pawn on c4 grants the player of the White pieces a space advantage – these are the main reasons behind White’s opening choice.
In addition to these dynamic features, it’s fair enough to say that Black’s position is not without any weakness. The d6 square has also been clearly debilitated, and controlling it is what White will try to do.
As you can see by now, there are pros and cons for each side, as in most pawn structures and positions in a chess game.
A great strategic battle will take place on the board, and it’s important to be aware of the features that shape each side’s strengths and weaknesses, as well as the best and most effective plans.
In order to help you structure your thinking, here’s a small and concise list of important points for each of the players to keep in mind:
White’s position
- Generally, the pieces are further developed;
- The pawn on c4 provides a long lasting spatial advantage;
- The d6 square is a weakness in Black’s field;
Black’s position
- The d4 square is a critical weakness in White’s field;
- The d5 square is controlled by the c6 pawn;
- There is greater control of the dark squares in the position;
As you see, it isn’t clear at all who has the better chances in this pawn structure: it all comes down to each game and to who will manage to carry out their plan in a better way.
Which leads us to a major question…
How do you play in this pawn structure?
As you have read earlier, the King’s Indian – Rauzer formation pawn structure has a reputation of being highly flexible and leading to a game that is open to many different possibilities.
Even so, it is important to clearly define in your mind what you should be striving for when you are playing it, and what your opponent’s goals in the position are.
Moreover, you might find yourself on the White side of this position in one given game, and on the Black side in another – so it’s important to test the waters on both sides, and really know what you are getting into.
Now that we know what the strengths and weaknesses for each side are, let’s continue our analysis of the position to try to figure out which plans will take place.
As you know by now, Black’s control of the d4 square is a critical factor in this structure.
If at some point in the game Black manages to manoeuvre his pieces in such a way that he obtains full control of this square, all of White’s hopes to have something in the position will come to an end.
With a Black Knight standing on d4, there will be no chance for White to double the rooks on the d-file, and often giving up the dark-squared bishop is the only possible way to tame this mighty Knight – which lets go of the powerful Bishop pair, but, more importantly, weakens the dark squares in the position even further.
Sometimes, Black can actually advance a pawn to the c5 square (if White does not have an effective way to control the d5 square himself) in order to achieve an even stronger control of d4 – which comes to show how crucial this square is.
But this is all theoretical – how can we exploit this in practice?
Well, as you may have heard, a basic concept of chess strategy is that all pieces except the Rook maximize their play by being in the centre of the board.
However, there is one particular piece that can jump over pawns, and be extremely well placed on the d4 square, supported by the e5 pawn without being restricted by it.
The Knight, of course!
The d4 square is simply the perfect home for a Knight – it’s a supported square right in the middle of the board, looking at every direction and bothering the opponent to a great extent.
If Black manages to install a Knight on d4 under good conditions, he will most likely find himself with a huge positional advantage.
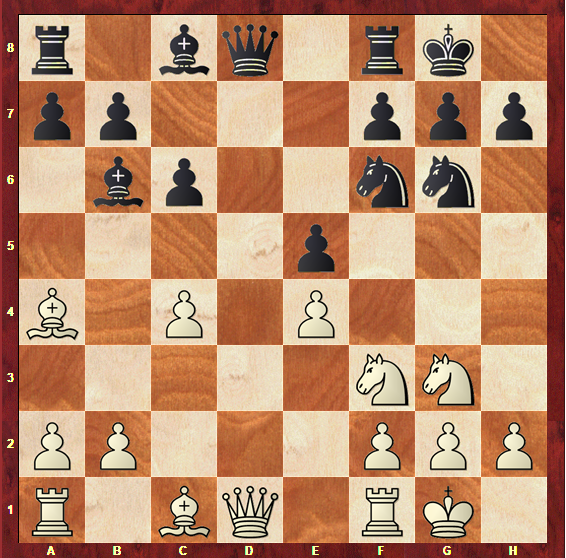
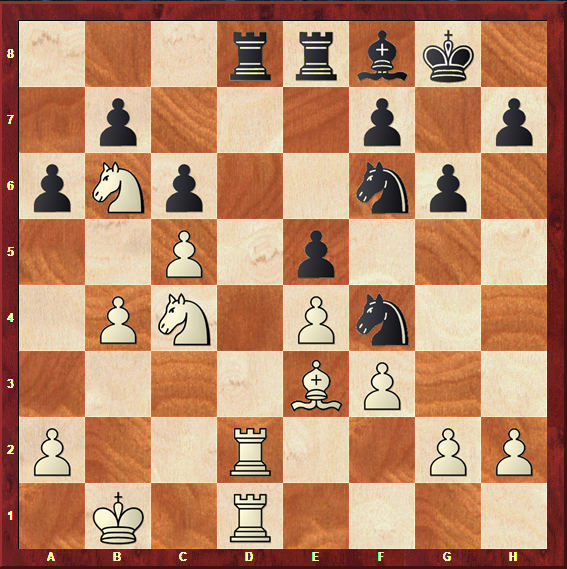
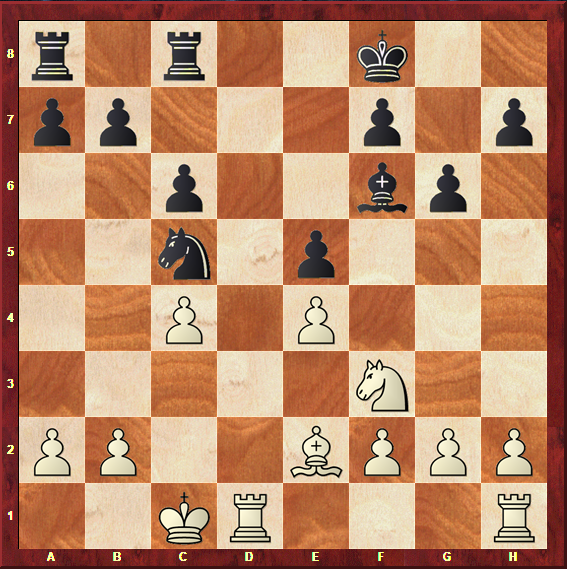
Take a look at the following diagram, which was extracted from the game Tarrasch-Euwe (Bad Pistyan Breyer Memorial, 1922).

It’s true that the pawn structure has already suffered many changes from its original state: White’s pawns have moved a2-a3, g2-g3 and h2-h3, while Black’s pawns have moved a7-a5, g6-g7 and… c6-c5.
This is an ideal setup for Black – the position that Black wants to get right from when play begins in this pawn structure. The position that you need to keep in mind you want to achieve if you have the Black pieces in this structure in one of your games.
Here, Black controls all of the dark squares in the position, and has advanced the pawn from c6 to c5 to increase the support on the d4 Knight, which is a majestic piece that is placed in its ideal square, as we have mentioned.
Please note that the c6-c5 advance is only so strong in this position because White has no effective way of directing his pieces towards the control of the d5 square, which becomes as critical as d4 is for Black after this move.
From the above diagram, play continued:
- Nxd4 exd4+
- Kd3 Bxh3
- Bb5 Rd6
- Rh1 Bg2
- Rxh7 Re6
- Rh4 g5
- Rh6+ Ke5
- f4+ gxf4
- Rh5+ Kd6
- gxf4 Bxe4+ with a decisive advantage for Black.

Black is not only a pawn up, but also has a tremendous advantage due to the supported passed pawn on d4. Tarrasch resigned just a few moves later as the position is too much to handle for White.
Another critical square in the position, even if not as much as d4, is the f4 square.
Placing a supported Knight there can also make the White pieces feel uncomfortable, and, again, often the dark-squared Bishop will have to be exchanged for this powerful Knight.
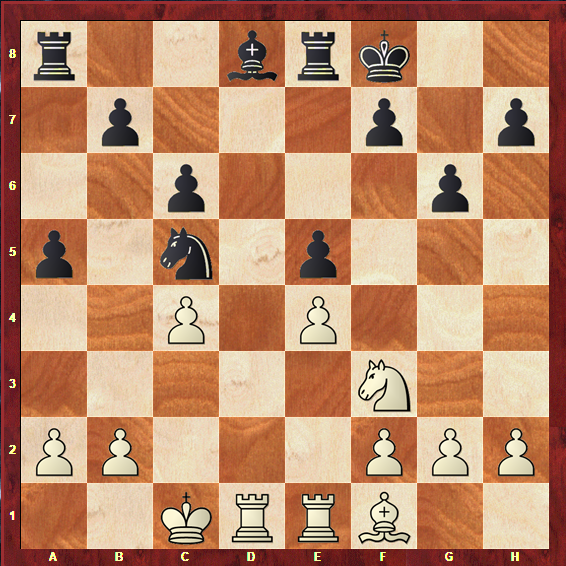
A good example of this idea in practice was found in the game Crisan – Beliavsky (Vidmar Memorial, 2001).
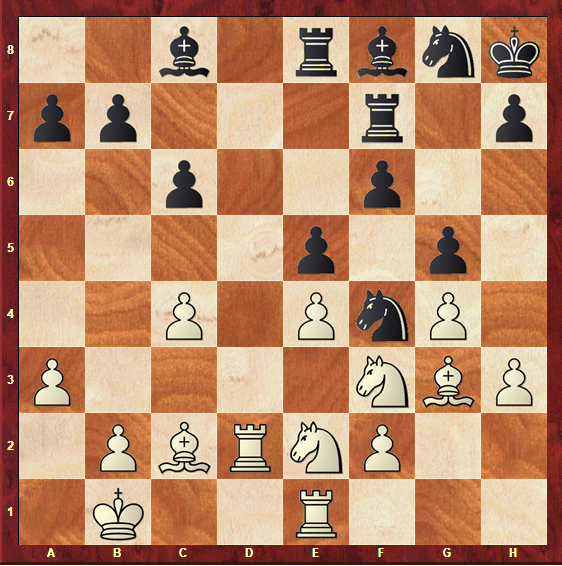
Maybe this position is not as ideal for Black as it would be if the Knight had found its way to d4, but on f4 it also does a great job of controlling White’s position – it’s worth keeping both ideas in mind and choosing between the one that will be most effective in a given position.
The play continued:
- Bxf4 gxf4
- Nc3 h5
- Rg1 Rh7
- Rdd1 Be6
- Bd3 Bc5
Unlike the previous one, this was still a long and complicated game – but Black has the best chances due to the control of the dark squares.
With accurate play, the Ukrainian grandmaster Alexander Beliavsky made his opponent dearly miss his dark-squared bishop, and ended up winning a great game.
Now that we’ve focused so much on what Black can do, it’s time to allow White to put in a good word for himself.
Undoubtedly, White is kind of in a rush. He needs to try to stop Black from fully controlling the dark squares and placing a strong Knight on d4, as you now know he will try to do at all costs.
Therefore, quick action is required: and that quick action comes in the form of a key move, the c4-c5 advance.
White wants to push this pawn one square further to control the weakened d6-square, and maybe place a strong Knight in there himself – that can only happen if the pieces are actively placed and the Rooks are able to dominate the open d-file.
In addition to this, with this advance White frees the way for his light-squared Bishop and gains even more space for his pieces, especially in the Queenside.
Therefore, White will strive to carry out this plan, which, if successfully conducted, can lead him to enjoy a comfortable and long lasting advantage.
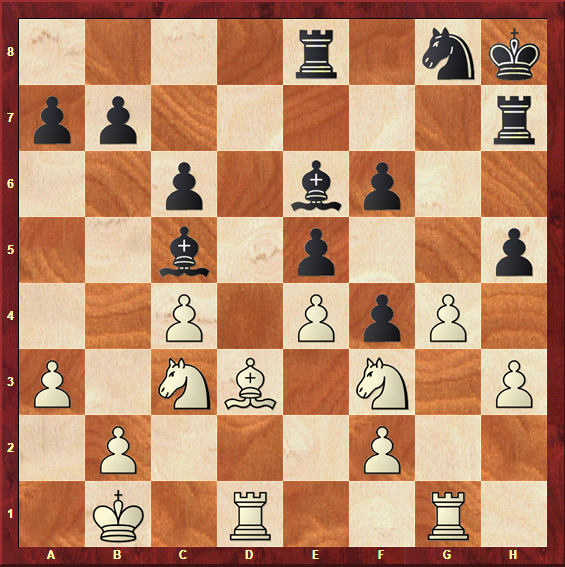
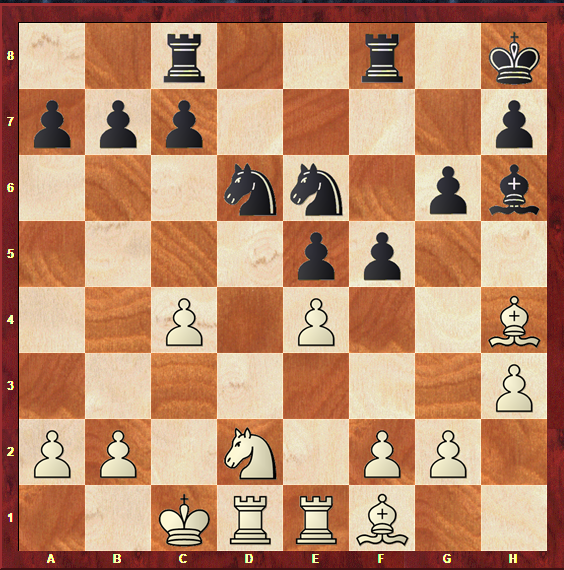
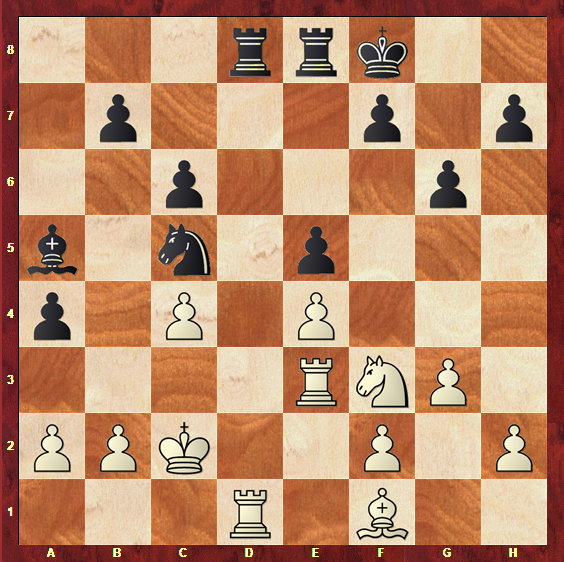
Take a look at the following position, extracted from the game Pantsulaia – Erdogdu, from the 2010 Turkish National Championship.
If on diagram 1f we said we had found the ideal setup for Black, then it’s only fair to state that diagram 1j presents us with exactly the ideal setup for White.
Here we see the c4-c5 push in all of its strength: paired with the b2-b4 advance, it provides White with all of the space he could have dreamed of having for his pieces, while leaving Black with very little room to breathe.
The knight on d2 is ready to take a very natural route, to c4 and after that to d6, where he will be right in the middle of the enemy’s field, creating all sorts of threats.
It also must be said that the fact that Black had to push a7-a6 also created another significant weak spot in the position, which may also be exploited by his opponent: the b6 hole.
In the game continuation, we see how Levan Pantsulaia majestically improved every single one of his pieces, saving the occupation of the d6 square for last: he only placed the Knight there at the very end of the game, when its presence became unbearable for Black.
The rest of the game went as follows:
24…Nf6
- f3 Re7
- Nc4 Red7
- Rxd7 Rxd7
- h4 Rd8
- Kh2 Nh5
- Bh3 Qe7
- Rd1 Bf6
- Rxd8 Qxd8
- Qd2 Qc7
- Qd7 Qxd7
- Bxd7 Na7
- Nd6 1-0

You might find that it was way too early for Black to resign, but after taking a closer look at the position, it’s easy to see there’s nothing but desperation.
White’s Knight on d6 controls the whole position by himself, attacking b7 and f7, and all of Black’s pieces are oddly placed, loose and inactive, with no connection to each other.
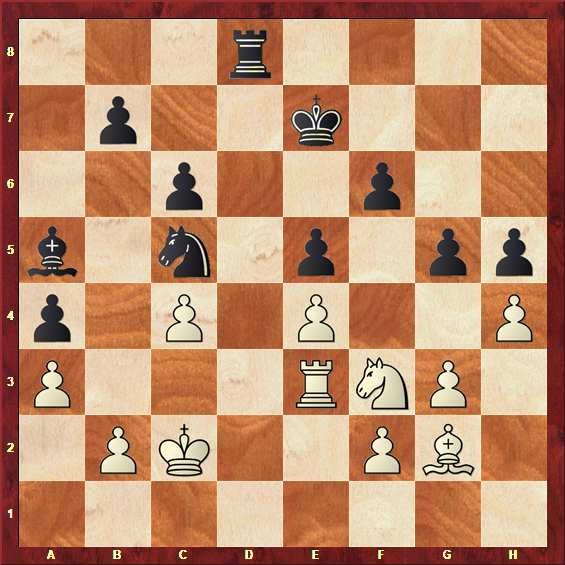
Another example of how tricky things can get for Black if White steps up to c5 from early on can be found in a clash of the classics, Geller-Boleslavsky, from the Soviet Championship of 1952.
Right from the start of the game, Geller adopted an aggressive strategy conducting the White pieces: he wanted to push his pawn to c5 and permanently get a hold of the d6 square.
He did this by seizing his lead in development, as well as the control of the d-file granted by his Queen and Rook; therefore, offering an exchange of Queens so early on is a great idea in this position.
White simply has an endgame that is much better and easier to play – which was clearly shown in the moves to follow:
15…Ne6
- Bc4 Bf8
- Qxc7 Nxc7
- Na5 Rb8
- Na4 Be6
- Bxe6 Nxe6
- Nc4 Nc7
- Nab6 Ne6
- b4 Nf4
- Rd2 Rbd8
- Rhd1
White’s position is entirely dominating.
The Knights are beautifully placed, with eyes on the weakened b6 and d6 squares, while the pawns on b4 and c5 grant them all the space and protection they need.
In addition to this, the Rooks are fully controlling the open d-file – not even the Knight on f4, Black’s best piece, can compete with how strong this setup is for White.
From looking at the ideal setups for both sides, you will already know what the main plans are; but there are some other ideas that are a bit more hidden in this structure.
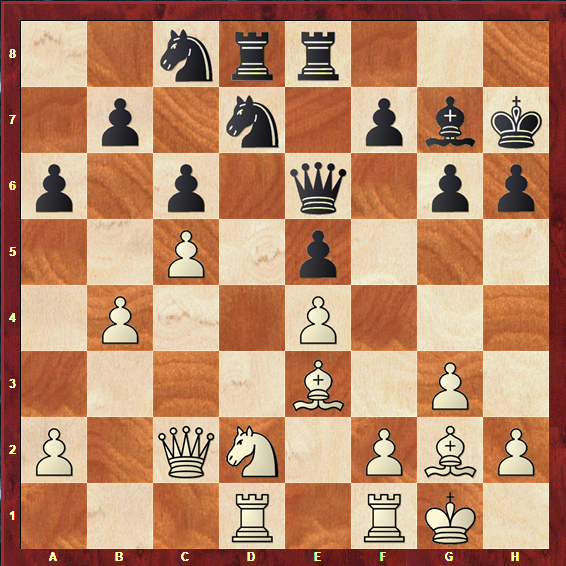
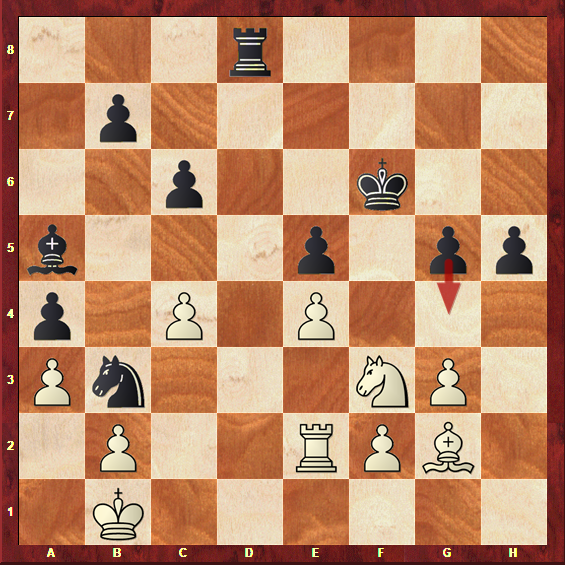
One of these ideas is a Kingside attack that may be launched by Black, by pushing the f-pawn to f5. This is a very aggressive idea of course, but it’s well in the spirit of the King’s Indian Defense and can definitely show up on the board.
Here’s a good example. There are a few particularities to this position, as the Black pawn is still standing on c7 and the White King has gone all the way to the Queenside by castling long.
However, the f5 break is timely and brings a lot of activity into the Black position. The White pieces are badly placed and this move presents them with a whole new set of problems.
Now that you have seen the ideal setups for White and Black and know exactly what you want and don’t want to see happening on the board, let’s break it down to a few critical points again to help you have a clear outlook on the matter:
White’s plans
- Advance c4-c5, exploiting the b6 and d6 weaknesses and gaining space;
- Try to place a piece on the d6 square, preferably a Knight;
- Defend the d4 square, trying to stop Black from occupying it under the ideal conditions;
- Expand on the Queenside with a2-a3 and b2-b4;
- Control the d-file with the Rooks;
Black’s plans
- Control the d4 square and try to place a piece there, preferably a Knight;
- Increase control over the dark squares and try to exchange dark-squared Bishops;
- Play a5 and place a Knight on c5, stopping White from advancing c4-c5 and carrying out their most dangerous plan;
- Create Kingside play with f7-f5, trying to create an attack.
Model game
In order to finish this article about the King’s Indian – Rauzer formation pawn structure with a cherry on top, let’s analyze a game played by no other than Garry Kasparov, considered by many to be the greatest chess player of all times.
In this game, the former World Champion had the Black pieces and faced Silvio Danailov, a Bulgarian player who is best known for his role as President of the European Chess Union.
The game took place in the World Junior (Under 20) Championship, in Dortmund, Germany, 1980.
- c4 g6
The game started with 1.c4, the English opening, but quickly transposed to a King’s Indian defense, exchange variation.
- Nf3 Bg7
- Nc3 d6
- d4 Nf6
- e4 O-O
- Be2 e5
- dxe5 dxe5
- Qxd8 Rxd8
- Bg5 Nbd7
Instead of 9…Re8 or 9…c6, as we have mentioned earlier, Kasparov went for 9…Nbd7, an ambitious move.
- Nd5 c6
Here, we have reached our beloved structure. Kasparov played the natural move c6, in order to kick the Knight away from the d5 square.
As usual, it can be said that White enjoys a certain lead in development in this position: the Knight on d7 is stopping the c8 Bishop from achieving its full potential at the moment.
- Ne7+ Kf8
- Nxc8 Rdxc8
A Knight that only a few moves ago was so powerful standing on d5, has now taken Black’s weakest and most underdeveloped piece.
- O-O-O Nc5
- Bxf6 Bxf6
The Knights on c5 and f6 were already putting a lot of pressure on the e4 pawn, so Danailov found himself obliged to give up his precious dark-squared Bishop, which would have been fundamental later on in the game.
- Bd3 a5
The Nc5-a5 plan is very effective, and Kasparov is already in full control of the position at this point.
- Rhe1 Re8
- Bf1 Bd8
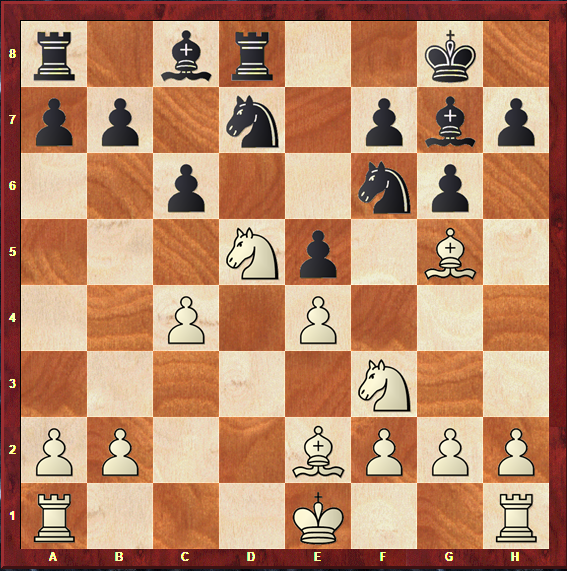
This move showcases Kasparov’s genius in practice. He moved the Rook to e8 when d8 seemed a much more natural square, fighting for the open file; however, he had a creative idea in mind. He wanted to activate his Bishop via d8 and a5.
- g3 a4
- Kc2 Ba5
- Re3 Rad8
Now, due to the misplaced Rook standing on e3, it’s Black who will be able to achieve full control of the d-file.
Every single Black piece is better than White’s counterpart: the Rooks are more active and connected, the Black Bishop is much better than White’s, and the Knight on c5 does an excellent attacking job, whereas White’s f3 Knight is a passive piece.
- Rxd8 Rxd8
- Bh3 f6
- Re2 Ke7
- Bg2 Nd3
- a3 Nc5
- h4 h5
- Re3 g5!
Black can afford to carry out this pawn-based attack because the Knight is tied to the defense of the d2 square – it would be simply deadly if White were to allow a Black Rook in there. Just a few moves later, the game reached its end.
- hxg5 fxg5
- Re2 Nb3
- Kb1 Kf6 0-1
The material might still be even, but White is completely lost in this position.
g4 is coming and there is absolutely no move to survive – there are just far too many threats for White to handle.
This game perfectly illustrates the ideas gaining shape and being put in practice in this structure.
Kasparov handled all the subtleties in the position with accuracy and mastery, and hopefully this game will not only guide you, but also inspire you if you are planning to give a practical test to all of the ideas we have just covered.
Conclusions
Now that we have reached the end of our coverage of the King’s Indian – Rauzer formation pawn structure, let’s take some time to draw the main conclusions and know what we must keep in mind.
- Studying pawn structures is extremely important to increase your positional strength as a chess player, even if the structures you are studying do not usually come from your opening repertoire;
- Not only the pawn structure is important, but also the placement of the pieces in each given position;
- This pawn structure is highly flexible and interesting, with chances for both sides;
- The structure is mainly symmetrical, except for one small detail: the difference in placement of the c-pawns;
- It usually comes from the King’s Indian or Old Indian defenses, though it can also be reached with 1.e4 openings;
- Black’s most important plans will be to control the d4 square and the dark squares in general;
- White’s most important plan will be to advance the pawn to c5, gaining space and creating an outpost for the Knight on d6;
Hopefully you now feel confident enough to outplay your opponent, whichever side of this structure you find yourself on.
Best of luck – but remember to keep on practicing!