
Welcome to yet another exciting stop in our route through all the 17 main chess pawn structures: the closed sicilian formation has finally been reached.
As the name suggests, this structure is typical of the Closed Sicilian, one of the anti-sicilians that White can choose from in order to avoid getting in an Open sicilian structure. However, as happens in all chess structures, this pawn formation can be reached through various move orders, and even with colors reversed.
This structure is not as common as some of the ones we have seen before. However, as you know, it is crucial to study all the 17 chess pawn structures, since all of them have meaningful strategic lessons to teach us.
If you like sharp games, with pawn storms in opposite sides of the board, then you will probably feel at home when playing this sort of positions: in fact, the closed sicilian structure is very known for complicated attacking positions. The name “closed” might indicate that this will not be an easy pawn formation to play with, but you shouldn’t let the complexity of this structure scare you: by the end of this article, you will know just what to do when playing this sort of positions.
Without taking any longer, it’s time to get started – as usual, we will start by seeing what this pawn structure looks like.
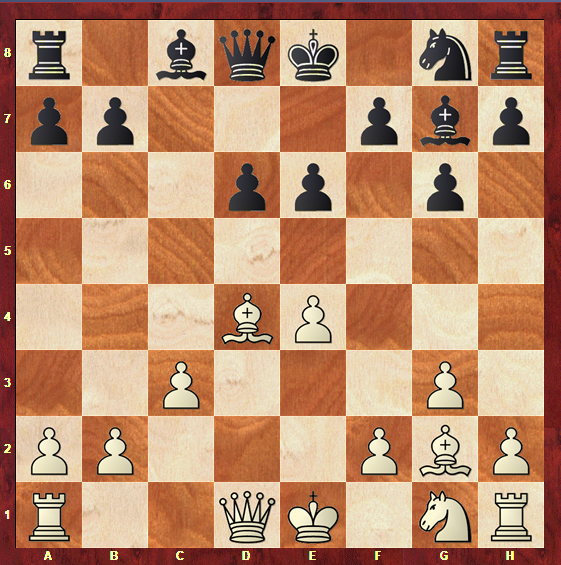
What does the Closed Sicilian Formation look like?
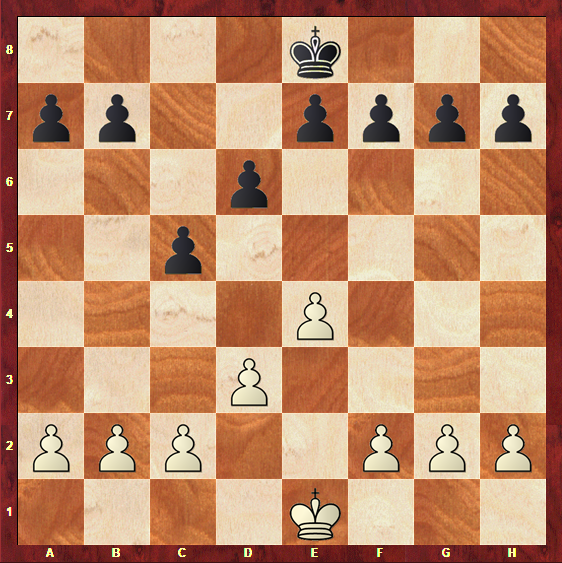
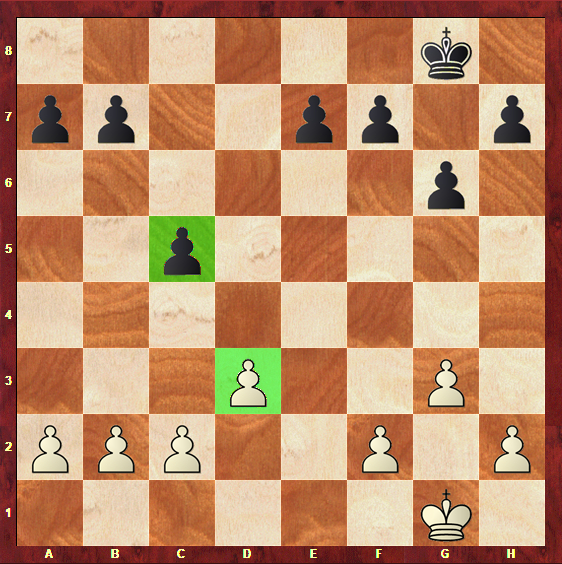
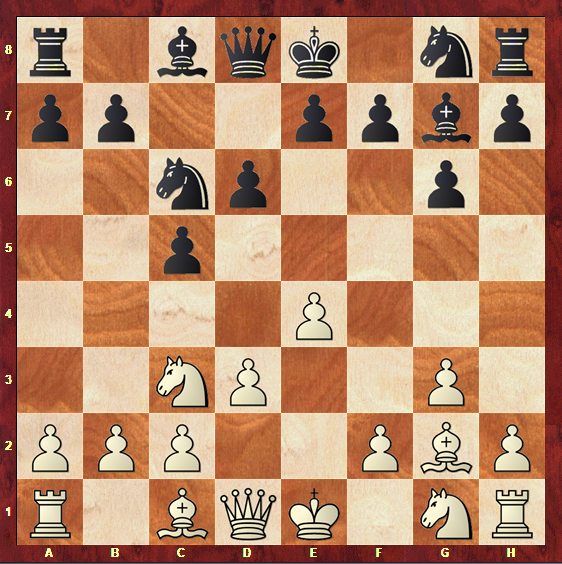
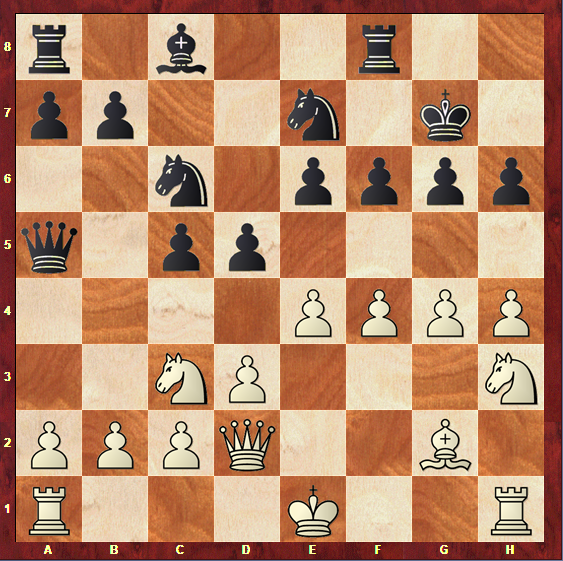
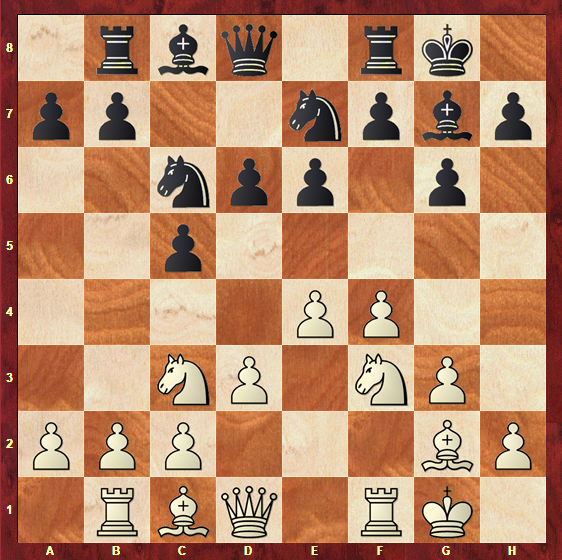
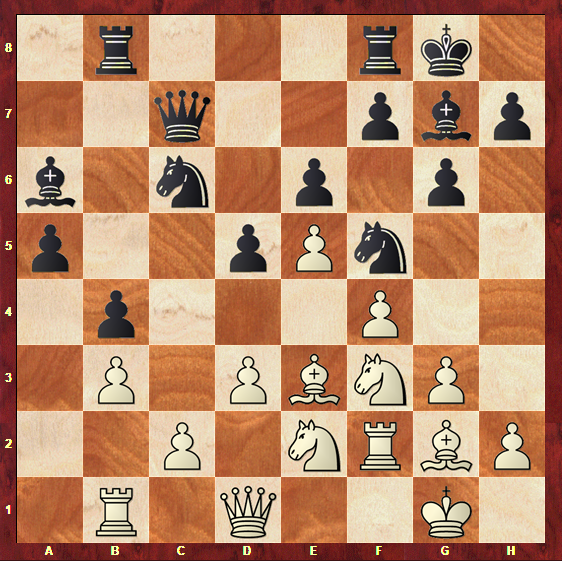
Take a few seconds to look at the position above and try to realise what are the imbalances present in this pawn structure. It is very important to take note of the imbalances in any given chess position you are analysing, as they will tell you a lot about the character and the possible plans in the game.
Something that should immediately pop out when seeing this position for the first time is the fact that all the initial pawns are still on the board. This means that there are no open or even semi-open files, and therefore it is a very closed game.
The truth is, in most of the positions that arise from this structure, usually there is a lot of time where no pieces or pawns are exchanged at the beginning of the game. This is the main factor why this structure is many times considered to be complicated.
Another very noticeable factor is that there is an imbalance in the centre: while White’s centre is mostly occupied by it’s pawn on e4, supported by the d3-pawn, Black’s centre is controlled from a more peripheral pawn on c5, also supported by the d-pawn.
Although in these positions there are no majorities and minorities of pawns in one of the sides of the board that could help us to figure out where each side should develop its play, there is a characteristic of the pawn formation that can help us with that.
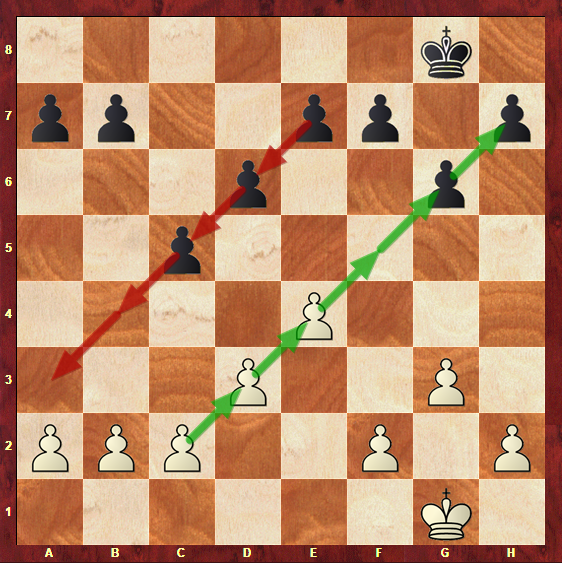
If you have closely analysed the position, then you might have figured out that the imbalance in the centre makes it look as if the pawn chains of each band are “pointing” at opposite sides.
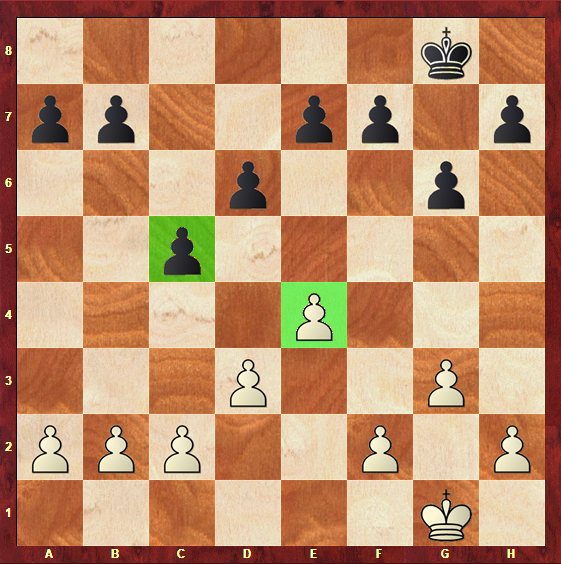
Another interesting feature present in this position is the fact that the g-pawns are both advanced one square. This pawn formation is known as the fianchetto, and its purpose is to place a Bishop on the diagonal where it can control the biggest number of squares possible.
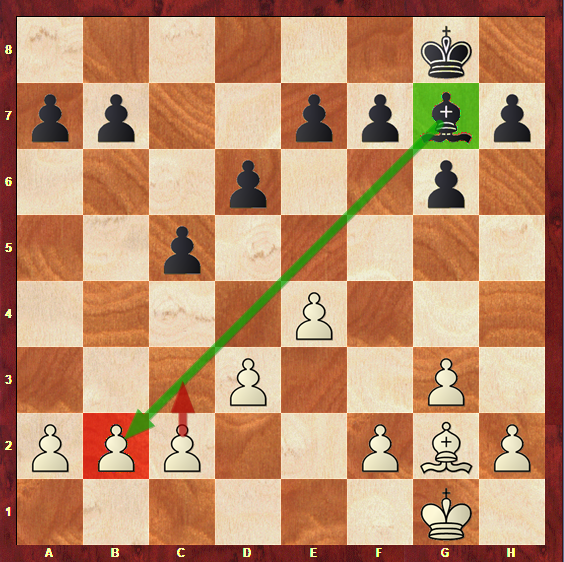
As you can see, Black’s Bishop on g7 is pointing directly to White’s Queenside territory:
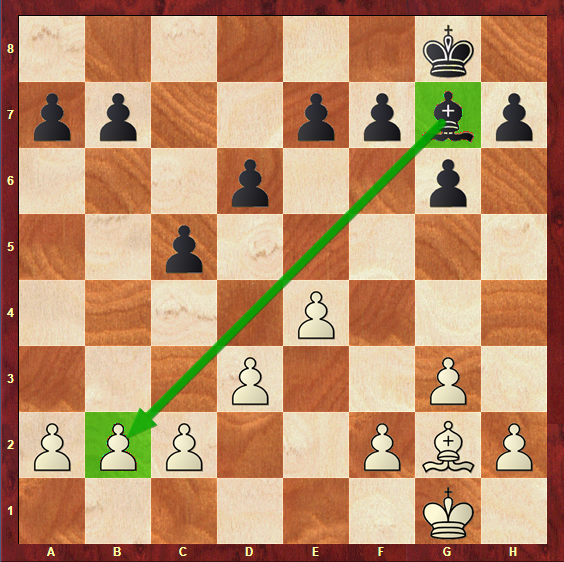
This active Bishop can be very helpful for Black when developing his attack on the Queenside, as it plays an important role in pressuring White’s pawns in this side of the board. Besides that, it also controls very important squares along the whole diagonal, such as the e5-square and the d4-square.
Meanwhile, White’s Bishop on g2 seems to be blocked by his own pawns and, because of this, not so active.

It is true that White’s g2-bishop is not the most active piece on the board, since it is not attacking any crucial point. However, it is a very important piece in the way that it adds some extra security to White’s king. Since White is very likely to end up developing a pawnstorm using the pawns that are protecting his King, it is very important that White’s pieces ensure that this plan is safe.
What are the characteristics of this pawn structure?
It’s time to learn how the most important features of this structure impact the games that arise from it, and the possible plans associated to them.
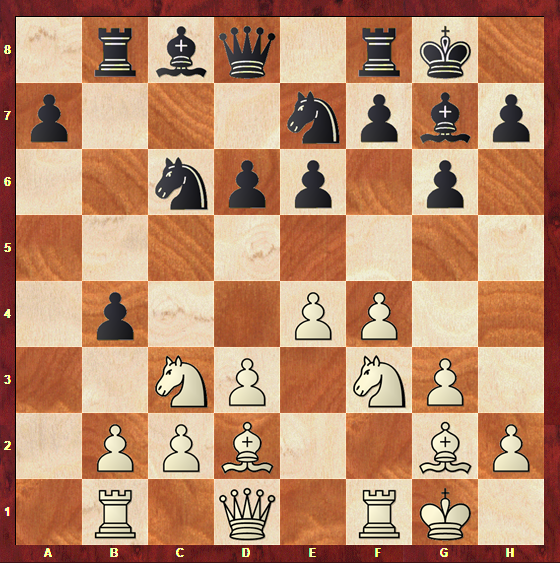
It was previously mentioned that, in this pawn structure, it is very common for White to develop a kingside attack.
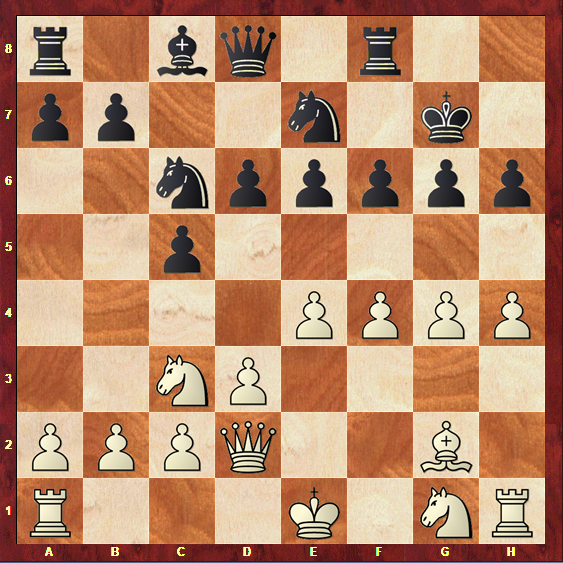
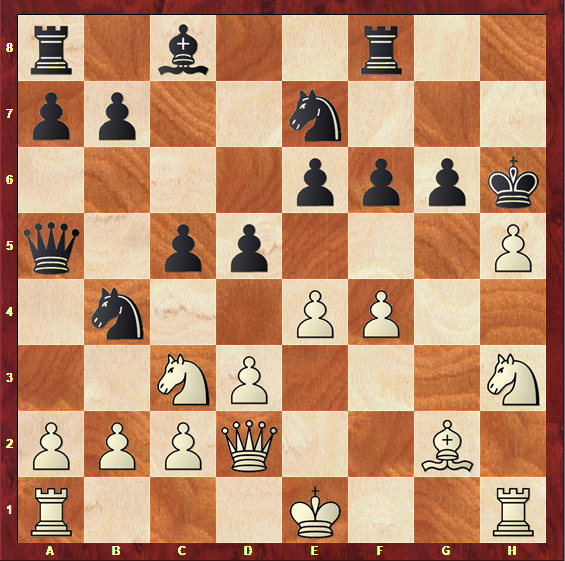
This attack usually includes both pieces and pawns. A typical plan is to advance the f-pawn all the way to f5, in order to pressure Black’s g6-pawn.
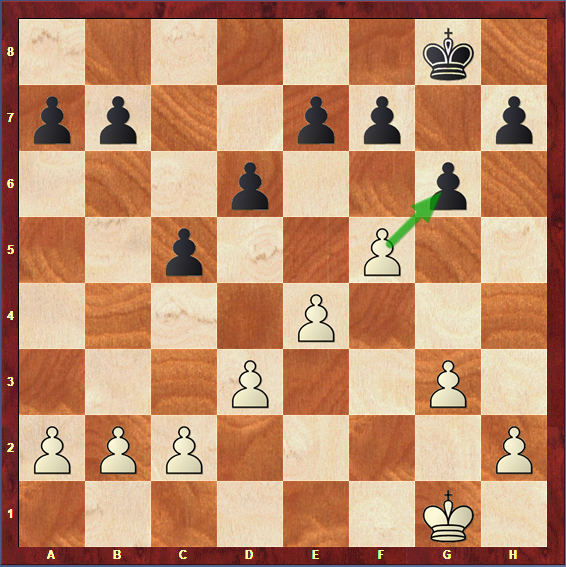
Great attacking opportunities can arise for White if he manages to securely expand on the kingside with f4-f5. This move, often supported by the g-pawn which advances to g4, activates many of White’s pieces, opening both the c1-h6 diagonal and possibly the f-file.
As you can see, this move can have a great impact in White’s chances of finding a winning combination on the Kingside. However, different pawn advances can be made.
For example, a white pawn on g5 could come in handy in order to take advantage of the weak h6-square, and possibly the f6-square if Black’s e-pawn has been advanced.
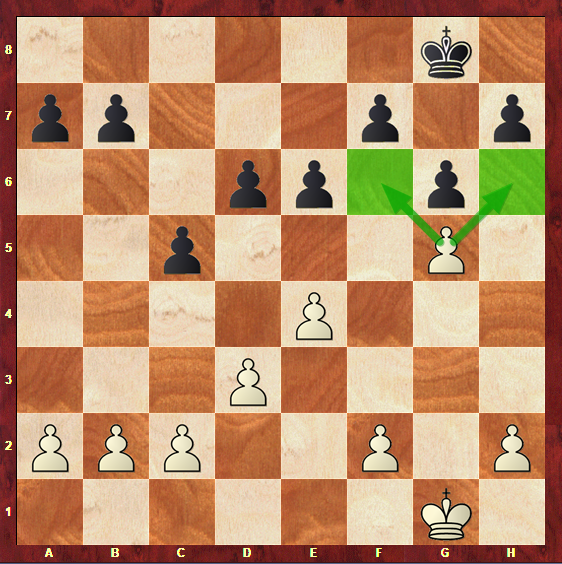
The h-pawn can as well be advanced in order to pressure the g6-pawn.
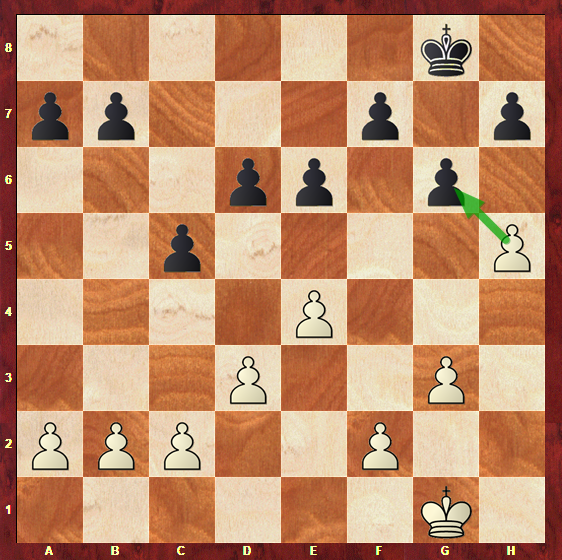
This pawn could even go to h6, threatening Black’s g7-bishop.
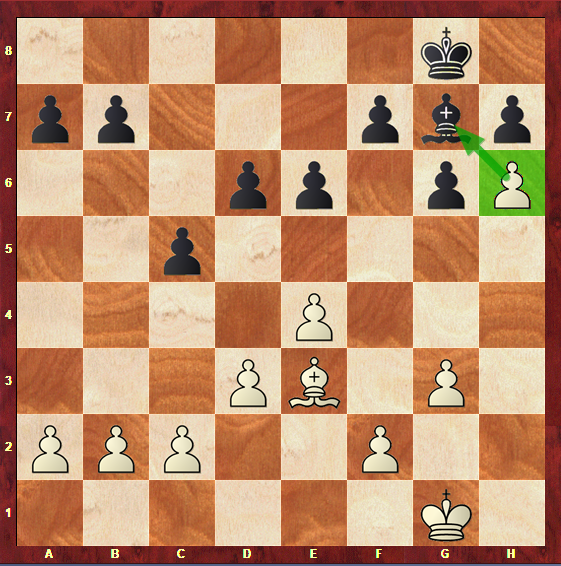
This move could restrain Black’s King and imprison it in order to secure an advantage.
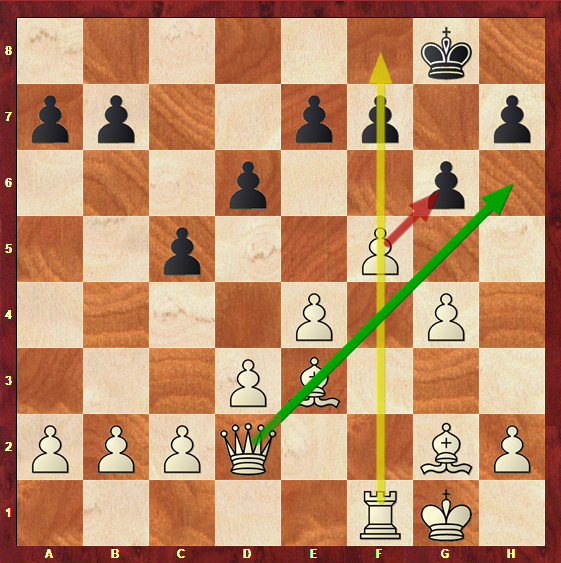
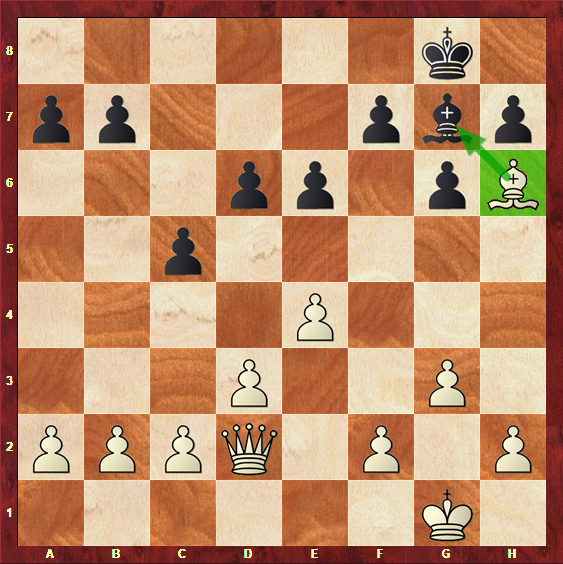
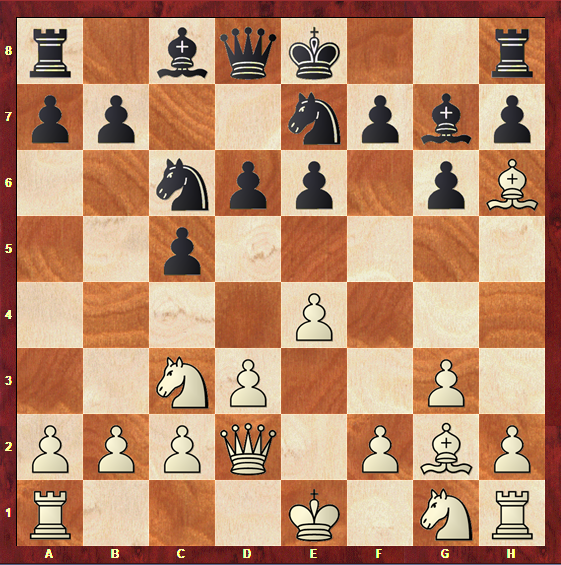
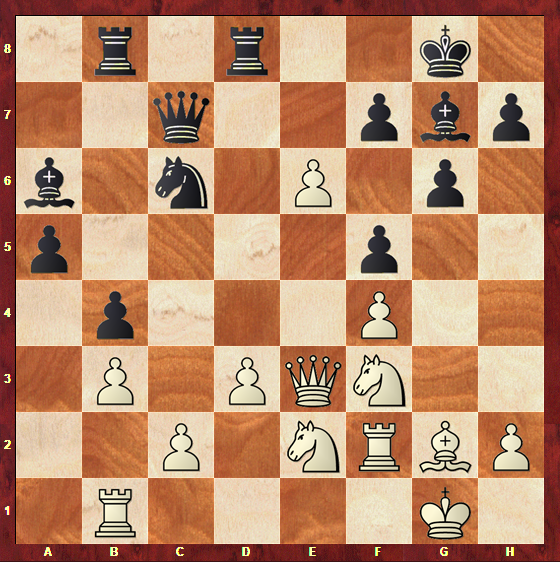
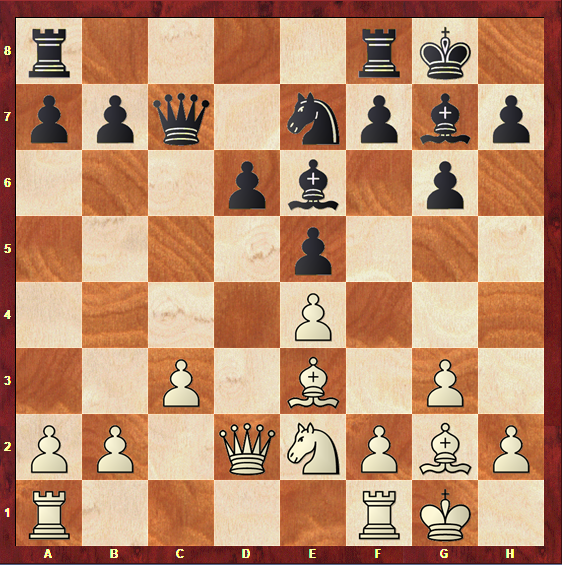
Besides the pawnstorm, White can also bring his pieces to the attack. One of the most important features of these positions is the c1-h6 diagonal.
This diagonal if often occupied by White’s dark-squared Bishop and Queen:
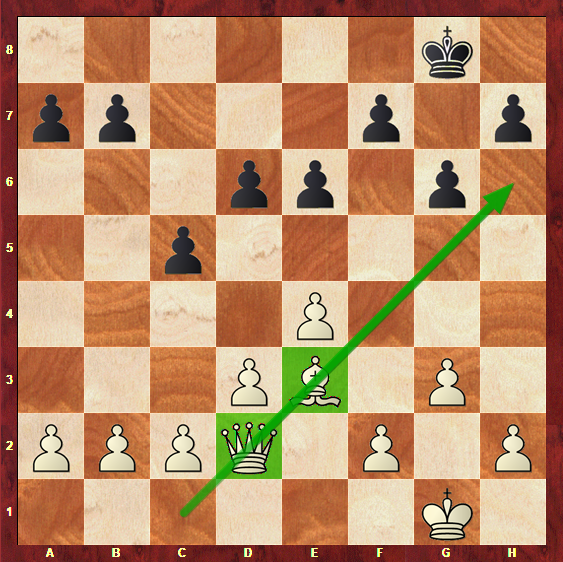
The fact that this diagonal is so important is, in fact, due to the possible move Bh6, whose purpose it to exchange Black’s g7 bishop.
As mentioned before, Black’s g7-bishop is a very powerful active piece. Because of this, it makes perfect sense that White would want to get rid of it. Besides that, there is another important reason why White would want to do that.
This brings us to a crucial attacking principle: the side who is attacking should try to get rid of his opponent’s most important defensors. It is true that, in most cases, when you’re attacking you should avoid exchanging pieces. However, when these pieces help your opponent defending your threats, then it is usually a good idea to exchange them, as this position would become more vulnerable.
In this case, it is easy to understand that without the g7-bishop Black would have a lot of unprotected squares around his king. It is true that White would no longer have his dark-squares Bishop to exploit them, however, he could try to do that with his other pieces and pawns.
As you can see, White has some attacking chances on the Kingside that shouldn’t be ignored. Because of this, Black has to fight for counterplay.
As you know, there are two typical ways of responding to a wing attack: you could either counterattack on the other side of the board, or try to break the centre.
Let’s first discuss the last idea: a central break is a very common theme in this position and it could completely stop White’s attack by disconnecting his pieces.
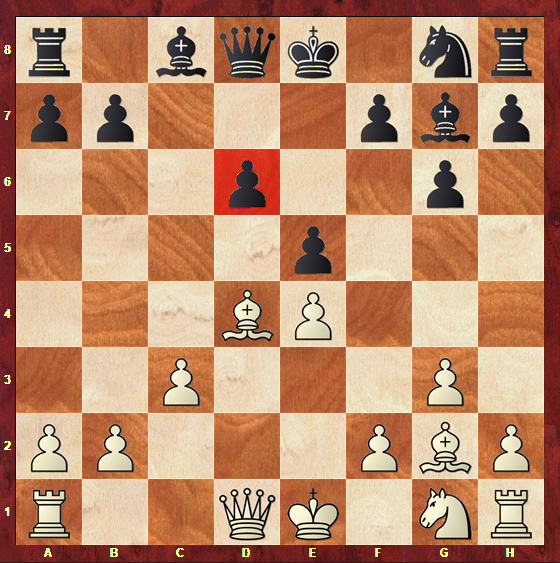
If you are a sicilian fan, then it is probably easy for you to guess what is the central break that Black should try in this position. In fact, most lines of the sicilian give Black the opportunity to breakthrough with the move …d6-d5. It is true that, in this position, the break doesn’t work exactly in the same way as it does in open sicilian structures, as the c-file is not open. However, it disrupts White’s control of the centre and can stop his attack, so it is important to keep this move in mind when playing in this structure.

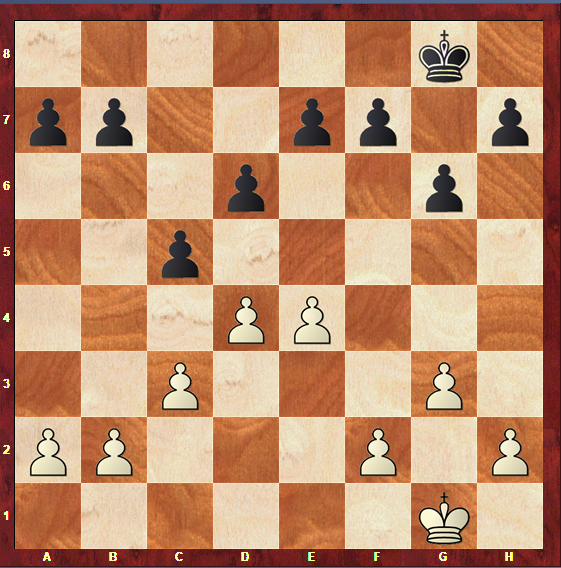
If Black manages to exchange his d-pawn for White’s e-pawn we would have a structural transposition.
In the diagram above, it is noticeable that Black’s centre would remain controlled by a more advanced pawn than White’s centre, as White’s e4-pawn disappeared. Besides this, White would have a semi-open e-file to play in, whereas Black would be left with the semi-open d-file.
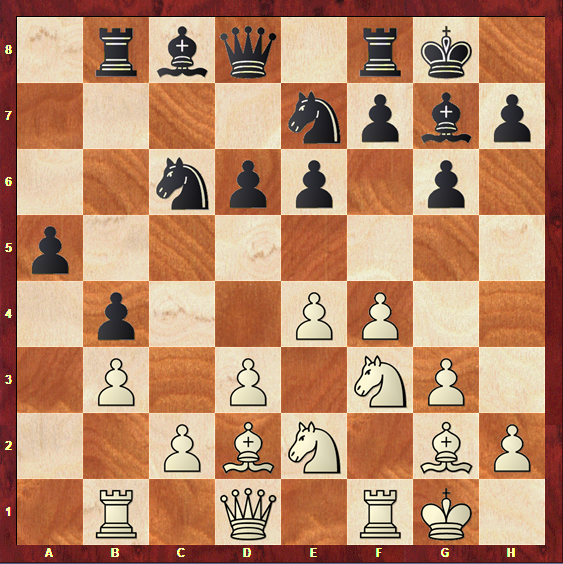
As you know, Black has another chance to combat White’s plan: attacking on the Queenside. The truth is both these plans are usually combined, which makes sense if you think that the d-pawn is placed on the Queenside, and because of this its advance could help with the attack on this side of the board.
Black’s Queenside attack is usually made by the advance of his pawns on this side of the board. This is usually helped by correct piece placement, supporting the pawnstorm, and the g7-Bishop.
White will often play the move c2-c3 to block the h8-a1 diagonal, otherwise he could have problems with his b2-pawn, attacked by Black’s g7-Bishop.
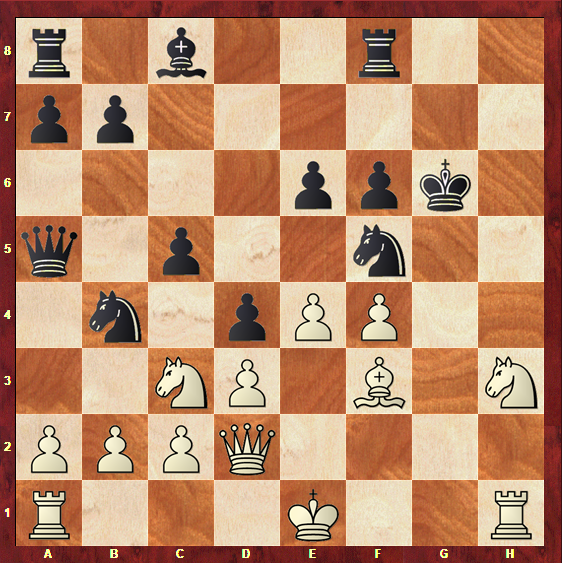
If the pressure of the g7-Bishop on the b2-pawn is not enough to provoke the move c2-c3, there is an extra thing Black can try: to place a knight on the d4-square, threatening the c2-pawn and making it tempting for White to play c2-c3 in order to get rid of it.
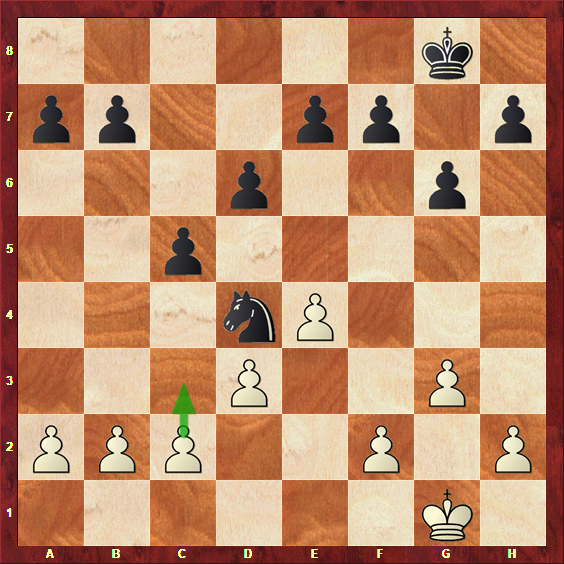
If White doesn’t play the move c2-c3, then Black will have a very well placed knight, controlling a lot of central squares.
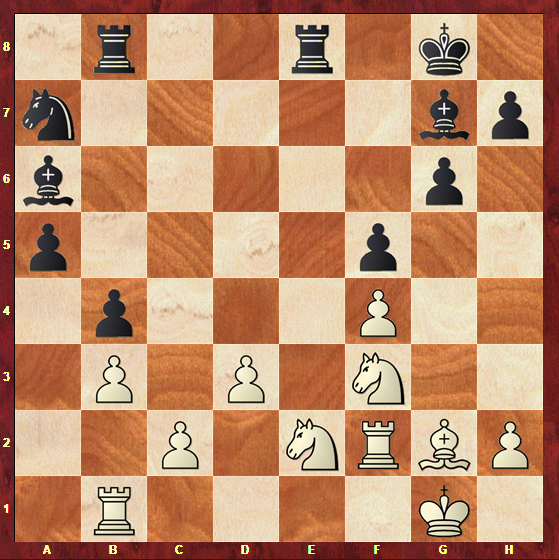
Once this move has been played, Black has a very typical plan: the …b5-b4 rupture.

As you can see in the diagram above, this move would put a huge amount of pressure in White’s queenside pawns.
Another possibility for Black is the move …c5-c4, disrupting White’s centre and threatening to open the c-file.

As you know, when the c-file is open in a sicilian structure, it tends to be a very important feature of Black’s position, as the control of this file could play a major role in the attack on the Queenside.
It is clear that Black has serious chances on the Queenside, and his counterattack should not be overlooked by White. So what can White do if his attack on the kingside doesn’t work out well?
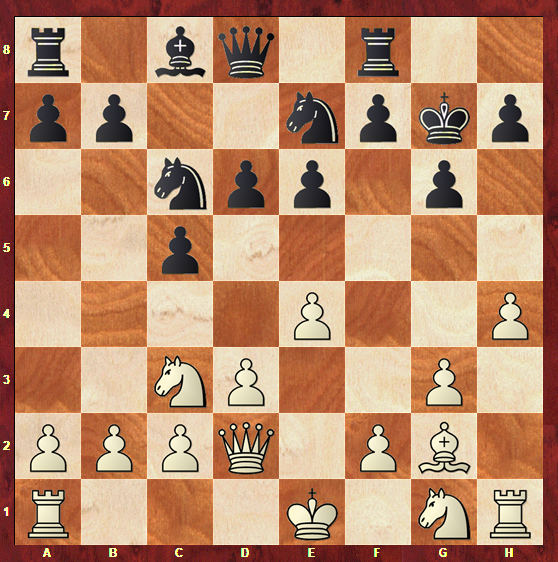
A very important plan for White is the expansion in the centre. It is true that this structure is typical of the closed sicilian, where White chooses not to place his d-pawn on the d4-square in the beginning of the game. However, this doesn’t mean that he won’t try to do that eventually, when the conditions are better.
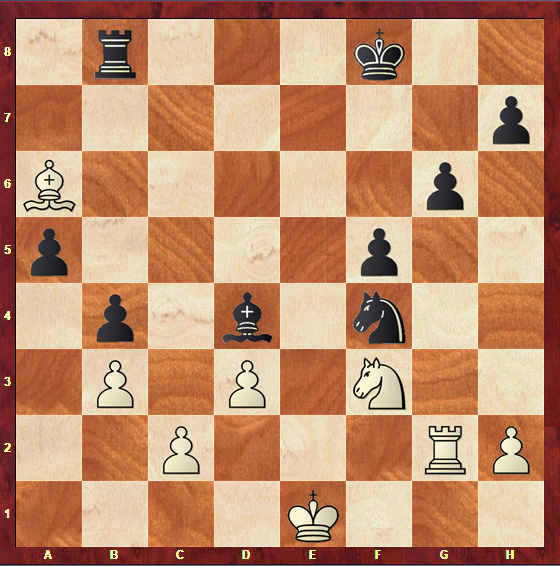
The move d3-d4 is usually preceded by the move c2-c3, which gives this central break a lot more support:
This plan could not only give White a full control of the centre and therefore a possible strategic advantage, but also disconnect Black’s pieces and their attack on the Queenside.
Let’s move on to the next section, when we will see what are the main plans that arise from these ideas and how they work in practice in games played by top-rated players.
How do you play in this position?
We have finally reached the section where you will truly become prepared to play on this structure and know exactly what to do when this pawn formation crosses your chess board. Top-level games will be analysed so you can see all the typical themes and plans that are usually present in the Closed Sicilian Formation.
Before we get to see all these model-games, let’s state the most common plans for both White and Black in this pawn structure:
White’s Plans:
- Launch a kingside attack, using pieces and creating a pawnstorm
- Expand in the centre with d3-d4, usually preceded by c2-c3
Black’s Plans:
- Launch a Queenside attack, creating a pawn storm and making good use of the g7-Bishop
- Breakthrough in the centre with …d6-d5
Now it’s time to see all of these plans in motion: make sure you have your chess board right in front of you and get ready for the most important step in learning this new pawn structure.
The first game exemplifies how White can create an extremely powerful kingside attack if Black is not careful enough. It was played in the year of 1984, between Nigel Davies and Leslie Smart. It starts with the following moves:
- g3 c5
- Bg2 Nc6
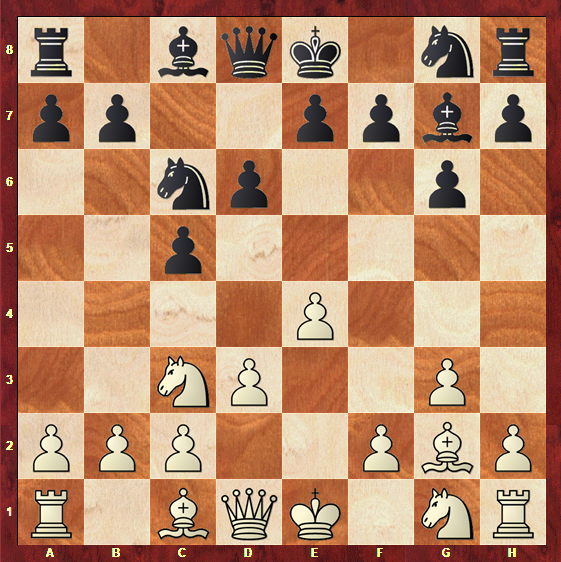
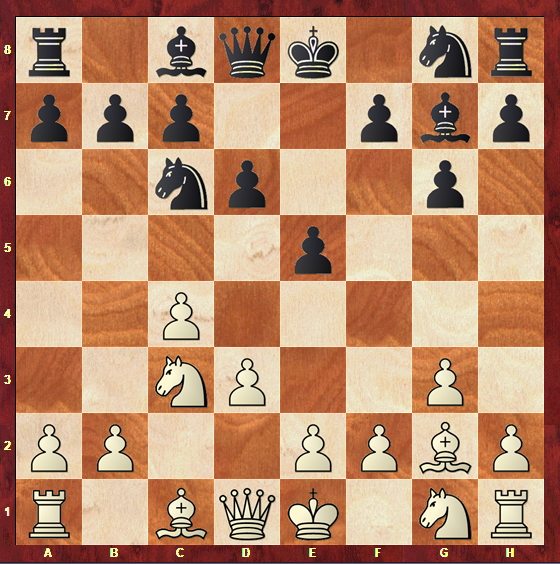
- e4 g6
- Nc3 Bg7
- d3 d6
The classic Closed Sicilian Formation has been reached. However, you may have noticed that this game didn’t start as a sicilian – White’s first move was 1. g3. It is always important to remember that this pawn formation, as any other, can appear in your chess board through many different move orders, and it is important for you to study all of them because of this.
The game followed with:
- Be3 e6
- Qd2 Nge7
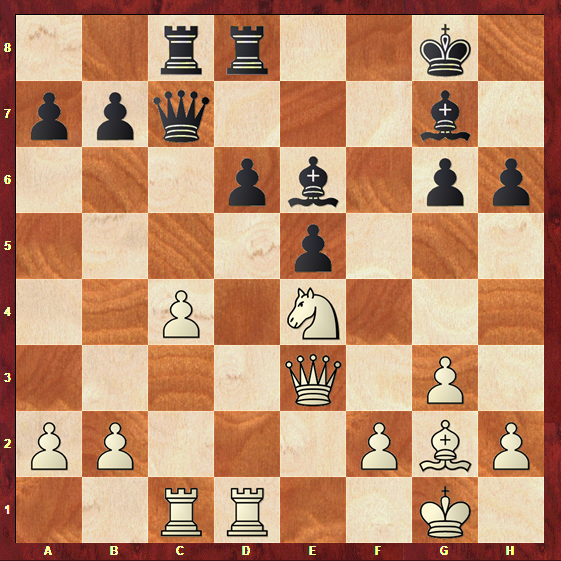
- Bh6
White is already trying to do something on the Kingside: exchanging the dark-squared Bishops would leave Black with the h6, g7 and f6-squares vulnerable, leaving Black’s king exposed. This is a plan to remember, as it happens very frequently.
- … 0-0
- Bxg7 Kxg7
- h4
White starts his expansion on the kingside, taking advantage of the fact that he hasn’t castled yet, and so he still has a rook on h1 to support the advance of this pawn.
- …h6
- f4 f6
- g4
White manages to get away with advancing all his pawns without having castled yet because Black’s pieces are far away from the kingside, and not very active.
- … Qa5
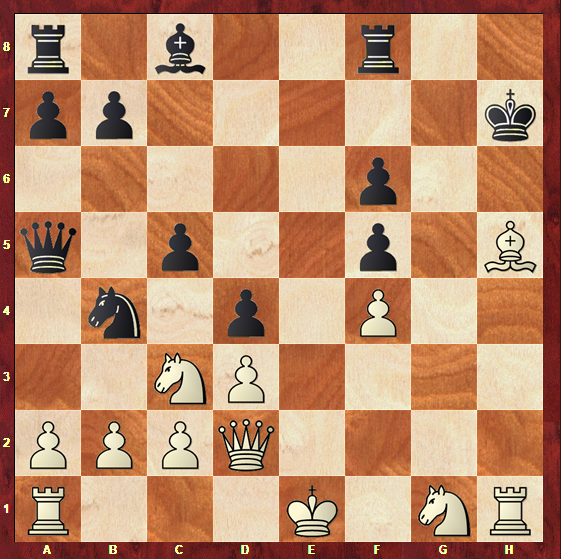
- Nh3 d5
Black breaks the centre with the common move …d6-d5. However, this is still not enough to disrupt White’s control of the position.
- g5 Nb4
- gxh6 Kxg6
- h5
Although he is not lost, Black’s position starts to seem very difficult to play, as White has some serious threats along the h-file.
- … d4
- hxg6 Kxg6
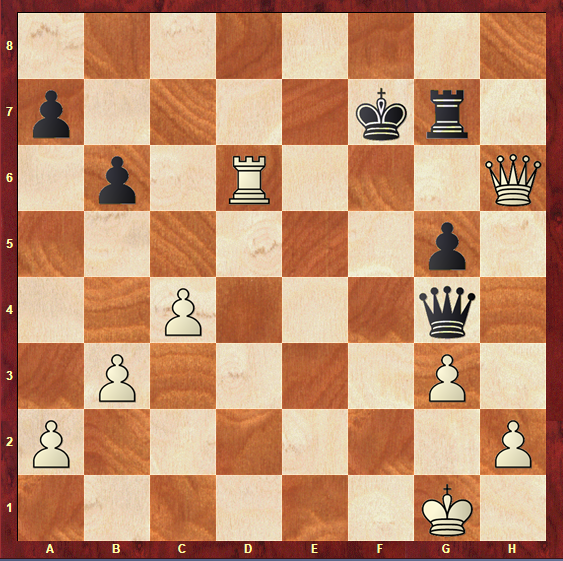
- Bf3 Nf5
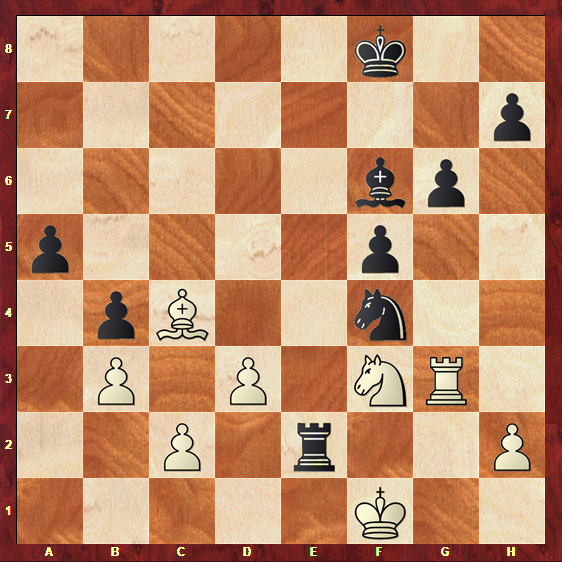
The decisive mistake: better would be 18… Rg8, preparing an escape for the king.
- exf5+ exf5
- Bh5+ Kh7
- Ng1
1-0
Clearing the diagonal, with an excruciating advantage. Black resigned, as there is nothing he can do to save the position.
White’s Kingside attack might have seemed to be an extremely exciting way of playing this sort of positions, however, Black can as well attack and fight back for counterplay. In the next game, we will see an example of how Black can create a pawnstorm on the Queenside and coordinate his pieces in order to neutralize White’s attack on the Kingside.
This game was played between Marek Vokac and David Navarra, in 2015.
- e4 c5
- Nc3 Nc6
- g3 g6
- Bg2 Bg7
- d3 d6

The typical Closed Sicilian Formation is reached, and White chooses to continue with:
- f4 e6
- Nf3 Nge7
- 0-0 0-0
- Rb1 Rb8
This move aims to support the direct advance of the b-pawn, creating a pawnstorm without wasting any tempi.
- a3 b5
- Bd2 b4
- axb4 cxb4
Opening the important a1-h8 diagonal.
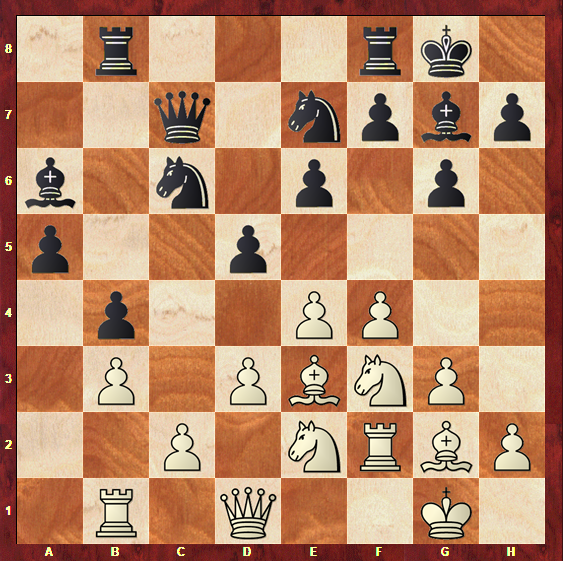
- Ne2 a5
- b3
White decides to Block the dangerous b-pawn, but Black already benefits from a small edge due to his space advantage on the Queenside. In the meantime, White has not developed any threats on the Kingside and he is far away from controlling the centre. Besides this, the move b2-b3 leaves the c2-pawn backwards, which can become a serious weakness in the endgame.
- … Ba6
- Be3 Qc7
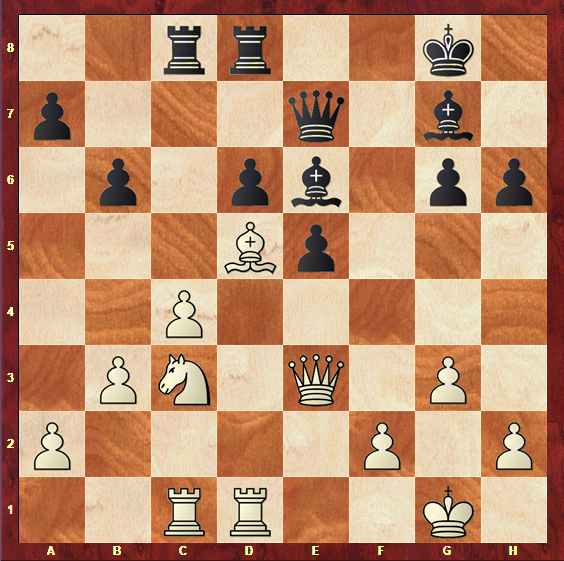
- Rf2 d5
The classic …d6-d5 break is finally achieved under great conditions. Black’s pieces are very well placed in order to control both the centre and the Queenside.
- e5 Nf5
Black places his knight on a very strong central square, controlling a lot of important squares.
- Qd2 Rfd8
- g4 d4
- gxf5 dxe3
- Qxe3 exf5

After exchanging pieces, Black is still in a better position, as White pieces are not very active.
- e6
Since White lacks space in this position, it might feel logical that he would want to break with the move e5-e6. However, this opens once again the a1-h8 diagonal, and because of this it can have some serious drawbacks.
- … Re8
- exf7+ Qxf7
- Qc5 Qa7
- Qxa7 Nxa7
Queens are exchanged and Black is left with an endgame in which he has the pair of Bishops, with a good advantage.
- Nd2 Nb5
- Bd5+ Kf8
- Bc4 Nd4
- Bxa6 Nxe2+

More pieces are exchanged, and this increases Black’s advantage, as White’s weaknesses become more exposed. It is important to note that White’s pieces are still very inactive.
- Kf1 Nc3
- Re1 Rxe1+
- Kxe1 Bd4
- Rg2 Nd5
- Nf3 Nxf4
Finally winning material. The endgame is now easily won with the following moves:
- Rg3 Re8+
- Kf1 Bf6
- Bc4 Re2
0-1
White resigned, as he was going to lose his second-rank pawns.
Hopefully this game has shown that, if Black plays actively, then he is able to find a lot of counterplay on the Queenside and in the centre. White must act quickly and develop his own attack, otherwise his Queenside of the board could become very vulnerable.
The next example will show another plan for White: controlling the centre with the move c2-c3, followed by d3-d4. This central break can help White achieving a positional edge, and the game that follows will have more of a positional dynamic type of play, without so many direct attacks and pawnstorms.
This game was played between Vassily Smyslov and Arnold Sheldon Denker, in the year of 1946.
- e4 c5
- Nc3 Nc6
- g3 g6
- Bg2 Bg7
- d3 e6
- Be3 Nd4
- Nce2 d6

The Closed Sicilian Formation has been reached, and Black chooses to place his knight on the central d4-square.
- c3 Nc6
- d4 cxd4
- Nxd4 Nxd4
- Bxd4
White achieved the d3-d4 central break, exchanging pieces and releasing his position. The d6-pawn was left slightly vulnerable, once it does not have any other pawn to defend it.
- … e5
The d6-pawn is now backwards. This weakness can become decisive in an endgame, since White has a semi-open d-file to pressure this point.
- Be3 Ne7
- Ne2 0-0
- 0-0 Be6
- Qd2 Qc7
The development has been completed. White benefits from a small edge due to the fact that the d6-pawn is weak.
- Rfc1 f5
- c4 fxe4
- Nc3 Nf5
- Nxe4 Nxe3
- Qxe3 h6

As more pieces are being exchanged, the endgame gets closer and the d6-pawn is more likely to be a decisive weakness. However, for this to happen, White must activate his rooks.
- Rdf1 Rfd8
- Rac1 Rac8
White’s pieces are now all well-placed and ready to fight for an advantage.
- b3 b6
- Nc3 Qe7
- Bd5
Blocking the weak pawn: this is a concept to remember. Blocking structural weaknesses makes it impossible for your opponent to get rid of them by advancing or trying to exchange them. This will give you time to prepare the attack without having to fear a structural transposition or a pawn break.
- … Kh7
- Bxe6 Qxe6
- Rd3 Rc7
- Rcd1 Rf7
- Ne4 Bf8
- Rd5 Qg4
- R1d3 Be7
- Nxd6
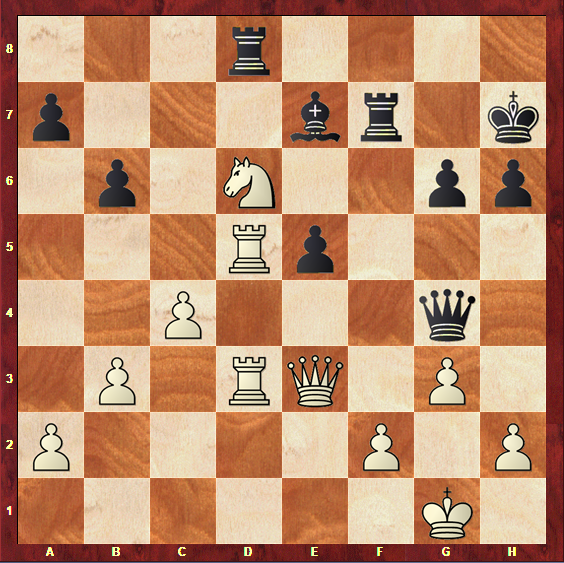
Finally converting the previous positional edge into a material advantage.
- … Bxd6
- Rxd6 Rdf8
- Qxe5 Rxf2
- Rd7+ R8f7
- Rxf7+ Rxf7
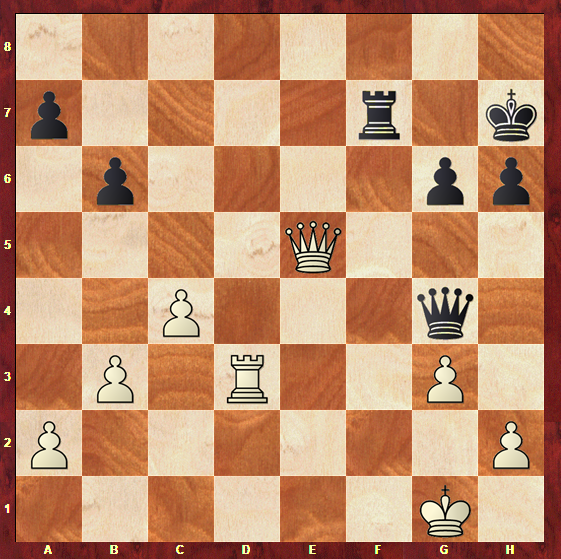
Exchanging rooks has neutralized Black’s counterplay on the Kingside.
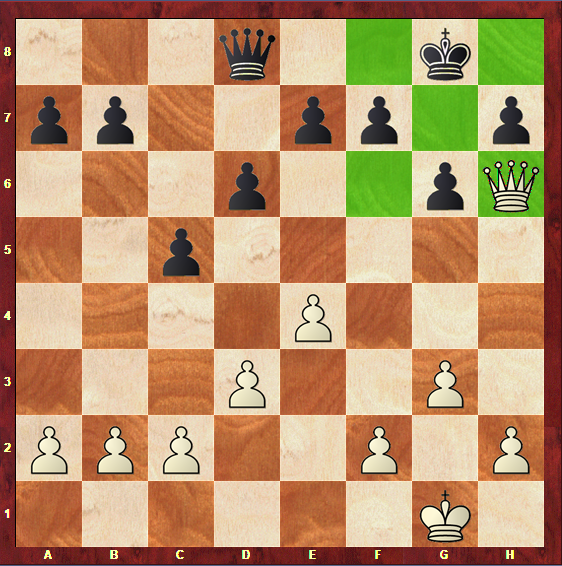
- Rd8 Rg7
- Qe8 g5
- Qh8+ Kg6
- Rd6+ Kf7
- Qxh6
White’s advantage is overwhelming, and the endgame was then easily won in the move 52.
This game carries a valuable lesson: in this structure, White has more options than to simply advance his Kingside pawns hoping his opponent will make a mistake and fall into a deadly threat. Besides this, if you remember that it is very important to have a stable centre before launching a wing attack, then it is easy to understand that, even if White plans to create a pawnstorm on the Kingside eventually, it would probably be a good idea to control the centre with the moves c2-c3 and d3-d4 before he does that.
Now that you have seen how the main plans present in this structure work, it’s time to find out what are some of the move orders that can lead to this pawn formation.
How do you reach this pawn structure?
It is true that this structure is not as common as some of the previous ones, so it is natural that not many well-known openings will lead to it. However, as happens with every pawn structure, there are still plenty of move orders that could lead to it.
Let’s find out what are the most common ways to get this position on your chess board, so that you will be able to put all you have learnt in practice!
As the name suggests, the main opening that leads to this pawn structure is the Closed Sicilian.
- e4 c5
- Nc3 Nc6
- g3 g6
- Bg2 Bg7
- d3 d6
As you know, every pawn structures in chess can occur with reversed colors.This one is not an exception: the English opening can sometimes result in a Closed Sicilian Pawn Formation.
- c4 e5
- Nc3 Nc6
- g3 g6
- Bg2 Bg7
- d3 d6
Although these are by far the most common ways of reaching this pawn structure, it is important to keep in mind that of other move orders can lead to the exact same structure, with the exact same plans.
Now that you are able to get this structure on your chess board and know how to play with it, it’s time to summarize the most important things about it.
Conclusions
Let’s draw some conclusions about the most important features of this pawn structure: these are the things that you should keep in mind when playing this sort of positions.
- The closed Sicilian Formation is one of the 17 fundamental pawn structures in chess
- This structure is associated with complicated attacking positions, with chances for both sides
- This pawn formation has a very interesting feature that cannot be ignored: all the initial pawns are still on the chess board. In fact, exchanging pawns and even pieces is something that usually takes time, and is not very likely to happen in the beginning of the game
- The centre is occupied by White’s e4-pawn and Black’s c5-pawn. This is the only imbalance of the position.
- The pawn chains in this position look as if they are “pointing” at opposite sides: White’s pawn chain is pointing directly at the Kingside, whereas Black’s chain is directed towards the Queenside. This shows us where which band is more likely to develop an attack.
- Both g-pawns are advanced in one square, leaving space for the Bishops to occupy the big diagonal of the board: fianchetto
- Black’s g7-Bishop is a very active piece, with much influence on the Queenside attack
- White’s g2-Bishop is initially not very active, but it is a crucial piece to guarantee that White’s King is safe during a pawnstorm on the Kingside
- White’s Kingside attack many times contains the move f4-f5. This is a very important pawn break, since it usually opens the crucial c1-h6 diagonal
- A very common theme for White is to try to exchange the dark-squares Bishops, in order to create weaknesses around his opponent’s King. This is usually done with the move Bh6, which is supported by the Queen
- The g-pawn and the h-pawn are also often advanced, in order to pressure Black’s pawn formation on the Kingside
- Black’s Queenside attack is usually done with a pawnstorm. When White’s c-pawn has advanced to the c3-square, the break …b5-b4 is very common, and puts a lot of pressure on White’s Queenside
- Another possible plan for Black is to place a knight on d4. This could be done to persuade White to play the move c2-c3, so then the previous plan can be completed.
- As in every Sicilian, the central break …d6-d5 is also often present. This could help Black releasing his game, and it could even be benefitial to his Queenside pawnstorm
- White can also try to control the centre in this structure. Trying to play d3-d4, usually after the move c2-c3 has been played, is a very important plan in the way that it can help to stabilize the centre so that then a Kingside attack would be possible. Besides this, White could be caught up in a position in which it is better to develop a slow and position type of play, and carefully preparing a central break can be a good way to do so.
- Many different move orders can lead to this Pawn formation. However, the most common are the Closed Sicilian and the English Opening (with reversed colors)
With all of this is mind, you are now ready to add this pawn structure to your games and get exciting results!
Make sure you read all our Pawn structure articles – as you know, knowing the fundamental structures is a crucial step in becoming a strategy chess master.