
In this article, we are going to cover one of the most essential and important structures in chess: the Queen’s Gambit – Hanging Pawns structure.
As you already know, there are seventeen essential structures in chess, and studying the placement of pawns in each of them is what will lead you towards knowing how to play whichever position you might come across over the board.
This structure is part of the Queen’s Gambit Family, and closely related to the isolani structure. Since this is a concept that will be frequently mentioned throughout the article, you are advised to check out our Queen’s Gambit Family – The Isolani article first, so that you know what it’s all about.
Even though these two are called Queen’s Gambit structures, the reason why they are so important in chess is that they occur in positions coming from many different openings, and not only the Queen’s Gambit.
Unlike many of the structures we have covered in previous articles, these are not tied to a limited number of openings.
In addition to this, they can occur during many stages of the game: you can come across hanging pawns or an isolani in the middlegame or endgame as easily as right out of the opening.
They can also happen in many different ways, and, for instance, with colours reversed. One can say that these two structures are perhaps even more essential in chess strategy than all of the others, simply because they are not as rigid as them.
If this description has worked up an appetite already, let’s get started so that you can master this pawn structure as soon as possible.
What does the Queen’s Gambit – Hanging Pawns structure look like?
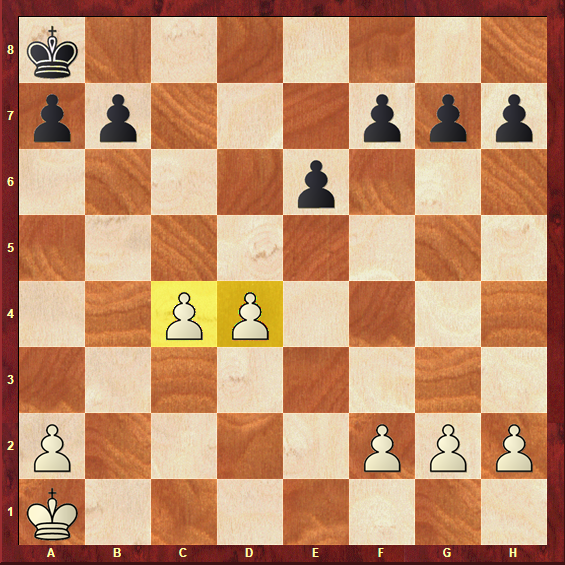
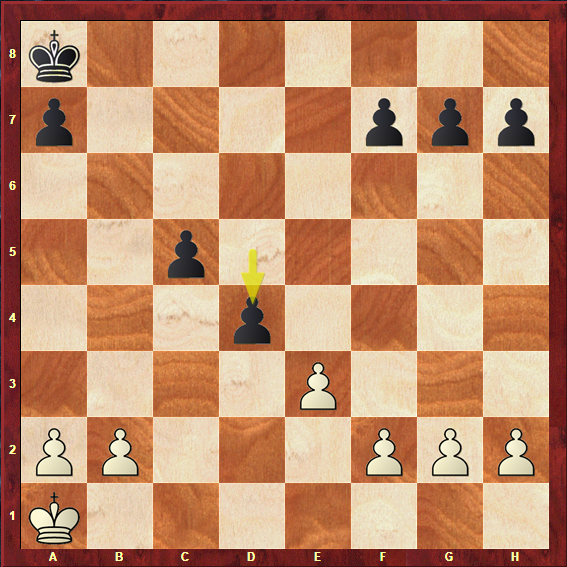
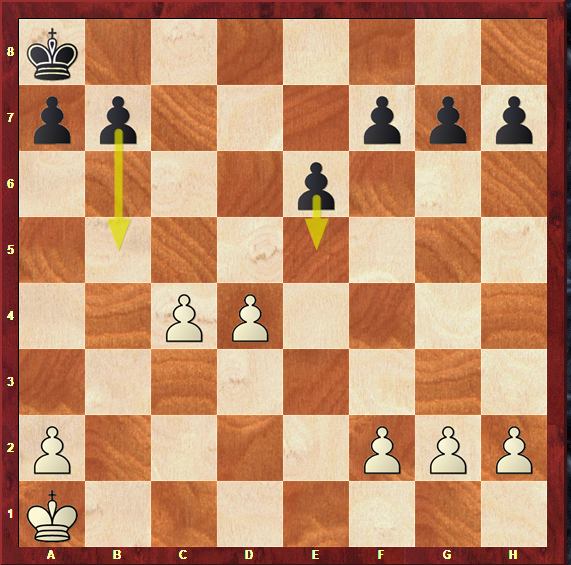
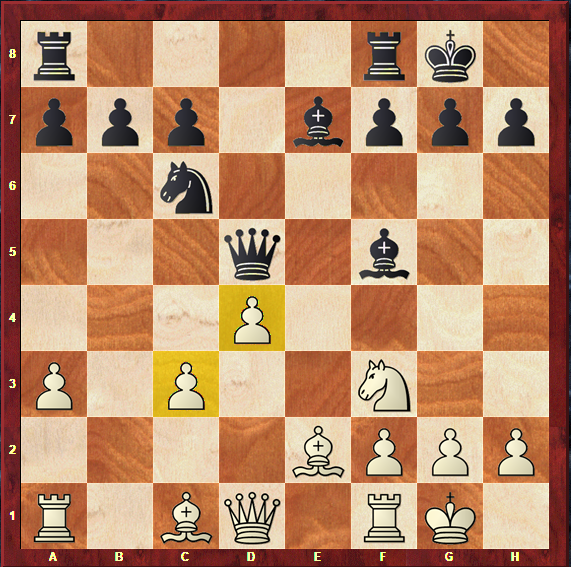
Marked in yellow in diagram 1a are those who give this pawn structure a name: the hanging pawns.
The concept of hanging pawns in chess was coined by the first World Chess Champion, Wilhelm Steinitz, and it refers to a pair of pawns on adjacent files that are separated from all other pawns.
As you can see, neither the pawn on c4 nor the one on d4 have any neighbours besides each other, as the b-pawn and e-pawn have already been exchanged.
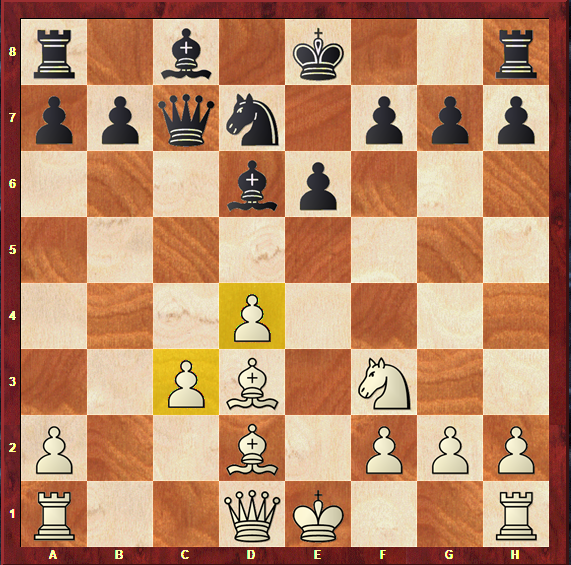
However, the structure you see in diagram 1a is not the only hanging pawns structure there is.
It can also occur on the board, for instance, with reversed colors, as you can see in diagram 1b.
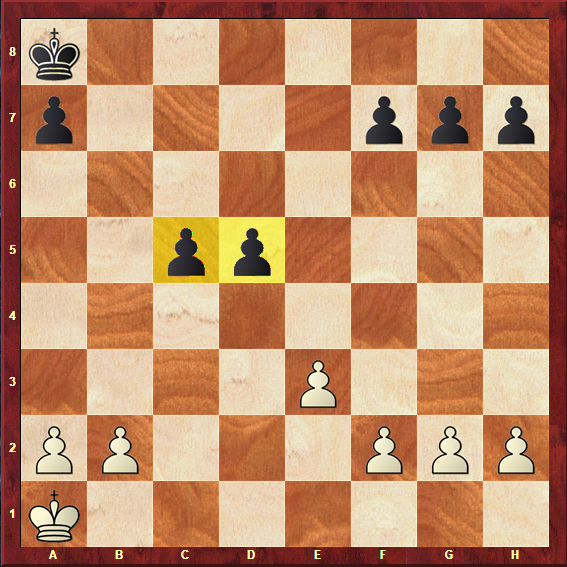
In order to make this article easier to read and analyze, we are going to refer to White as the side who has the hanging pawns and to Black as the side who is fighting against the hanging pawns (as in diagram 1a).
However, we will also cover some games in which the position occurs with reversed colors (as in diagram 1b) so that you can get a better outlook as a whole.
We mentioned that this structure has a close relationship to the isolani pawn structure (diagram 1c) we have covered before.

Well, first of all, they share a few common characteristics. Both of these structures are weak formations by nature, because they both feature pawns that have no neighbours, which means, undefended by other pawns. This roughly means that they must always be defended by pieces when attacked.
Being a structural weakness, this pawn display demands active piece play, and the placement of pieces is of the utmost importance in playing either of these structures.
In both structures, you will be able to find beautiful attacking games by the side who has the isolani or hanging pawns – that happens because they must make the most out of their pieces in order to claim their chances of winning the game.
Secondly, these structures are related because they can often transpose into one another.
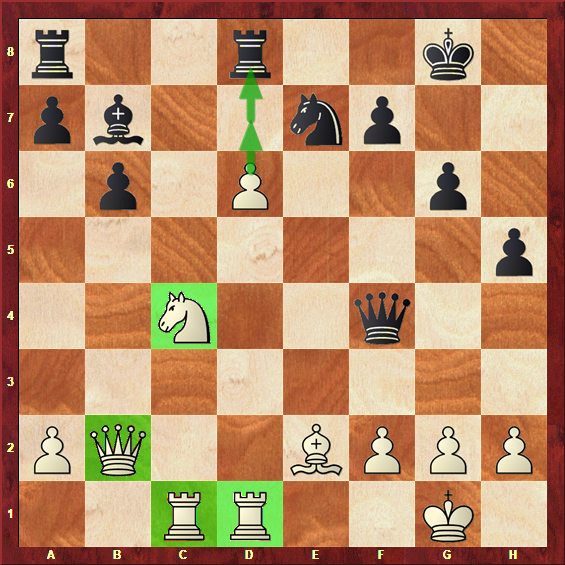
In diagram 1d you can see how a transposition from the isolani structure into the hanging pawns structure may occur; in fact, this is, by far, the most common way to reach the hanging pawns formation.
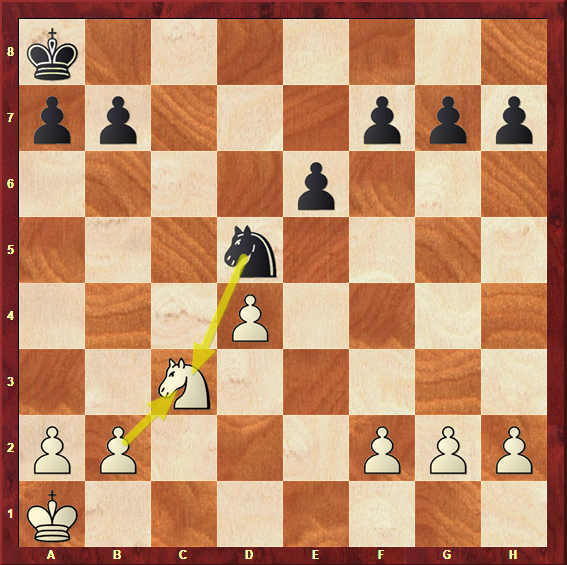
By exchanging a Black Knight on d5 for a White Knight on c3, a hanging pawns position is reached. Most likely, White will then push c3-c4 and we will have the exact structure from diagram 1a on the board.
The opposite can also be true, and it’s a sneak peek into the rest of the article: the side who is fighting against the hanging pawns will often try to force the opponent into an unfavourable isolani position.
One of the ways for this to happen is pictured in the next diagram.
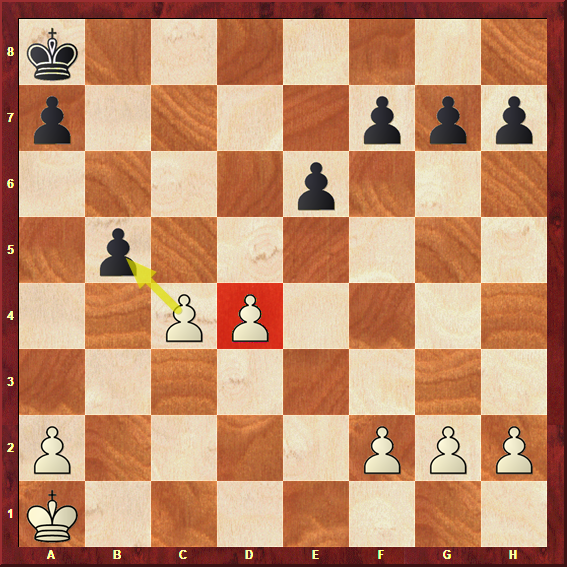
If White takes the pawn on b5, he will be left with a typical isolated Queen’s pawn, or, as we know it, an Isolani.
Therefore, knowing how to play these two structures, together, and interchanging plans and ideas between them is crucial. We urge you again to check out the previous article on the Isolani if you haven’t yet – it will surely come across as useful!
Here are a few notes we can make about what this structure looks like:
- Hanging pawns are pawns which are located in adjacent files, and which are separated from all other pawns;
- A hanging pawns position can occur with colors reversed;
- The isolani structure is closely related to this one, and transpositions between them frequently occur;
Let’s get on with it and deepen these ideas throughout the next few sections.
What are the characteristics of this pawn structure?
This is the section in which you will find out the basic elements and features of this structure – this is crucial in your play, and if you read it carefully, you will be one step closer to mastering it.
Now that you know what the structure looks like, you must be curious to know what the hanging pawns implicate for the side who plays with them, and for the side who is fighting against them.
First of all, you must keep in mind that, in structural terms, the hanging pawns are indeed a weakness.
When they are under attack, they will have no pawns to protect them safely, keeping a sound and solid structure; instead, the player who has these pawns will have to allocate pieces to defend them.
If these defending pieces are attacked or exchanged at a given moment of the game, this may result in losing one of the pawns, or forcing a different weakness elsewhere.
Take a look at the position in diagram 1f to see how these pawns may, at times, be difficult to defend.
In this typical position coming from the Queen’s Gambit opening, we can see that White has open lines towards Black’s hanging pawns, and is ready to coordinate his pieces to attack them.
In the meantime, Black’s pieces have prepared for it – if you look closely, each of the members of Black’s army has a defensive function towards these pawns.
The side who has the hanging pawns is often at a crossroads when it comes to deciding the approach he should choose for the game.
While, on one hand, they will want to defend these pawns, because losing them is highly prejudicial, on the other hand, they must try to have active pieces at all costs, and to build an attack.
If the side who has the hanging pawns has a lead in development and well-placed pieces, the position can be highly pleasant.
The open files on the sides of each hanging pawn are the perfect home for the Rooks, and the central squares that they control are an excellent support for a minor piece, most likely a Knight.
Take a look at diagram 1g for a visual representation of how these features can work in favour of the owner of the hanging pawns.
Taking these advantages into account, it is obvious that the player who has the hanging pawns must strive for a complicated middlegame, in which he may be able to utilize the open files, supported squares, lead in development and superiorly placed pieces in the best way possible.
Across the board, the player who is fighting against these pawns aims exactly for the opposite: an endgame. Weak pawns are far more obvious in an endgame – there are less pieces that can defend them, and less pieces that can generate a dangerous attack.
If you have been reading our articles carefully, you already know that each pawn structure bears its own strategic battle, and the Queen’s Gambit – Hanging Pawns structure is no exception.
This is precisely the battle that will take place: the owner of the hanging pawns trying to extend the middlegame as much as possible, giving potential to his pieces; and the one who fights the hanging pawns trying to exchange pieces in order to reach a favourable endgame.
This shapes the character of the game to a great extent.
Again, if these ideas sound familiar to you, it’s because you know a few things about the isolani, as the same middlegame vs. endgame battle takes place in that structure.
All of the things you have just learned will prove themselves useful when you face this structure on the board.
This is also the right moment to reflect upon the kind of chess player you are and, taking that into account, which side of this structure you should be finding yourself on.
If you are a dynamic player whose strength is piece maneuvering and play, you will find that playing with hanging pawns can be a great deal of fun!
If, on the other hand, you are a strategic player who enjoys slow fights, and prefers knowing that your opponent has a weakness that can prove itself hard to defend, especially in the endgame – you will enjoy playing against the hanging pawns, without a doubt.
Taking all of this information into account, you already have a fair amount of knowledge in which concerns the Queen’s Gambit – Hanging Pawns structure – it’s time to take one more step further!
How do you play in this pawn structure?
This is the section that is going to provide you with all the knowledge you need in order to play the Queen’s Gambit – Hanging Pawns structure with mastery.
As you know by now, there are seventeen essential pawn structures in chess; it might seem like this is just one of them, but the frequency with which it happens on the board, and the broadness of the strategic concepts associated with it, turn it into one of the most important structures in chess.
Fully mastering it is a great step towards chess improvement – if you’re ready to take it, stick around and read this section carefully.
We will now cover plans for both sides in the Queen’s Gambit – Hanging Pawns structure.
We started by covering its most important features and characteristics in the previous section, but only now will we approach what each side should really do in order to claim an advantage.
Let’s get started by analyzing the plans of the player who has the hanging pawns on his side.
Plans of the player who has the hanging pawns
Since this structure can happen equally as often with both colours, instead of splitting plans between White and Black, let’s split them between the player who owns these pawns, and the player who is fighting against them.
The first plan we will cover is one of the most frequent and powerful ones, if you ever find yourself playing with these pawns.
It is to break in the centre with one out of two objectives:
- To create a powerful passed pawn on the d-file;
- To generate a dangerous attack, opening up lines for the pieces;
Take a look at the following diagrams to see what this central break looks like, depending on the side who owns the hanging pawns.

As always, we are going to use games played by top-level chess experts to illustrate the plans we are discussing.
The first game we are going to cover was played in the European Team Championship of 2011, and it is White who has the hanging pawns. It has been played by none other than Levon Aronian, one of the strongest chess players in the world.
This game illustrates how the central break may lead to a powerful passed pawn on the d-file.

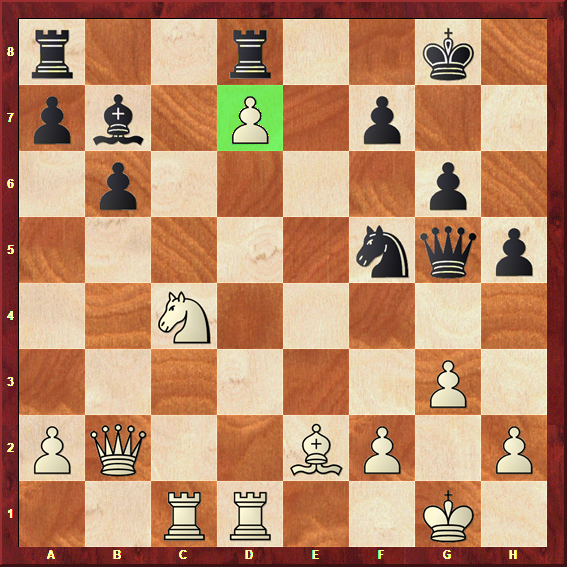
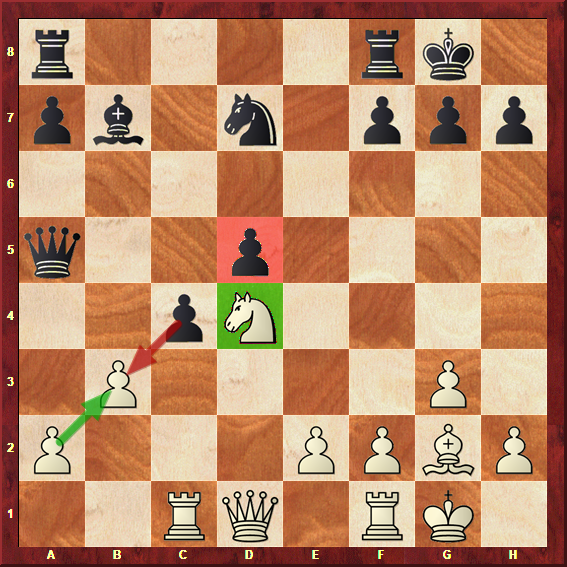
This is our starting position, and the one in which White has just decided to push one of his hanging pawns in the centre.
When doing this push, a few things must be considered:
- That Black cannot block the hanging pawns effectively, such as by placing a Knight on c5, controlling the dark squares;
- That the pieces are well-placed to create dangerous tactical and positional threats, putting pressure on the opponent in order to make him allow the creation of the passed pawn;
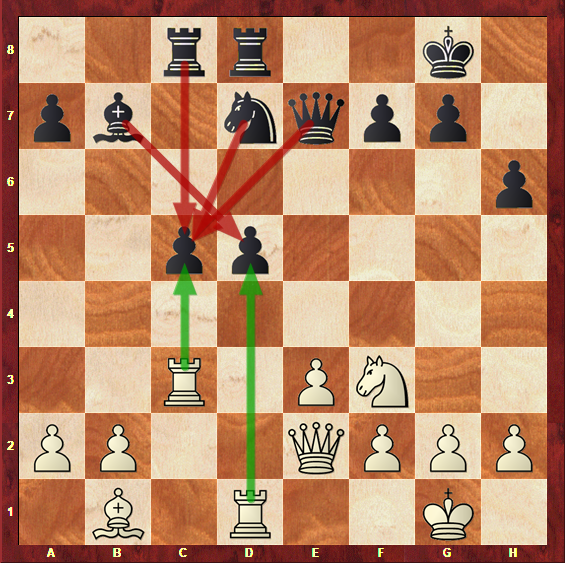
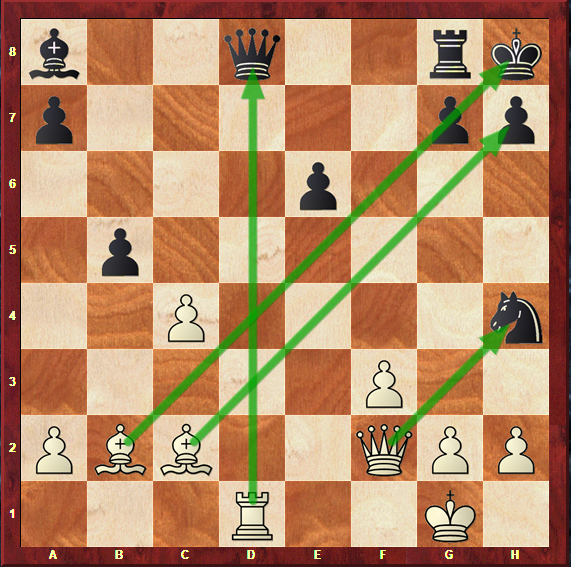
This is precisely what is happening in this game: White’s pieces are very well placed, as you can see from the Queen and Knight pointing towards the King. This d4-d5 move creates dangerous threats for Black, which lead him to accept White’s creation of a passed pawn.
- d5 exd5
- cxd5 Qd6
- Nc4 Qf4
- d6
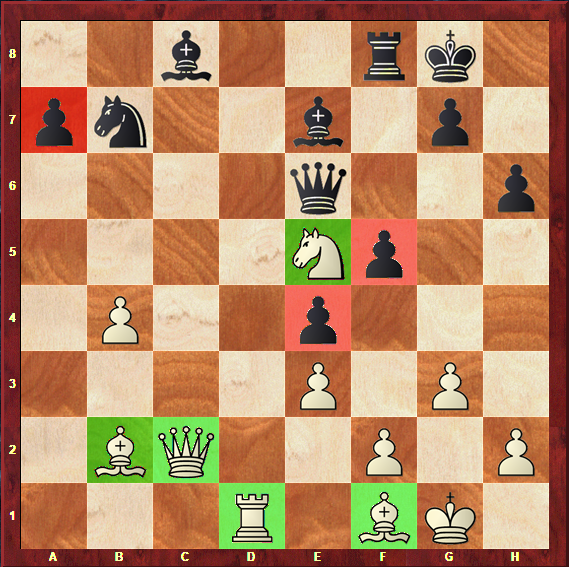
In this moment, we see how strong this passed pawn is; paired with White’s well-placed pieces, it can lead to a desperate position for Black, which happened only a few moves later.
- d6 Nf5
- d7 Qg5
- g3
This game is the perfect example to illustrate the strength of this plan.The passed pawn is the reason behind White’s triumph.
It is simply too much for Black to handle – and the Kingside counterplay he is trying to generate will lead him nowhere, as White can easily defend with the Bishop and the solid structure in front of the King.
In the next game, we will see how the central break can be very powerful with reversed colors.
We are going to analyze a 1981 game, played in the World Championship between two of the most remarkable players of chess history: Viktor Korchnoi and Anatoly Karpov.
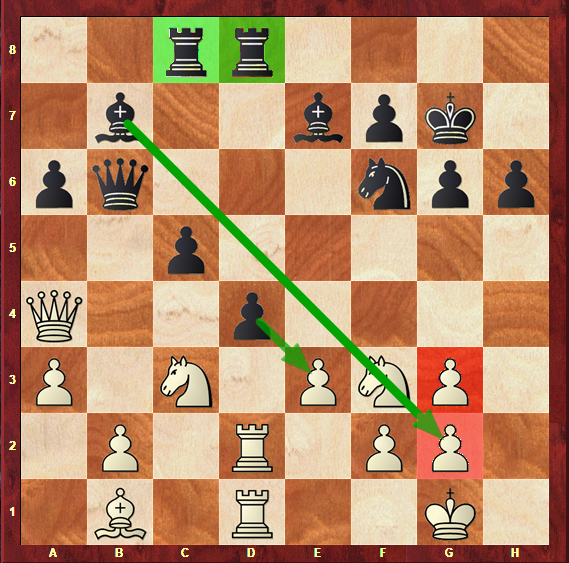
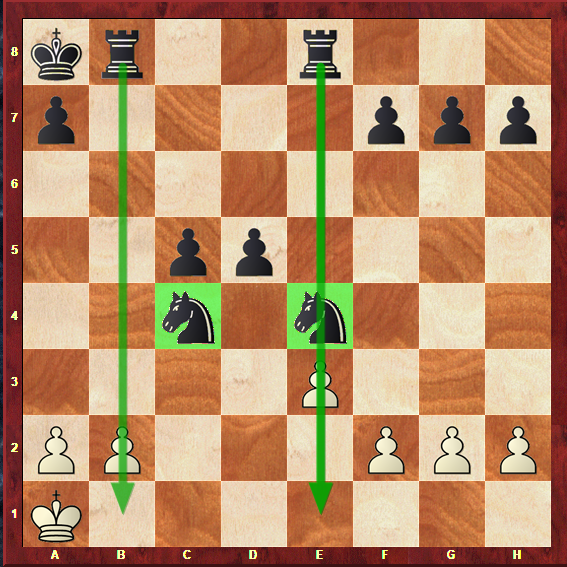
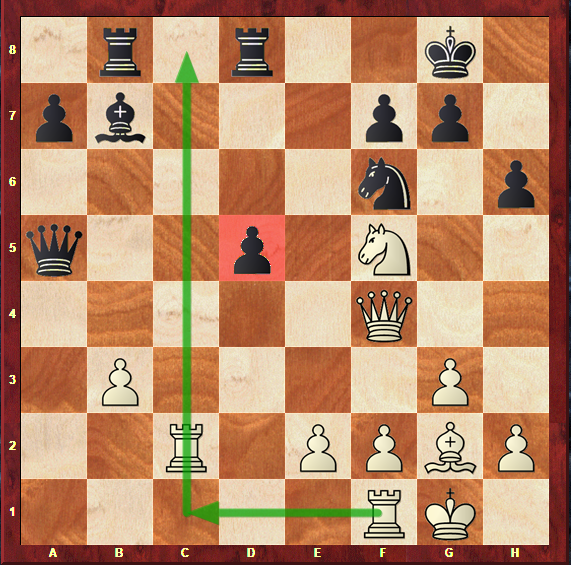
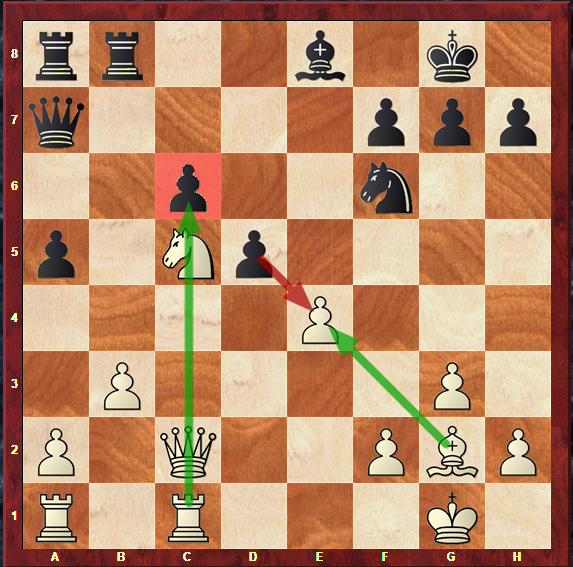
Our starting position is, again, the one in which the central break has just happened on the board.
Again, the strength behind this move lies in the fact that Black’s pieces are tremendously well-placed: the Rooks sit beautifully behind the pawns, waiting to unleash their potential in the files that will soon open; and the Bishop on b7 is aggressively staring at the King, also waiting to create dangerous threats.
Another factor that makes this central push so strong is that, in this position, White’s pawn structure is not very healthy.
The doubled pawns in front of the King might not be such a big problem in many chess positions. However, in this particular case, the f2-e3 pawn chain is challenged by the central break, which will affect the whole White Kingside complex.
A few moves later, we see Black easily leading the game towards a win, in fine strategic style, as usual by Karpov.
- Ne2 dxe3
- fxe3 c4
- Ned4 Qc7
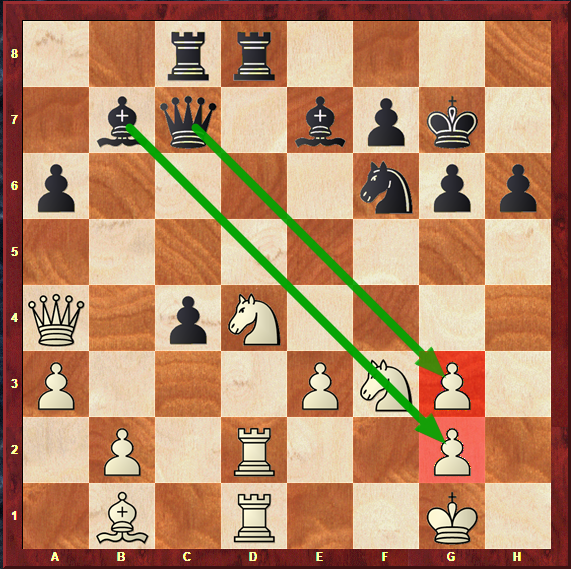
Together, Black’s Queen and Bishop stare at the weaknesses in front of White’s King, which stands very exposed.
Looking at the pawn structure at this point is what makes you realize that White is simply lost: the isolated pawn on e3 and the isolated doubled pawns on g2 and g3 are not healthy at all, and the weaknesses are simply too much to handle.
To conclude our coverage on the central break plan, let’s analyze one more game, played between the Brazilian Grandmaster Henrique Mecking and the Argentine Grandmaster Sandro Mareco, in 2011.
This time, it is White who has the hanging pawns and makes use of this strong and dangerous plan.
It takes only a good look at the position to understand how strong this central break is in the position in diagram 1o.
White has a well-coordinated Bishop pair, looking towards Black’s King, and this central break unleashes its potential in all strength. In addition to this, the Queen is also ready to join the attack by jumping to the g-file.
This is the perfect example of how the hanging pawns may be a dangerous asset. If the pieces are well-placed and the side who owns the pawns has the initiative, they can lead to a lot of trouble – and you will never remember that they are weak, if you manage to checkmate your opponent’s King!
Let’s see a few moves further into the game.
- d5 b5
- Bc2 Rg8
- dxe6 fxe6
- Rad1 Rxd1
- Rxd1
All of a sudden, the whole White army works together, towards dangerous threats against Black’s pieces and King.
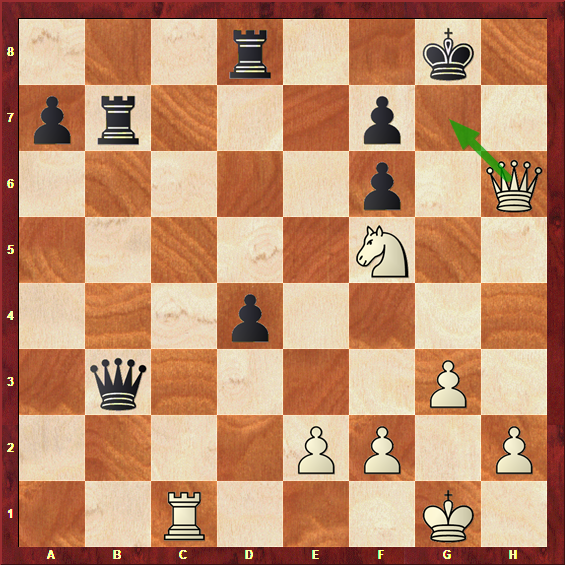
The coordination is simply admirable in this position, and the game came to an end with a beautiful move in just two moves’ time.
- Rxd1 Qg5
- Qg3 Qe7
- Rd7!
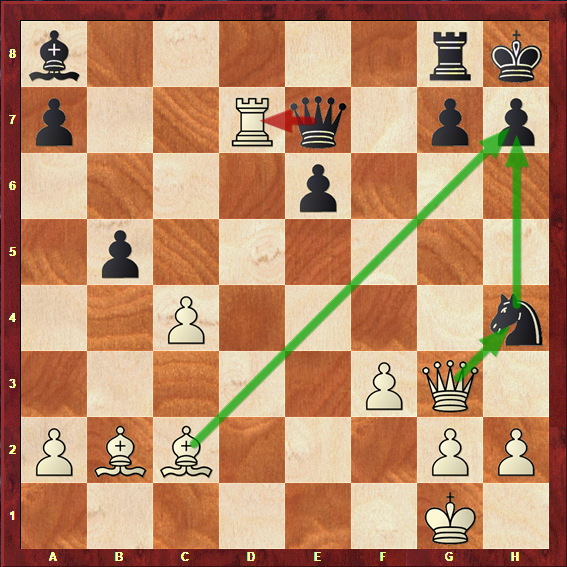
If the Rook gets taken, White will simply take the Knight on h4 and threaten unstoppable checkmate on h7.
The Queen has no square to move while maintaining the protection of the Knight, and the position is hopelessly lost, which is why Sandro Mareco threw in the towel and decided to resign.
Let’s move on to analyzing another plan, which is often played in coordination with the central break we have just seen. It is to generate a dangerous Kingside attack, featuring sacrifices and direct threats.
The first game we are going to look at was played between Nimzowitsch and Tarrasch, two historical chess players, back in the year of 1914.
It might sound like an old game, which it is indeed – but many of the ideas played in it are valuable nowadays, and there is always a lot to learn from the classics.
This game could have been included in the coverage of the last plan, as it also features a breakthrough in the d-file: however, the real star of the show was the way Tarrasch launched all of his pieces forward, towards Nimzowitsch’s King.
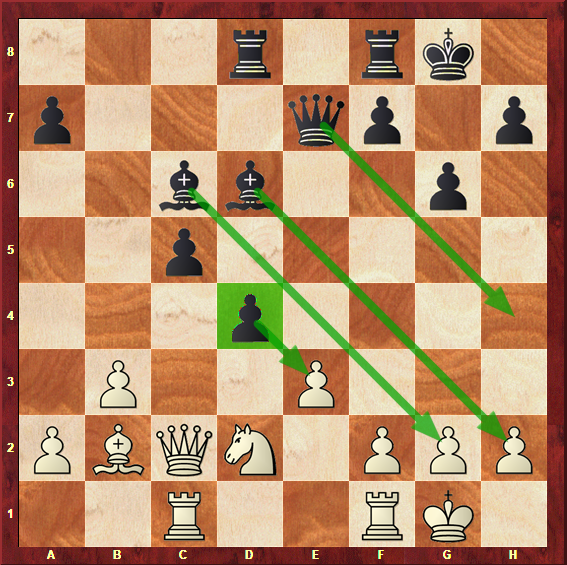
By playing this central push, Black activates all of his pieces, including the powerful Bishop pair; it is curious to see how all of the arrows point towards White’s King, which will be mercilessly attacked.
- exd4 Bxh2+!
- Kxh2 Qh4+
- Kg1 Bxg2!
A double Bishop sacrifice, being something that every decent chess player is familiar with, is not something you see every day.
It works beautifully in this position due to the great placement of the Queen, and the possibility of bringing the Rook to the Kingside via d5, very shortly.
If this Bishop is taken, it is indeed what will happen: Black will check on g4, forcing the King to go to the h-file, and then bring the Rook to join the party, by playing Rd8-d5-h5.
Nimzowitsch didn’t take the Bishop, but the end of the game came suddenly and powerfully, nonetheless.
- f3 Rfe8
- Ne4 Qh1+
- Kg2 Bxf1

The game came to an end in Black’s favour in a few moves’ time.
This brilliant win by Tarrasch perfectly illustrates the danger that can be associated with owning the hanging pawns – provided that the pieces are well-placed and the player who owns them is aware of this potential, and of ways to play with the initiative.
If this section has made you slightly unconfident with the fact that you might face the hanging pawns instead of owning them, move on to the next one, where we will explain how to face these plans and create strong ideas yourself.
Plans of the player who is fighting against the hanging pawns
From reading the previous section, you have probably concluded that the player who is fighting against the hanging pawns has a tough job: to neutralize the opponent’s potential attack and dynamism.
Since the hanging pawns are weaknesses in themselves, it is clear that the player who faces this structure on the board must have a slow-paced, strategic approach to the game.
There is one main plan to fight against the hanging pawns: to break them apart and block them effectively.
Often, as mentioned before, the player who fights against the hanging pawns will want to turn them into isolated pawns, but under the most unfavourable conditions possible.
In addition to this, the idea of separating and blocking the pawns should always be connected to the principle of exchanging pieces, in order to try to achieve an endgame. In a later stage of the game, the weakness of the hanging pawns will manifest itself far more evidently.
The first game we are going to look at dates from 2012, and has been played between Sandro Mareco and Christian Toth. It is White who is fighting against the hanging pawns.
The c5-c4 was a dubious approach by Black; it gains space, but allows White to place a great Knight on d4, where it effectively blocks the hanging pawns.
However, this could not be enough to claim an advantage with White; we see the critical approach in the b2-b3 advance. It aims to break apart the hanging pawns, in order to try to create an isolated pawn out of the two.
The game went on:
- b3 Rab8
- Nf5 Nf6
- Rc2 Rfd8
- Qc1 h6
- Qf4 cxb3
- axb3
The d5 pawn turns into an obvious weakness, especially if you consider that more and more pieces and pawns are getting off the board, and the endgame stage is peeking at Black.
But there is another important aspect to the position: the recently open c-file, in which White has a perfectly placed Rook already.
White’s plans are clear: to exploit the potential of this open file, and make the d5 pawn hard to defend, until eventually it becomes a serious problem for Black to deal with.
In the game, Black succumbed to the pressure early, which lead White to a triumph in only five moves’ time.
- axb3 Qb6
- Rfc1 d4
- Bxb7 Rxb7
- Rc6 Qxb3
- Rxf6! gxf6
- Qxh6 1-0
22…d4 was the decisive mistake. It allowed White to exchange the only defender of the c6 square, and invade it with a Rook in full swing.
Black clearly succumbed to the pressure of being in an inferior position and having an isolated pawn, and decided to advance it far too early in the game, without carefully measuring the consequences of this move.
This game is the perfect illustration of how hanging pawns can be broken apart and turned into isolated pawns under unfavourable circumstances – this happens because the side who is fighting the hanging pawns is able to prepare his pieces and place them in the desired squares, while waiting for the adequate moment to unleash the breakthrough.
The next game, played in 2009 between Axel Bachmann and Max Cornejo, illustrates a similar idea; except that this time, the break takes place on the b4 square, instead of b3.

Again, this breakthrough fits like a glove when fighting against the hanging pawns. White will manage to create a weak isolani on d5, as the c5 pawn has no option but either to be taken, or take on b4 himself.
In addition to this, as usual in front of an isolated pawn, White gets a strong square to place a blocking piece, especially a Knight.
The game went on:
- b4 Nb7
- Nhf3 Ne4
- Nxe4 dxe4
- Ne5
So as to avoid the dreaded isolani, Black committed for an even worse pawn structure, with three weaknesses: a7, c5 and e4.
White’s central Knight, supported by the Bishop, and the fact that all of the other pieces are well-placed grants him a long lasting advantage, as the course of the game made evident.
- Ne5 cxb4
- axb4 Rxd1
- Rxd1 f5
- Bf1
Black’s position is quite simply hopeless, as White’s army is perfectly coordinated, as opposed to Black’s poorly coordinated pieces, and weak pawn structure.
However, the d-pawn is not the only one that can be under fire: the c-pawn can also become isolated, provided that the player who fights against the hanging pawns breaks through on the other side, in contact with the d-pawn instead of the c-pawn.
The move that does this is, naturally, the e3-e4 breakthrough (from White’s point of view).
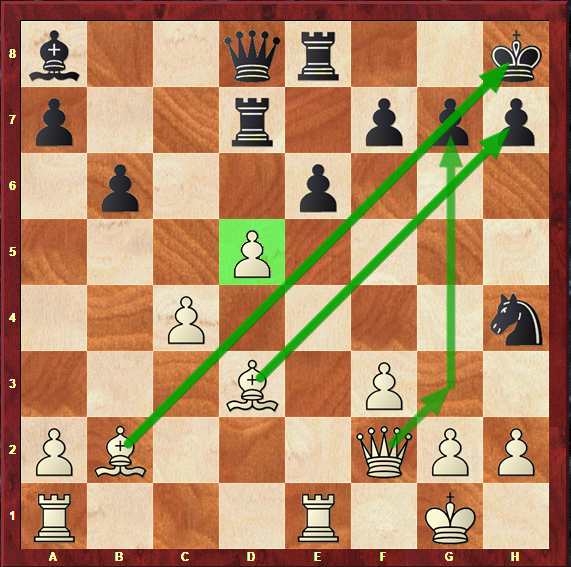
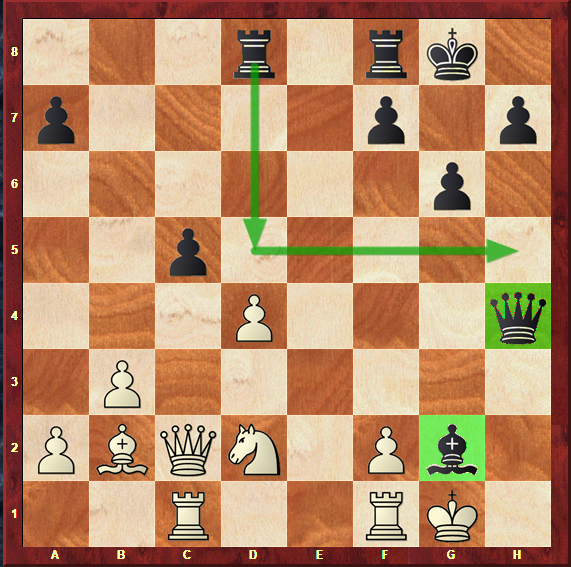
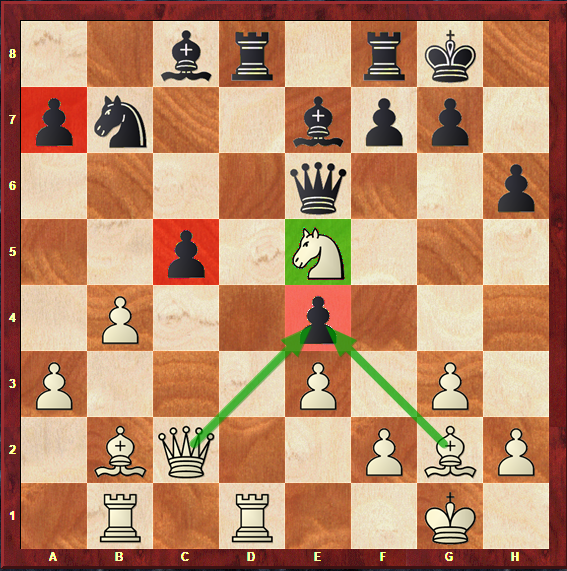
Before we summarize what the plans are for both sides, let’s just take a brief look at this idea, by studying a 2012 game played between Bartlomiej Macieja and Holden Hernandez.
The e3-e4 breakthrough also makes perfect sense, with the same idea to permanently break up and damage the hanging pawns, creating permanent and serious weaknesses in Black’s field.
Again, note how White’s pieces work perfectly together: the Bishop on g2, Queen on c2 and Rook on c1 all have eyes on the weakened c6 pawn, while the Knight on c5 makes sure it is not going anywhere by effectively blocking it.
While all of these games coincidentally happened to be played by White facing the hanging pawns, please remember that these situations are as likely to happen with colors reversed.
Diagram 2b has the intention of mirroring these plans, in order to make it easier for you to visualize how these breakthroughs look like if Black happens to be the one facing the hanging pawns.
Right! After this overdose of information, it’s crucial to take a moment to summarize the things we have just learned, in order to avoid getting caught up in the middle of the hanging pawns ideas and plans.
Plans of the player who has the hanging pawns
- Avoid exchanging pieces, prolonging the middlegame stage as much as possible;
- Create a Kingside attack, by pointing the Bishops at the King, keeping in mind potential sacrifices and ideas of bringing the Rook to join the attack;
- Break in the centre with d4-d5 or d5-d4 (see diagrams 1h vs 1i), either to open lines for the attack, unleashing the potential of the pieces, or to create a powerful passed pawn;
Plans of the player who is fighting against the hanging pawns
- Exchanging pieces, looking to enter the endgame stage as quickly as possible;
- Put pressure on the central pawns, and block them;
- Break the hanging pawns apart with either b2-b3, b2-b4 or e3-e4 (from White’s point of view) / b7-b6, b7-b5 or e6-e5 (from Black’s point of view), with the idea of isolating one of the opponent’s pawns;
Before we conclude this article, there is still one major question that you can’t forget to answer. Without it, you will know your way in this pawn structure – but you won’t know how it will ever appear in front of you.
How do you reach this pawn structure?
This is the section that will tell you the opening knowledge you need to bear, in order to find this structure on the board – and when you do, you will be one step closer to mastering all kinds of chess positions, which should be your goal when reading these articles.
Coming from the name Queen’s Gambit – Hanging pawns structure, you may be able to guess that one of the openings in which this structure often comes up is, of course, the Queen’s Gambit.
One of the variations that sees this structure many times is the Tartakower Variation.
- d4 d5
- c4 e6
- Nc3 Nf6
- Bg5 Be7
- Nf3 h6
- Bh4 0-0
- e3 b6
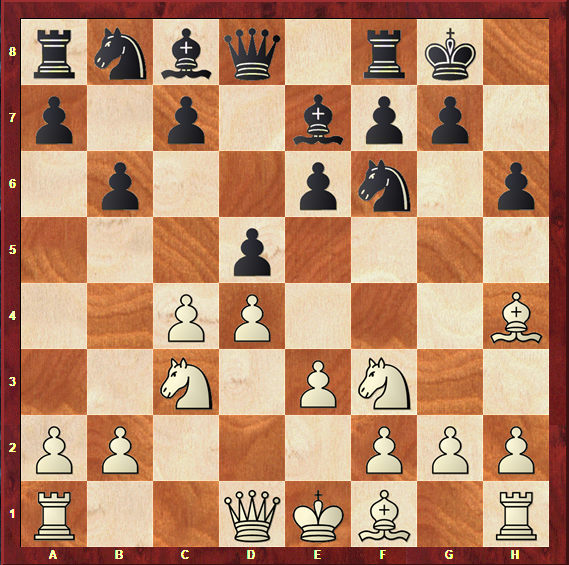
A hanging pawns position can be reached once Black pushes c7-c5 and White captures both on d5 and c5. This move is typical for Black, but the moment in which the hanging pawns arise can greatly vary – either a few moves after this position, or only later on in the middlegame.
Another opening in which this structure can often arrive is the Tarrasch Defense, also played against the move 1.d4.
- d4 d5
- c4 e6
- Nc3 c5

Similarly to the Tartakower variation we have covered above, the hanging pawns might actually only appear many moves later – but any of these two lines offers a great chance to find this structure on the board.
At this point, you might be asking yourself – what about colors reversed?
As mentioned before, it is equally as likely to find hanging pawns in a White formation as it is in Black’s.
An opening that, rather surprisingly, could lead to this structure, is the well-known Petroff defense. We see our favourite structure arriving after the following moves:
- e4 e5
- Nf3 Nf6
- Nxe5 d6
- Nf3 Nxe4
- d4 d5
- Bd3 Be7
- 0-0 Nc6
- c4 Nb4
- Be2 0-0
- Nc3 Bf5
- a3 Nxc3
- bxc3 Nc6
- cxd5 Qxd5
Another opening which frequently features White owning the hanging pawns is the Alapin Variation of the Sicilian Defense.
- e4 c5
- c3 Nf6
- e5 Nd5
- d4 cxd4
- cxd4 e6
- Nf3 d6
- Nc3 Nxc3
- bxc3 Qc7
- Bd2 Nxd7
- exd6 Bxd6
- Bd3
As you see, there are many ways to reach the Hanging Pawns structure, with both the White and Black pieces, and in both open and closed games.
This is a great example of the broad character of this structure, and its universality – which is why you should feel proud to have finished this article!
Let’s just briefly conclude before you can move on to a different pawn structure article.
Conclusions
We have approached the end on yet another pawn structure article.
On this one, we have extensively covered one of the most important structures in chess.
Certainly, studying all of the seventeen pawn structures there are is important and will take you places – but one might even be tempted to say that this structure is more important than many others, due to how frequently it can be played, and how rich its ideas can be.
Let’s draw a few conclusions about the Queen’s Gambit – Hanging Pawns structure:
- The Hanging Pawns structure offers chances for rich and complex play for both sides;
- It is a frequent structure in chess, because it can happen in many stages of the game, from the opening on to the middlegame and even the endgame;
- It can happen as frequently with colors reversed;
- The hanging pawns are weaknesses in itself, which means that the player who has them must strive to complicate the game as much as possible, so that the weakness is not as noticeable;
- On the other hand, the player who is fighting against the hanging pawns will want to achieve an endgame, in which the weakness of the pawns will be far more evident;
- The plan of the player who has the hanging pawns is, roughly, to breakthrough in the centre in order to generate an attack, or create a strong passed pawn;
- The plan of the player who is fighting against the hanging pawns is, roughly, to break the pawns apart, in order to create a weak isolated pawn that can be easily blocked;
And that’s it – hopefully, by now, you feel confident enough to apply this structure in your games and be successful.
See you soon, for yet another pawn structure article!