In this article, we will be discussing what the different Pawn Structures in the Queen’s Gambit Opening Family.
Specifically, we will discuss what the different pawn structures look like, the different ways to reach these positions in the opening, and what White and Black’s main plans are.
A lot of chess strategy comes down to how the pawns are placed on the board. Pawn structures on the board, mainly determine what you should be doing as your next move. For more information, read this article, Why you need to learn Chess Pawn Structures.
What does the Queens Gambit Pawn Structure pawn structure look like?
In this article, we will be discussing the majority of the pawn structures that could occur from the Queens Gambit Opening.
We will start, however, with the most basic pawn structure and work our way up to the more complicated case.
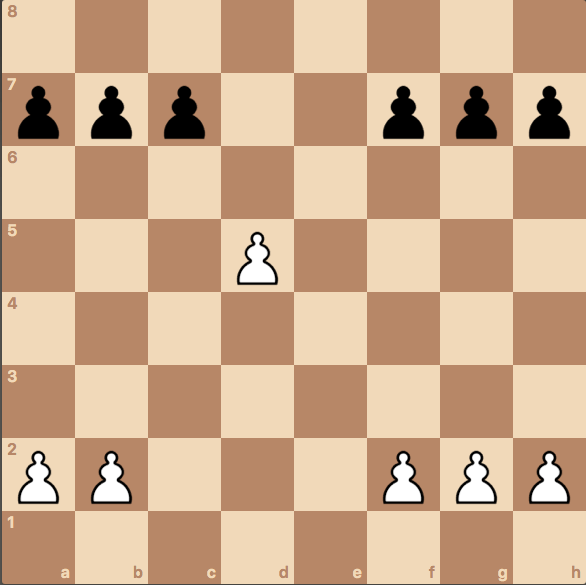
The most basic pawn structure being the Queen’s Gambit Isolani Pawn Structure.
The reason for this is that this is the most fundamental and base pawn structure to learn about the Queens Gambit Pawn Structure family.
The majority of the themes learned from this pawn structure carry over to the different variant pawn structures from this family.
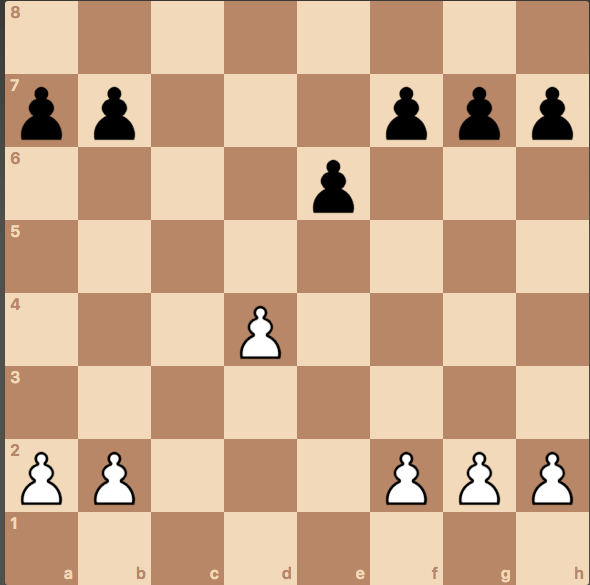
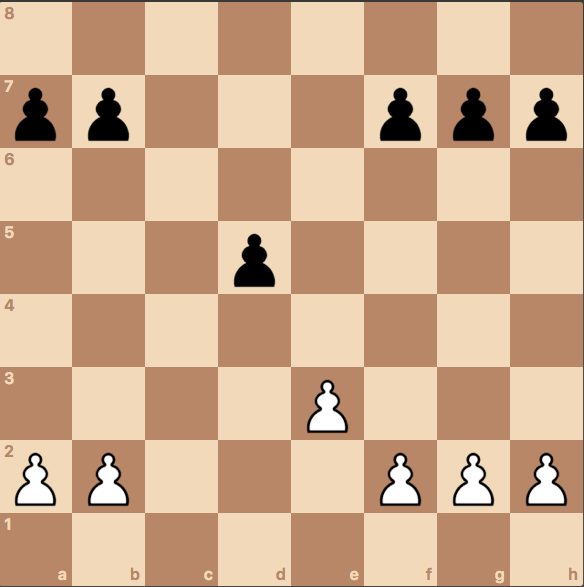
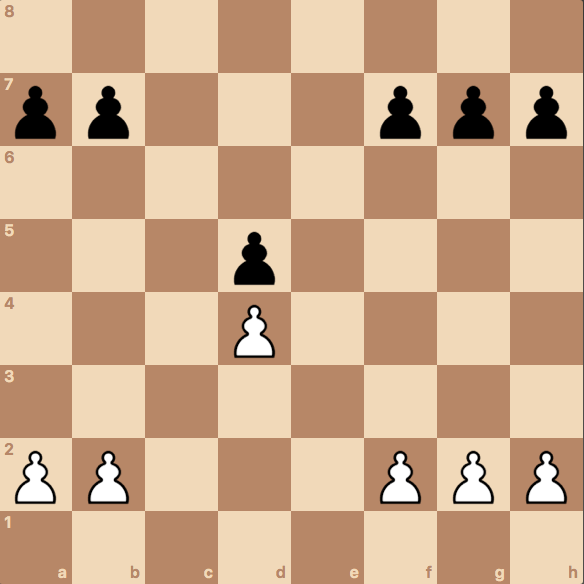
If you are at all familiar with the Isolani pawn structure, you probably have seen and are familiar with the first diagram but not the second.
This brings up an important point.
Most chess articles, books or videos always discuss pawn structures from White’s point of view and gloss over the fact that the reverse pawn structure could happen as well.
Any given pawn structure that you study from white’s point of view can also occur with the same strategies/themes with just the colors reversed.
Note that this pawn structure (and the themes/ideas behind it) would be the same if the white d-pawn was on d5 instead of d4 and Black’s e-pawn was on e7 instead of e6 (or even c6 instead of e6).
How do you reach this pawn structure?
This pawn structure is one (if not the most) frequent to occur and you can encounter and occurs in many different chess openings.
Even if you say to yourself, “Hey, I only play 1.e4, I will never see this pawn structure”, I have news for you.
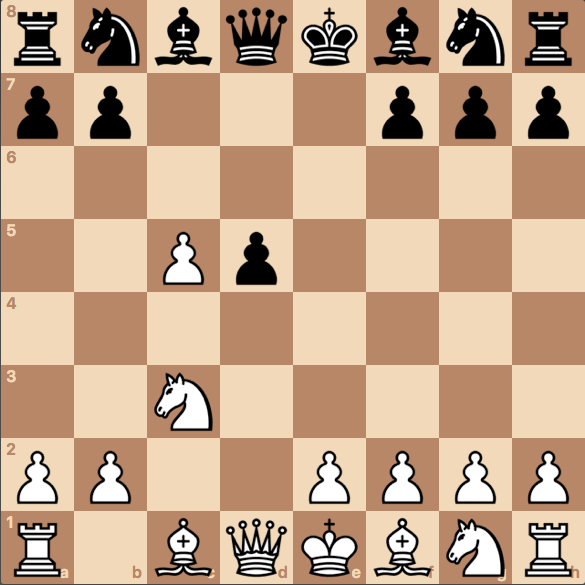
The isolani occurs commonly in reverse in the French Defense – Tarrasch Defense.
- e4 e6
- d4 d5
- Nd2 c5
- exd5 exd5
- cxd4

Comparing this with Diagram 1b above you can see the similarities.
Note that the white pawn on c5 doesn’t take away from the fact that this positions essence is still an isolani pawn structure.
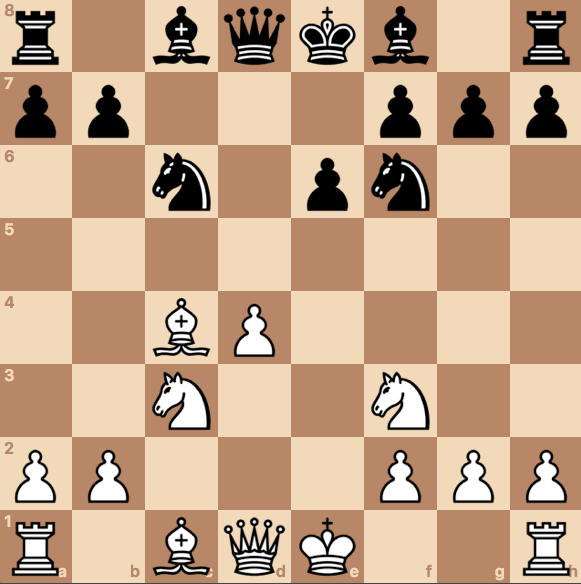
This pawn structure also occurs in reverse in the Queen’s Gambit Declined – Tarrasch Defense.
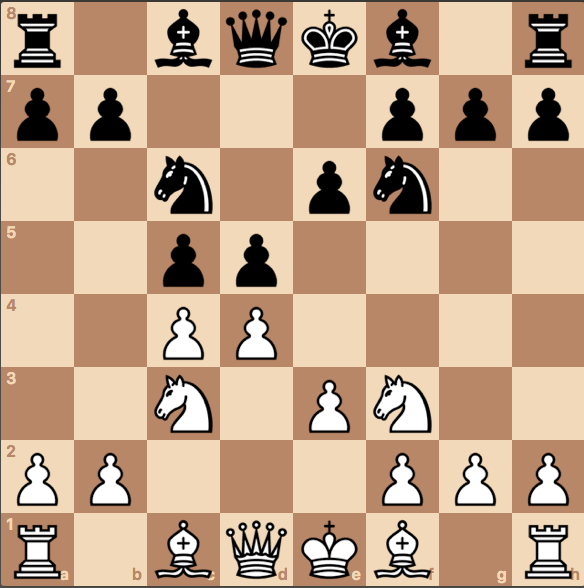
Here is how you reach this pawn structure as white in the Queen’s Gambit Opening
- d4 d5
- Nf3 Nf6
- c4 e6
- e3 c5
- Nc3 Nc6
- Bd3 cxd4
- exd4 dxc4
- Bxc4
In some situations, you have the choice of controlling which side of the board gets the Isolani by carefully choosing which exchanges to make.
Take this position for example, that comes out of the Queens Gambit Opening that comes from the following:
- d4 d5
- Nf3 Nf6
- c4 e6
- e3 c5
- Nc3 Nc6
Here, black can choose to give white an isolani if White plays a waiting move like 6. Bd3 by playing 6… cxd4:
- 6.Bd3 cxd4
- 7. exd4 dxc4
- 8. Bxc4
White can choose to give black the Isolani by playing the following:
- 6. cxd5 exd5
- 7. dxc5 Bxc5
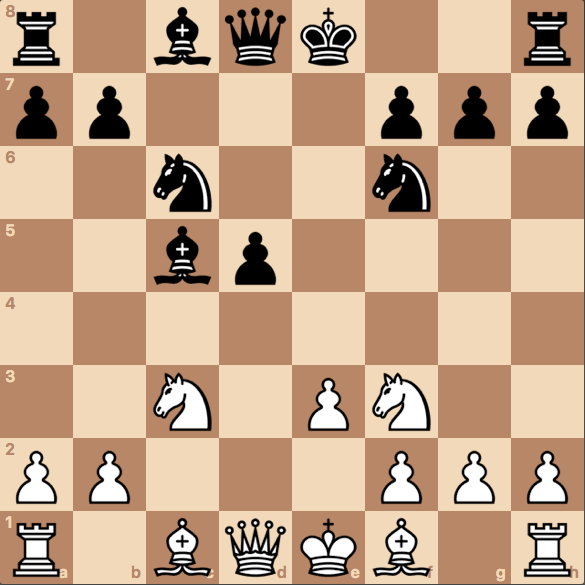
The key takeaway here is that by being familiar with this pawn structure, you can decide how you want a given pawn exchange to go.
There are many positions like the one above, where you have to decide whether you want to make pawn exchanges with your opponent.
In this specific example, by choosing what pawn exchange to make, you have the choice of either giving yourself an isolani pawn or giving your opponent one.
If you know your opponent likes to attack, then you may want to take an isolani pawn yourself to remove their possibility of creating one themselves, and trying to use it to attack you.
If you know your opponent likes to be passive, exchange pieces and go for an endgame, then you may want to give them an isolani pawn.
In this scenario, if your opponent continued to try and exchange pieces, they would be creating a weak pawn on d5 in the endgame that you could just place a piece in front of.
The Basics
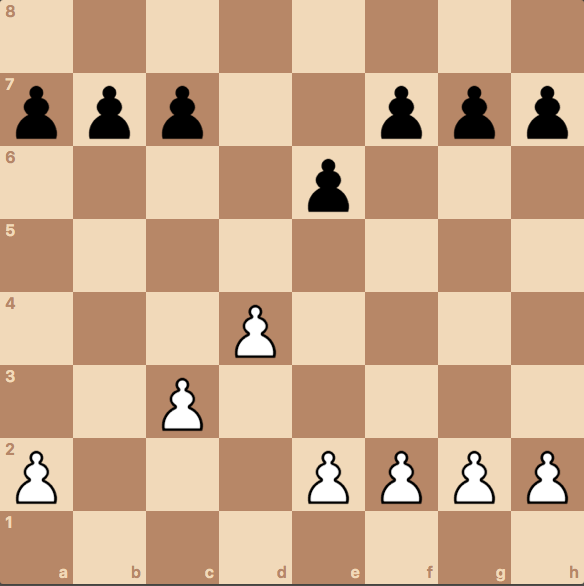
So the main key feature in this pawn structure is the isolated d-pawn.
Some players look at this isolated pawn and do everything they can to avoid it, as they believe it will ultimately turn into a weakness.
Yet, when they have the opportunity to play against such a pawn, they are unsure how to exploit this ‘advantage’.
The main question here is whether this pawn is weak or strong.
The answer to this question is actually quite simple:
- The pawn is a strength during the middlegame
- The pawn is a weakness during the endgame
Why the Isolani pawn is a strength during the Middlegame
This pawn is strong during the middlegame because it creates an outpost on both the c5 and e5 squares.
Specifically, with the Knight on the e5 square, this can be used to launch a kingside attack on black (if black castles kingside).
With the Knight on the c5 square, this can be used to launch a queenside attack on black (if black castles queenside).
This strength, during the middle game, unfortunately, turns into a weakness during the endgame.
Why the Isolani pawn is a weakness during the Endgame
In the endgame, attacks on the King don’t really happen, so the benefit of having a Knight on the e5 square loses its glory.
So what you have to understand is that during an endgame, the majority of pieces (queens/rooks/bishops/knights) are off the board.
Because of that, there are very low chances that either sides king will get checkmated.
So let’s break down why the d4 pawn that was a strength in the middle game becomes a weakness in the endgame.
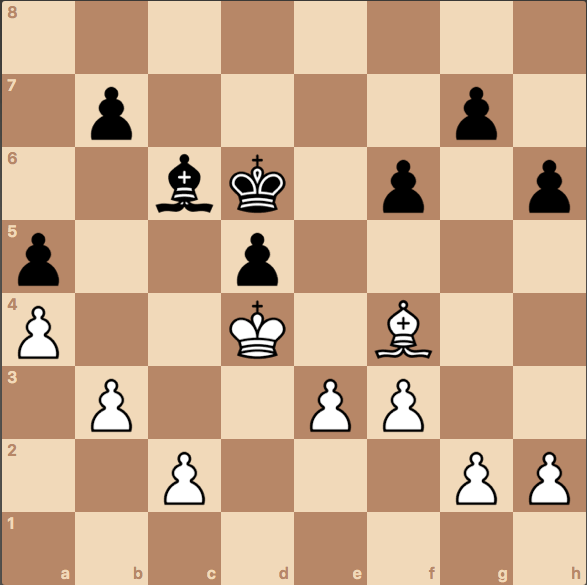
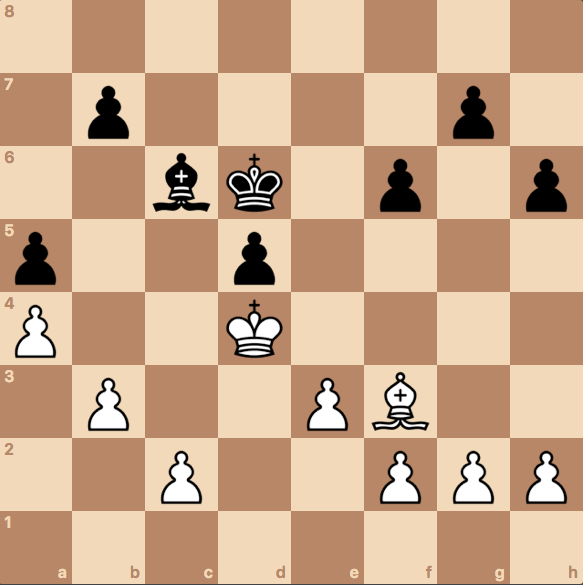
Take a look at diagram 1a which was just the pawn skeleton for the Isolani.
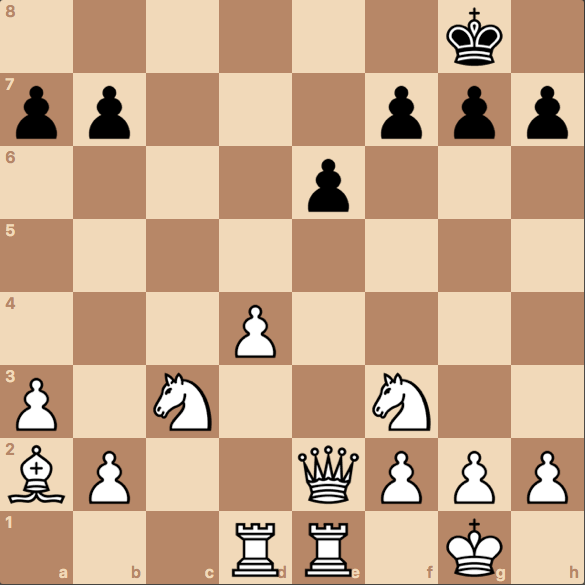
Now let’s take Diagram 1a and add some pieces.
What I’ve done is added a typical endgame situation here to illustrate a point.
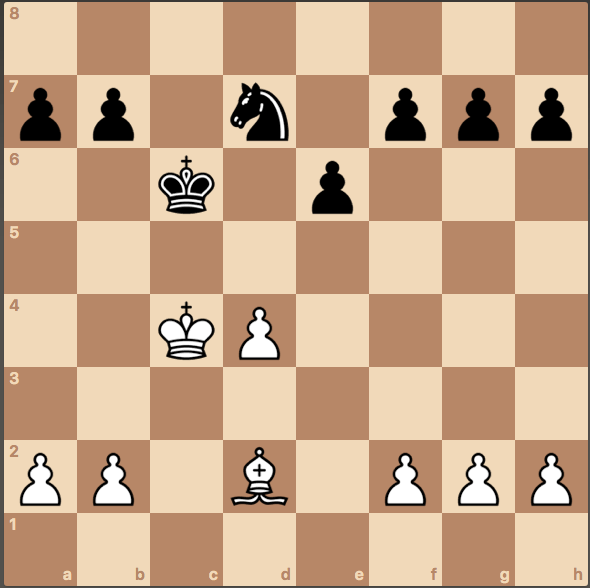
Black’s whole goal in this position is to control the weak d5 square. With Nb6+, black can drive the white King away from d5.
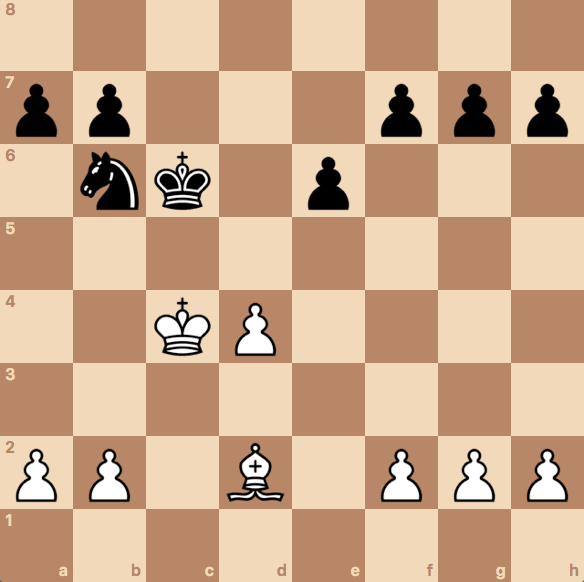
Now black can place his King on d5 and later take either the c4 or e4 squares to take a claim on White’s pawns.
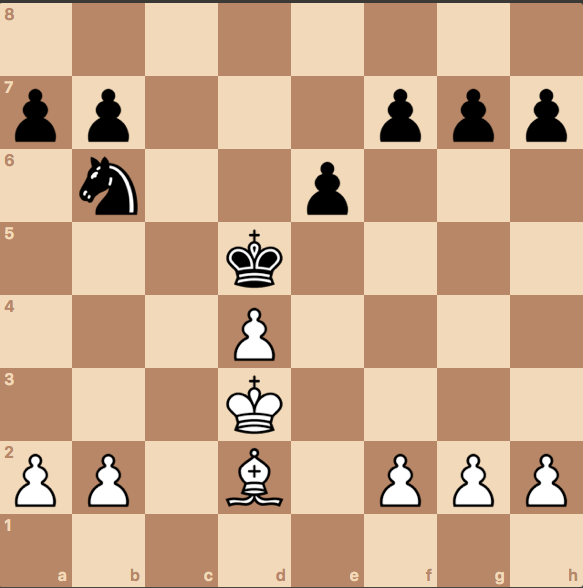
The main problem here is that since this d pawn is not protected by any pieces (therefore by definition, it is isolated), it requires either the King or the Bishop to always be protecting the d4 pawn.
Black can use his Knight to maneuver and cause problems for White’s other pawns as they advance.
We can use the example above to generalize some ideas for the endgame in black.
- The isolated d-pawn alone is not enough of a weakness to win the game alone. But given that white must have a piece defend this pawn, black can try to target another attack. If this other attack is successful, then most likely, the endgame will be won for black. This is known as the principle of two weaknesses.
Detailed Analysis of Different Endgames that occur in this pawn structure
We will first discuss the endgame that occurs if all pieces were exchanged from the board and we were just left with the core pawn skeleton.
That way we can see in the most simplified base case which side has the advantage.
By understanding the base case here really well, we can then build up from it and add pieces here and understand how those pieces affect the fundamental position.
By explaining the endgame this way, you will know in different scenarios whether you should either try and trade down your pieces (to get a more advantageous position) or keep your pieces on the board.
King and Pawn Endings
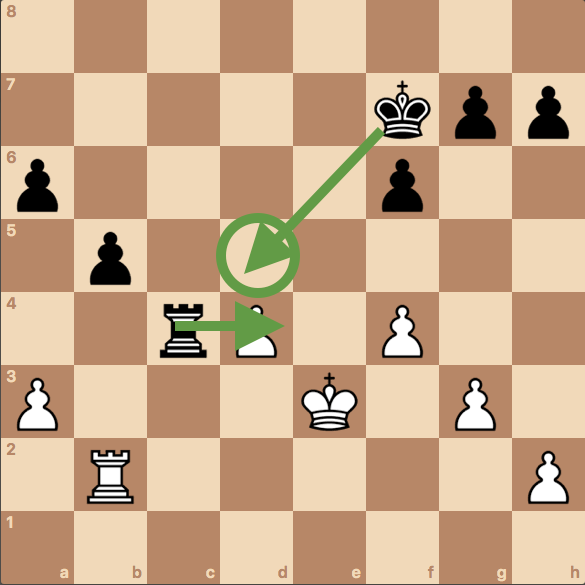
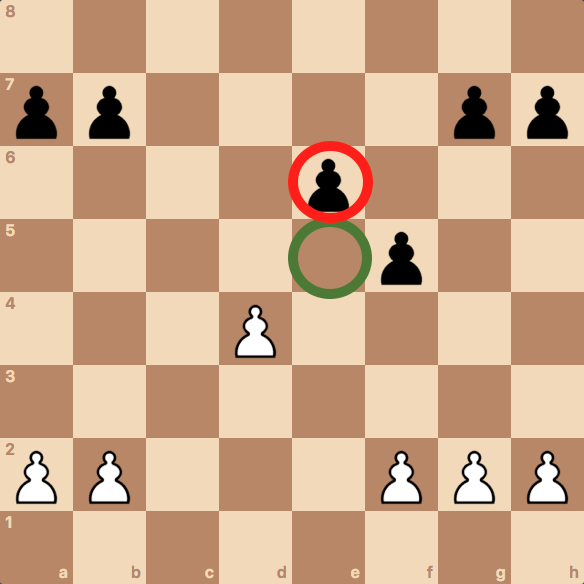
The most simplified endgame is a situation where there are just kings and pawns on the board.
Take a look at the board below.
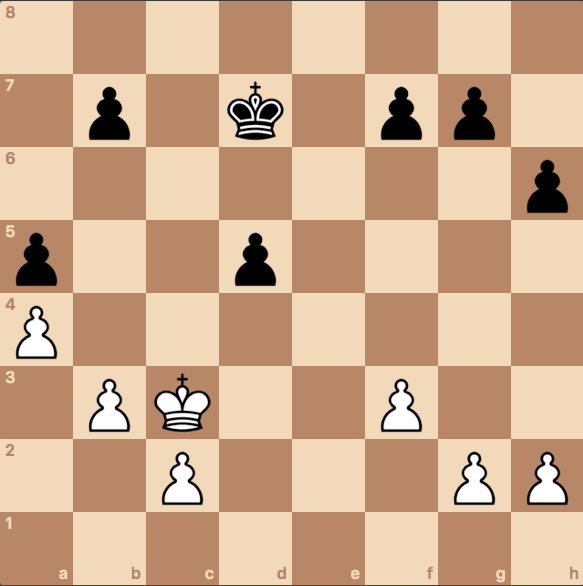
So in this situation, the weakness of the Isolani pawn is illustrated in its purest form.
Specifically, the Isolani pawn requires a piece (the King) to defend it at all times.
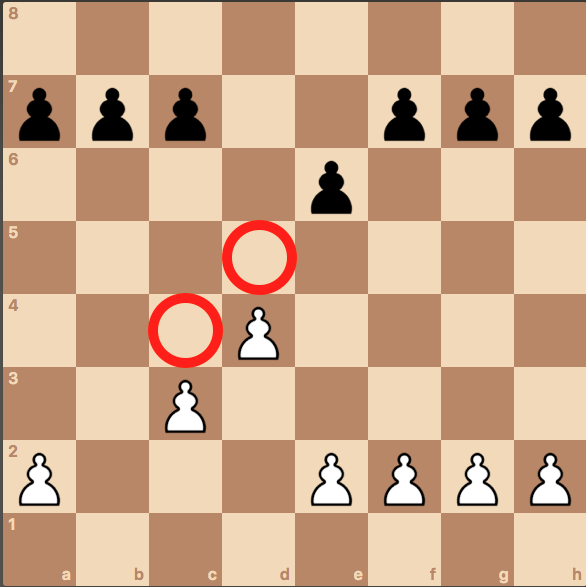
The goal if your opponent has an Isolani pawn is to take advantage of the square right in front of it.
You can see this in the diagram below.
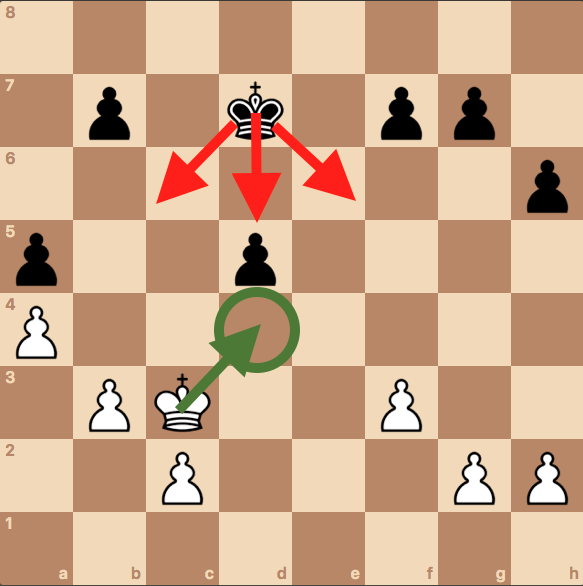
White will go ahead and take advantage of the weak square in front of the Isolani pawn (circled in green).
By doing this, black is forced to keep his king bounded between the three red arrows at all times.
If black had the opportunity, it would try taking control of this square itself, if, for example, white decided to push Kingside pawns instead of playing Kd4!
Black must respond by defending the pawn. Here black chooses Kd6.
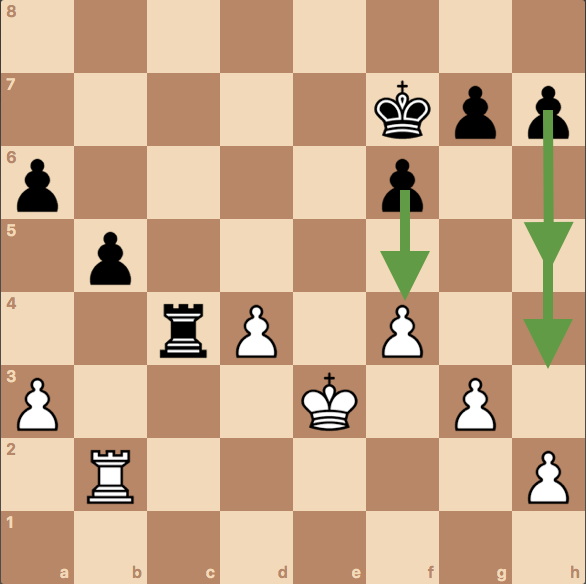
Here is the updated position.
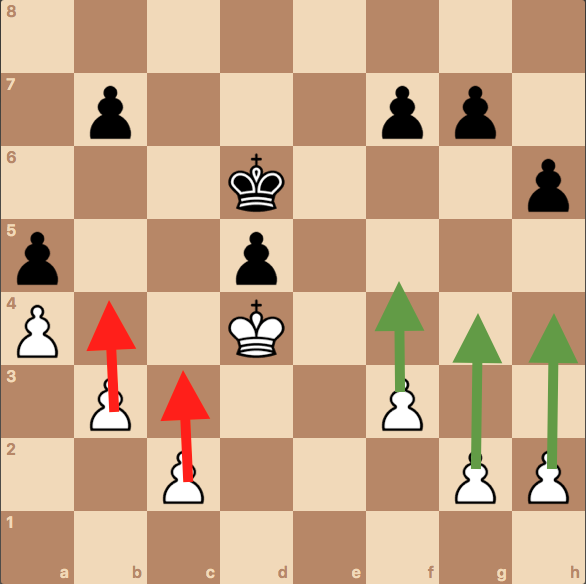
Now what White will do is to attack the kingside or the queenside in order to create another weakness.
Since black’s King is tied down to the isolated d-pawn, if another weakness is created, black will not have the resources necessary to defend it.
In that scenario, the black king will be forced to move or that other weakness could become enough of a create a queen.
This is known as the principle of two weaknesses.
Most of the time, this plan is successful and the Isolani pawn must be forfeited.
Therefore it is pretty dangerous to have an isolani pawn in the endgame.
Bishop Endings
Bishop Of Opposite Colors
Let’s first examine the scenario of Bishops with opposite colors.
If the side with the isolated pawn has a bishop of the same color to defend it (and you have a bishop of opposite color), then most of the time, no weaknesses can be created.
As we saw above, creating multiple weaknesses was the key to winning the endgame.
In scenarios like this, the light squared bishop adequately defends the isolani pawn, so these positions are very drawish.

Bishop Of Same Colors
Let’s change this position a bit so we now have bishops with the same colors.
This situation is very similar to the basic King and Pawn endings we discussed for this pawn structure above.
White has the advantage here if he can create another weakness for Black to defend.
By creating two weaknesses, Black will not be able to defend both so will have to compromise and move his King from defending the d5 square.
Knight Endings

Having Knights instead of Bishops in this pawn structure generally makes defending the isolani pawn difficult.
The reason why is: having Knights on the board makes defending the Isolani pawn more difficult because with a Knight, it’s easier to create a second weakness (or target).
In the position above, White should have the advantage.
The black queenside pawns are particularly weak and the d5 pawn has been blockaded successfully.
Rook Endgames
Usually, the Isolani is a huge disadvantage in Rook Endgames.
Even more so than either Knight or Bishop Endgames.
The reason why is similar to what we’ve seen above.
The possessor of the Isolani pawn is forced to keep his Rook tied down to defending that pawn, thus becoming passive.
This advantage gives the opportunity to create a second weakness (the principle of two weaknesses).
At some point, the defender will have to look at this second weakness and make an unwilling compromise.
Let’s look at an example below.

Black’s plan here is pretty simple.
To march his King on f7 onto the d5 square, and then force the exchange with the rook.
This can be seen in the diagram below.
As White tries to defend, Black will also try and create a second weakness with a kingside pawn storm.
In the situation where you have an isolani and rooks are on the board, you are going to want to try and exchange the rooks off the board.
Conversely, you really do NOT want to exchange rooks off the board when playing against the isolani d-pawn.
Queen Endgames
Similar to the Rook Endgames, the Isolani is a huge disadvantage in Queen Endgames too.
The reason why is the same as what we’ve seen above.
The possessor of the Isolani pawn is forced to keep his Queen tied down to defending that pawn, thus becoming passive.
This advantage gives the opportunity to create a second weakness (the principle of two weaknesses).
At some point, the defender will have to look at this second weakness and make an unwilling compromise.
Bishop Vs Knight Endgames
As you can imagine, if you have an isolani, you will be at a huge disadvantage going into an endgame with a bishop vs your opponents knight.
The reason being is the Knight is great at doing forks and can create multiple weaknesses at once.
The main idea for all of these different endgames is that the side playing against the isolated d-pawn can rarely win just using the weakness of that pawn.
It almost always requires the creation of a second weakness.
Whether that second weakness can be created or not usually determines the outcome of the match.
Main Takeaway Of Plans For This Pawn Structure
The side which has the isolani pawn needs to orchestrate an attack in the middle game, while the opposing side needs to attack that isolated d-pawn and exchange pieces toward an endgame.
If White succeeds with the attack (either by gaining a material advantage or actually getting a checkmate), then the game will be won for him.
If black can fend off the onslaught of attacks and get the game into an endgame position, then black will have the advantageous and most likely will.
White’s Specific Plan In This Pawn Structure
- To make a pawn break in the center with d4-d5
- To try and attack the King, first by attacking the e6 pawn that protects the king. This will be prepared by pushing the f2 pawn to f4 and then later f5, to remove the pawn on e6.
- To attack the King by attacking the f7 square.
- An attack on the Kingside by bringing one of White’s rooks to the third rank with a rook lift and swinging it either to the f, g or h file to put pressure on black.
- If necessary, push the h pawn and advance it toward the enemy king.
- Sacrifice your dark squared bishop on h6.
- Try to use either or both the e5 and c5 squares as outposts for Knights.
Black’s Plan In This Pawn Structure
- To blockade the d4 pawn by placing a piece on d5 (preferably his Knight).
- Attack the isolated d4 pawn to force White to try to defend it (since it can only be defended by pieces)
The d4-d5 pawn break
A key strategic theme in this pawn structure is the d4-d5 break. If this d4-d5 pawn is exchanged, we will end up with a new pawn structure, a pawn free center.

The key plan for this new pawn structure formation is the side which has its pieces mobilized and actively placed in the center when the center is cleared, will benefit the most from the d4-d5 break.
When to do the d4-d5 pawn break
Based on the explanation above, we conclude that you only want to do a d4-d5 pawn break when you have a lead in development, with your pieces mainly in the center.
This is really vague and general so let’s get specific.
Your goal in this pawn structure as White is to try and get your pieces in their ideal squares as fast as possible.
And once your pieces are in their ideal squares, then you want to push d4-d5 as soon as you can.
If you can do this, then the position will be very dangerous for black.
What are the ideal squares for your pieces in this pawn structure?
Look at the diagram below and burn it into your memory.
This idea was taken from the book “Winning Chess Pawn Structures” by Grandmaster Alexander Baburin.
These are the ideal squares you want your pieces to be in when playing with an isolani pawn structure.
Keep in mind that the d4-d5 exchange will open up the a2-g8 diagonal for the bishop on b2.
This will allow you to attack the f7 square effectively to checkmate the opposing king as will be explained in detail below.
How to deal with the d4-d5 break as black
If you are in the situation where your opponent has an isolani pawn, and your opponent knows what they are doing, they will be trying to launch a powerful kingside attack against you.
What should you do to defend this?
- Firmly control the d5 square with your pieces and place a minor piece there in order to prevent the break from even occurring.
- Try to exchange as many pieces as you can to simplify the position. By doing this, you will be giving White fewer pieces to attack with and reducing White’s attacking potential.
- Swing your rooks over into the center files to try and mitigate White’s center control after the break. Ideally, use the open c-file and try to exchange your rooks with your opponents.
Attacking the f7 (or f2 square)
Before the d4-d5 break, you should have placed your bishop somewhere on the a2-g8 (to attack the kingside castled king, specifically the f7 square).
After removal of the e6 pawn (with the d4-d5 push), that a2-g8 diagonal (specifically the f7 square) becomes really weak.
But let’s say for some reason, you are NOT able to push d4 to d5.
Perhaps your opponent placed his Knight on d5 and you can’t get rid of it.
In this situation, what do you do?
Advance your f-pawn!
After f4-f5 and then …exf5, the diagonal is clear and the f7 square becomes vulnerable again and the d-pawn becomes more passed.
The Rook Lift
So hopefully when you saw the ideal piece position when playing with an Isolani, you noticed that one rook was placed on the d-file and the other was on the e-file.
The rook on the d file makes sense.
The main role of this rook will be to protect the isolani d-pawn.
But what about the rook on the e-file?
So along with the pawn break on d4-d5 and the f-pawn push, there is another plan that White will also try to
To put your rook on e3 and then eventually swing it over to either the f, g or h file to attack the enemy king.
This is called a rook lift.
See the diagram below.
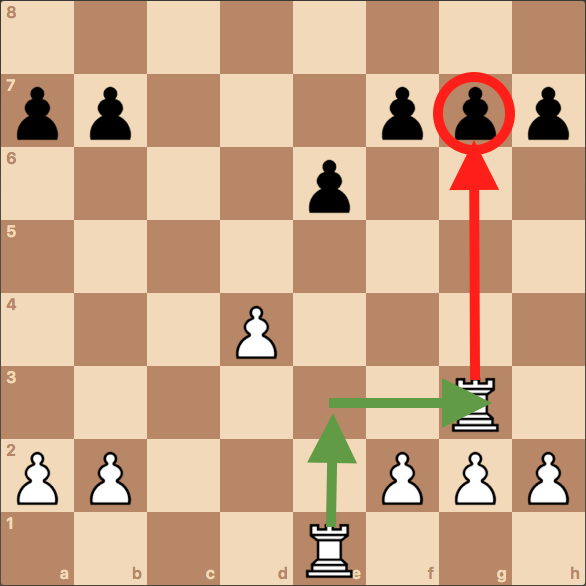
This rook will bring a lot of firepower against the enemy king.
How To Guard Against The Rook Lift As Black
If you are playing against the isolated pawn, you need to tie down the enemies rooks to defend the isolani d pawn.
You are also going to want to exchange pieces, as much as you can.
If you can trade away your opponents rooks, then that will be great for you.
Sacrificing Your Dark-Squared Bishop On h6
The mindset you need to have when you have an Isolani pawn is to start thinking about sacrifices.
This could be pawn sacrifices, such as your d-pawn or f-pawn.
Or it could be piece sacrifices.
These are things such as:
- Sacrificing your Knight on the f7 square.
- Or sacrificing your bishop on h7.
In this section, we will focus on sacrificing your dark-squared bishop on h6.
The reason why is that this is a typical theme that occurs in many top-level chess games.
Whenever you see your opponent play h6 after he castled kingside, the first thing that should come to your mind is to sacrifice your bishop on h6.
The sacrifice on h6 will expose the enemy king and leads to checkmating opportunities.
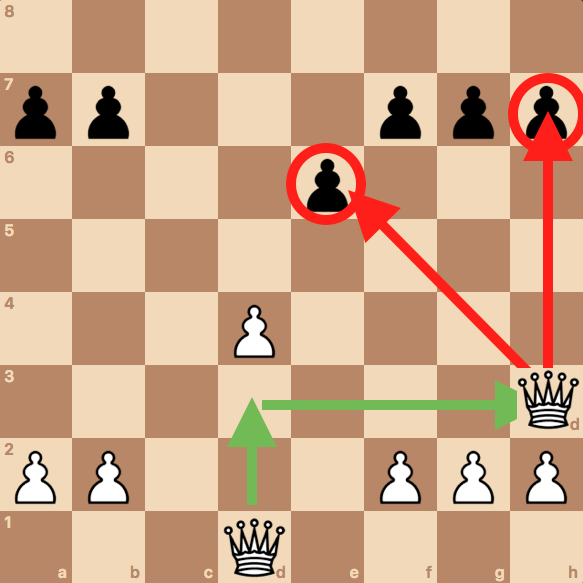
The Queen Shift As White
Swinging your Queen over to the Kingside in addition to all the techniques above puts a whole lot more pressure on your opponent.
The typical path you are going to want to maneuver your queen will be through the d1-d3-h3 path.
This way, your queen will attack both the e6 pawn and the h file.
You can see how this will work with the diagram below.
Guarding Against The Queen Shift As Black
Black’s main defense against this Kingside onslaught will be to try and put pressure on the Isolani d4 pawn so White will try to move resources over away from the Kingside to it to defend it.
In addition to this, Black can try and force an exchange of pieces.
As a last resort, black can make the pawn pushes …g7-g6 or …h7-h6.
Sometimes, these moves may be necessary.
Other times, however, all these pawn pushes do is weaken your position.
Using the h-pawn as a battering ram
Using the h-pawn push works great when using it with all the other plans above such as repositioning the Queen over to the enemies kingside and doing the rook lift.
The main question here is, when is it okay to start pushing this pawn?
The signal for when you want to do this is when your opponent pushes the g6 pawn.
Look at the diagram below.
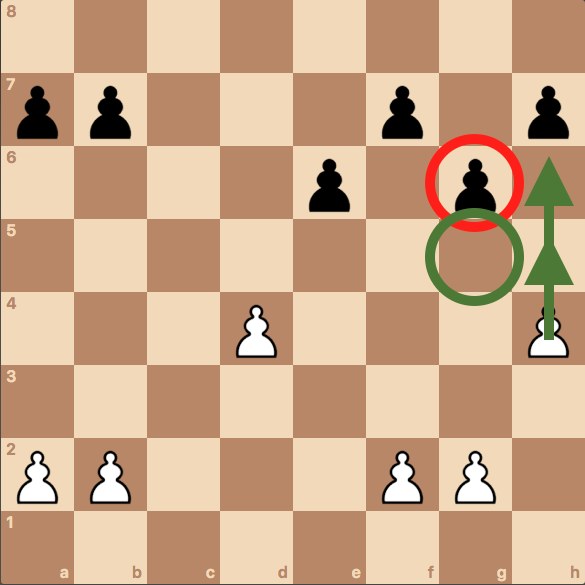
There are three different options here for how far up you can push this h-pawn up.
- By pushing the h pawn to h4, white can use it to control the g5 square, for let’s say a knight.
- By pushing the h pawn to h5, an exchange for black’s g6 can be done.
- And by pushing the h-pawn all the way up to h6, this will create a permanent weakness around the dark squares near the enemy king.
The ideal situation, out of all of these options is option number two — to push the h pawn and exchange it for black’s g6 pawn.
By being able to do this, you will create serious weaknesses on black’s kingside that are irreversible.
How to defend against the h-pawn push
The main way to avoid this attack by white is to avoid weakening your kingside, to begin with.
Specifically, don’t play …g6 unless you have to.
Regardless of whether you were forced to play …g6 or not, as black, you need to do the following things to counter-attack against this h-pawn battering ram.
- Simplify the position by exchanging pieces off.
- Counterattack in the center and attack the isolated d pawn.
- Fortify your king by moving pieces over there to defend it.
How to attack the Queenside with the Isolani Pawn
It’s also possible with the isolani pawn to attack the Queenside of the opponent as well.
You should look to do this if your opponent plays a move like …b7-b6, at which then you can move your light squared bishop to a6 which will control the c8 square.
With control of this square, black will not be able to play Rook c8.
Then you can swing your rook over to the c file and control the kingside as well.
If black plays something like …b7-b5, as well, that will create a permanent outpost on the c5 square for a knight.
This can be coupled with placing a Knight on c5.
If we are able to get control of the c-file with the rook, then the next plan would be to try and place that rook onto the 7th rank and use it to swing over eventually to the kingside and attack it.
How To Prevent A Queenside Attack While Defending The Isolani Pawn
First, do not give control of the a6 square for White’s light-squared bishop.
Second, be really cautioned playing …b5. By playing this move, you create an outpost square on c5 for your opponent to take.
Develop the light squared bishop as soon possible since you need to get your rook on c8.
The Two Main Variations of the Queens Gambit Pawn Structure
We went into detail to discuss the Queen’s Gambit Isolani pawn structure.
The main reason for that was that this is the most frequent pawn structure you will see if either you or your opponent plays 1.d4.
There are two other common pawn structures that arise out of the Queen’s Gambit Family of Openings.
Luckily, the majority of concepts, plans, and themes we learned above will carry over to these two variants.
So we will we just discuss the main differences and what you need to do be aware of and what to do in different situations.
So the last two pawn structures that need to be talked about when working with the Queen’s Gambit Pawn structure are the following:
- The Isolated Pawn Couple
- The Hanging Pawn Structure
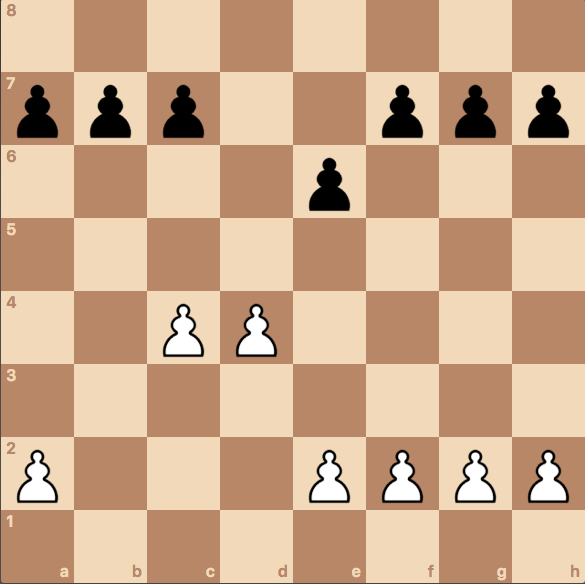
The Isolated Pawn Couple Pawn Structure looks like the following:
And the Hanging Pawn Structure looks like the following:
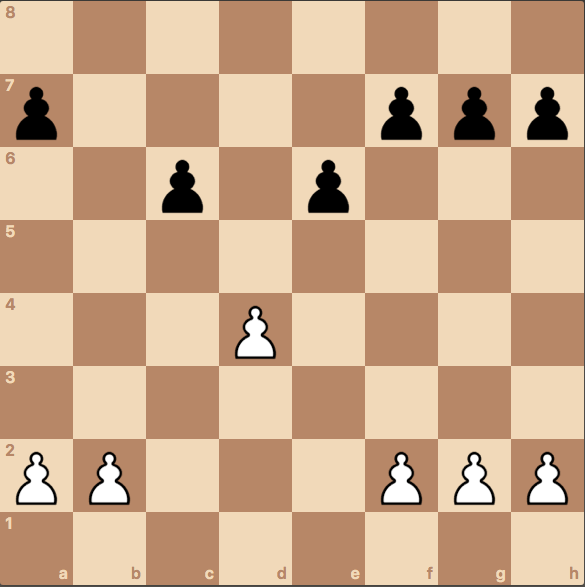
Queens Gambit – The Isolated Pawn Couple Pawn Structure
All it takes to get this pawn structure is an exchange of the knight on c3 and a retake with the b pawn.
This situation causes some of the themes we analyzed above to change.
First of all, the d-pawn is not isolated.
No pieces need to be present to protect the d4 pawn since the pawn on c3 protects it.
Since the isolated d-pawn is now protected by another pawn, White can launch an even more powerful Kingside attack since more resources can be allocated to that side of the board.
This greater initiative, however, comes at a cost, and this cost makes it so keeping the pawn on c3 is most of the time not worth it.
The cost is that now the squares on c4 and d5 have become weak can be occupied by Black’s pieces.
Look at the diagram below.
Given these two pawn weak squares, the ideal situation for black would be to put pieces on c4 and d5 (or just control those squares).
That way, black can use those squares as outposts and completely block white in.
Once black has these pawns blocked in, black will continue by playing either …e6 or b7-b5-b4 to attack and pick off these pawns.
To emphasize this point to you, look at the diagram below.
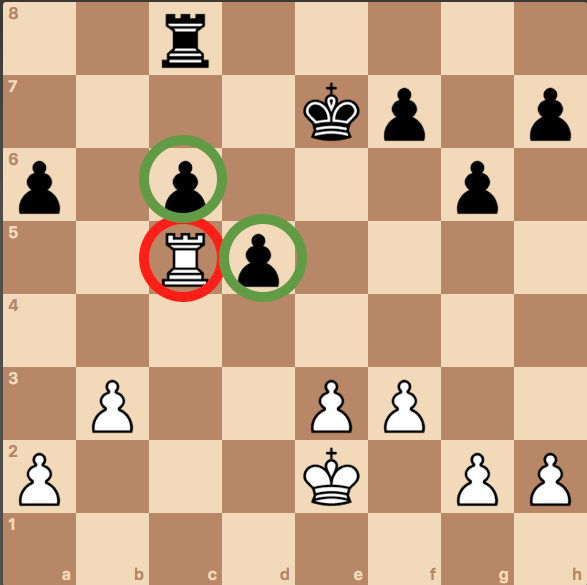
Here is an endgame position where you can just tell that Black is going to lose.
This is an example of why you do not want to avoid playing c3-c4.
White’s rook has successfully blockaded two of Black’s pawns and forces Black to protect these pawns with pieces.
Therefore, white can now try to create another weakness on the board (principle of two weaknesses) in order to win the game.
Typically in top-level play, White’s main goal here will be to play c4 as soon as possible to prevent getting blocked in.
This will transition us into the Hanging Pawn Structure we will discuss below.
Queens Gambit – Hanging Pawn Structure
So if given an isolated pawn couple, White normally plays c4 as soon as he can to transition the pawn structure above.
Now white has two hanging pawns which cannot be blockaded in.
The main benefit White has here in this situation is the great control of the central squares.
A general plan here is for white to eventually play d4-d5.
The idea here to try to create another Isolani situation with more open files and clear diagonals to launch a Kingside attack using the themes noted above.
The side going against the Hanging pawns should do the following:
- Attack these two pawns with pieces first. This will force your opponent to be defensive and make them need to defend these pawns.
- Then try to push either ..e6 (very common) or (sometimes) …b5. By forcing these pushes when White is not ready, this will create holes in their pawn structure which can be exploited later.
Other Pawn Structure Variants For The Queen’s Gambit Family
Life isn’t perfect.
And a lot of the chess games you play under the Queen’s Gambit Family of openings will not be a perfect Isolani, a pawn couple or a pair of hanging pawns.
This will be due to different decisions that either you or your opponent make throughout the game.
- Some of these pawn structures occur when exchanges are made on the board.
- Others are due to your opponent seeking unconventional ways to counter-attack.
- While others are due to either you or your opponent wanting to claim more of a stake in the center.
Don’t worry though.
We got you covered.
We will go through each of these possible variants that are likely to occur so that you are prepared and know what to do in each of these situations.
Now let us begin.
1. White decides to push to d5.
This push to d5 commonly occurs in a bunch of different openings such as the Petroff Defense or Grunfeld Defense where White is better off pushing his pawn to d5 instead of keeping it on d4.
Note that in this pawn structure, black’s pawn on c7.
A similar idea where White is better off pushing his pawn to d5 instead of keeping it on d4 also occurs in the Tarrasch Defense.
Note now that Black’s pawn on e7 instead of c7 and that black is planning to Fianchetto his dark-squared bishop.

Regardless of the minor differences of whether Black’s pawn is on either c7 or e7, the fundamental ideas that we discussed above of what White or Black plans don’t change that much from the Isolani base case.
Black will still try to blockade this advanced pawn.
White will try to take advantage of these open files in order to eventually launch a Kingside attack.
Now there is just either an open c-file or d-file that both sides will try to take advantage of.
In specifically in the Tarrasch defense, black will eventually Fianchetto his dark-squared bishop.
2. Black plays …d5
This is a pawn structure that occurs very frequently.
Because this pawn structure is purely symmetrical, the only advantageous one side can get is due to better placement of pieces.
Keep in mind that this general principle applies to all pawn structures that are purely symmetrical.
For purely symmetrical pawn structures, the only advantage one side can get is due to better placement of pieces.
Note that this pawn structure does not just happen at high levels of chess play.
It occurs due to one side deciding to make the exchange to create this resulting pawn structure.
Normally this decision is made after one side gains at least one of the following:
- Better control over the c-file
- Better control over the e-file
- Control over the e5 square
- An exchange of a Bishop for a Knight. Specifically white wants a light squared bishop (opposite of the d4 square color) while black wants a dark-squared bishop (opposite of the d5 square color). This will give the opposing side a bad bishop + allow better control of either the e4 or e5 square.
White captures d4xd5 and black blockades with …e6

This pawn structure also commonly occurs a lot, mainly when White decides to capture back an exchange on e5 with his Isolani d4 pawn.
The thing that is clear here is that white has a huge space advantage here.
This is the first thing we will talk about.
Most players tend to overvalue the importance of space advantage.
While space is important, space advantage doesn’t matter that much when pieces have been exchanged off the board.
Specifically, white isn’t as advantageous in this Pawn structure as it may appear.
The main thing to take away here is the following:
If you are in a situation where there are many pieces on the board, it may make sense to advance your pawn, so you can take advantage of the extra space.
In contrast, if you are defending against an advanced e-pawn, your goal should be to exchange pieces off the board to nullify this extra space advantage.
If you are in a situation where there are very few pieces on the board, don’t think making this exchange gives you a ‘space advantage’.
You don’t really gain any space benefit from doing this exchange.
The other thing to note in this pawn structure is that: White will try to use the d6 square as an outpost while Black will counter by trying to take the d5 square.
Black decides to push for counterplay by playing …f5

People think when seeing an opponent playing …f5 that this move is a mistake.
This does make a lot of sense.
By playing …f5, Black weakened his e5 square and now has a backward pawn on e6.
…f5 also runs so counter to the ideas we’ve discussed throughout this post.
Black does benefit, however, from this move.
Specifically, Black is able to defend the h7 square from White’s light-squared bishop during an attack.

If White doesn’t know to readjust his bishop to a different diagonal and keeps him on the b1-h7 diagonal, then it makes a lot of sense to make this move.
White needs to relocate his bishop to a different diagonal (the a2-g8 diagonal) to attack the e6 pawn instead.

Black’s pawn on b7 captures on c6.
Black, in general, purposefully exchanges the b7 pawn to capture back on c6.
The reasons for this are the following:
- Black has gained greater control of the d5 square. The d4 pawn cannot push to d5 (because it can be captured by either the c or e pawn) so it is effectively blockaded.
- Black can counter White’s kingside attack by using the open b-file to launch a counter queenside attack.
The drawbacks for Black gaining the following are
- The c6 pawn has become isolated and weak. White can place a rook on the semi-open c file to cause havoc to this pawn.
- White can now use the c5 square as an outpost for his pieces
Black should consider making this move when pieces have been exchanged, as having a semi-open file or outpost squares become less important during an endgame.
Other Strategies You May See
It is possible for either side to just decide to exchange the center pawns and end up in a pawn structure like the one you see below.
The idea to want to do this exchange primarily comes when one side has a bishop pair, while the other side has a bishop and a knight.
The hope here is an advantage here due to having an open center.
Conclusion
So hopefully you made it to the end of this article.
If so, congratulations!
You now know everything you need to know about the Queens Gambit pawn structure and its variants.
Keep in mind that this is an active document and will constantly be updated over time.
Please leave comments below with your feedback plus any questions you have.
Do you now feel confident with the Queen’s Gambit Pawn structure?