
Welcome to yet another ride down the pawn structure lane! Today we are visiting yet another exciting location: the Sicilian – Maróczy Bind pawn structure.
As you must know by now, there are 17 essential pawn structures in chess, and they are the very foundation of each chess position. The Maróczy structure is one of them, and if you study each of these 17 structures – this one included – you will find something familiar in each chess position that can come your way, and know exactly how to proceed.
This is one of the most essential and characteristic pawn structures that come from the Sicilian defense.
However, as you already know, even if you are not a fan or regular player of this opening, your general chess knowledge will benefit from learning this structure in the sense that you will know exactly what to do when a similar structure comes up on the board – and isn’t it great to know what to do in a game of chess?
This structure is named after the Hungarian chess master Géza Maróczy, who was well-known for his sound and positional chess, and introduced this pawn formation in many of his games.
In the past, it was commonly believed that this structure brought an immediate advantage for White, so much that it was even considered a blunder to allow it to happen with the Black pieces.
However, if you are reading this article from Black’s point of view, don’t get scared! Nowadays, with modern chess evolution, things have changed a lot.
By now, you already know that things are rarely so easy to define in terms of claiming an advantage in chess: as you will be able to see for yourself in this article, once again everything comes down to the personal style and taste of the player and the specific characteristics of a given position.
Let’s get started!
What does the Sicilian – Maróczy Bind pawn structure look like?

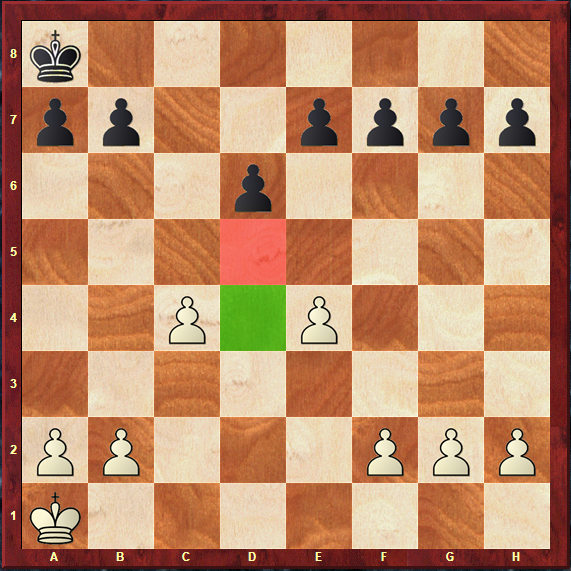
The first step is, of course, gaining awareness of what this pawn structure looks like. Once you get familiar with the position on diagram 1a, you can be aware of when to apply the concepts you will learn throughout this article.
In order to reach this structure, only the typical open Sicilian pawn exchange took place: White has exchanged his d-pawn for Black’s c-pawn, which, as usual, created two half-open files on the board, precisely the c and d files.
The most characteristic element of this structure is the fact that White’s pawns are on e4 and c4, creating the bind.
These pawns exert control over the d5 square, and clearly grant White a space advantage, since Black has not moved any pawn past the 6th rank. These considerations were what made many chess players over the years believe that the Maróczy was a structure that simply granted White a long lasting positional advantage.
In modern chess, the concepts of space and development are still as important as they were in the past; however, many chess players in the old days were averse to playing positions in which they had little room to move and maneuvre pieces.
Since the Maróczy Bind seemed to effectively tie Black down, many players believed that it was a bad way to play with the Black pieces, without looking deep into the position – and that’s where the theoreticians and great chess players of our times came into place, creating a new place for the Maróczy in the world.
Nowadays, its reputation has changed from “essentially very good for White” to something along the lines of “an interesting, rich structure, with possibilities of giving rise to a great fight on the board where both sides will play for a win”.
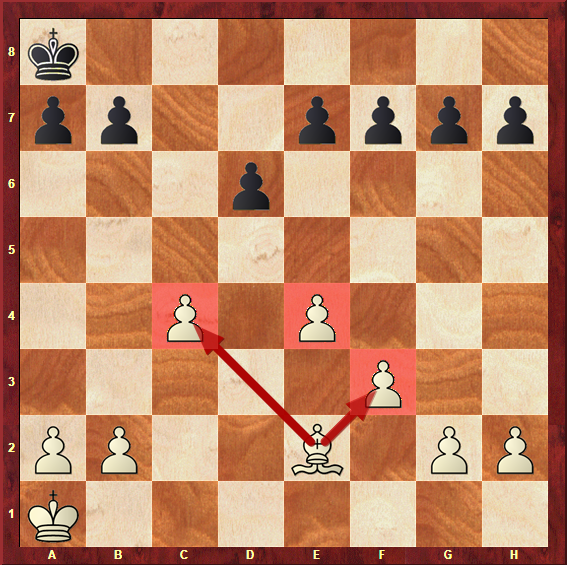
However, it must be said that advancing these two pawns forward isn’t without its drawbacks.
One of the most obvious weaknesses it creates is the d4 square, which is left without any pawn protection from early on. Black will try to exploit this square while White will try to exploit d5, so these two squares right in the middle of the board will definitely be critical in the course of the game.
Another drawback that comes from the placement of these two pawns is that they limit White’s light squared Bishop. This might not seem so obvious without the pieces on the board, but if you picture a light squared Bishop in this position, you will realize that its movements will be limited by the pawns, which will not allow it to move forwards very easily, and turn it into a passive piece.
In most occasions, this Bishop stands on the e2 square, and White is forced to advance f2-f3 in order to defend the e4 pawn, as we will see later on.
As you can see, there are pros and cons for both sides, as in most pawn structures out there – White may have a slight advantage only because he has the first move, but he has to be tremendously careful in how he handles it, since Black will be trying to hit him with dangerous counterplay right from the word go.
Now that you have seen what the Sicilian – Maróczy Bind pawn structure looks like, you must be wondering: can it be played against every variation of the Sicilian defense? Can White always simply place his pawns on c4 and e4 and have this structure on the board?
The answer is no. Only some variations of the Sicilian defense allow this formation to occur on the board, and that’s what we are going to look at very soon – but first of all, let’s discuss the main ideas behind this pawn structure.
What are the characteristics of this pawn structure?
It is now time to start digging into the Sicilian – Maróczy Bind pawn structure and find out what it is all about. By the time this section comes to an end, you will know exactly what you should do, either if you encounter this position with White or Black. You will know just where to place your pieces, which plans and lines of thought you should follow, and which are the critical points in the position that you must be attacking or defending.
This will definitely allow you to have an important edge over the competition you face – and be ready to see an increase in your rating as well!
This structure generally leads to strategic and positional games, but many tactical ideas can also take place – for both sides.
As you have read before, it was commonly thought that the space advantage was enough to grant White an overall edge in the position, while Black would simply suffocate and have no room for his pieces.
Nowadays, this is quite far from the truth. White will indeed strive to maintain this space advantage and leave Black’s pieces with barely any room to breathe, but this does take some time to build up. In the meantime, Black will try to achieve as much counterplay as possible.
A basic concept of chess strategy is that when you have less space, you must exchange pieces in order to have more room for those that are left on the board. This is precisely what Black must try to do.
In addition to this, endgames can be good for Black, because White’s advanced pawns have left weak squares behind them.
Conversely, if Black does not manage to exchange pieces and carry out accurate plans, White can have a controlling position and slowly increase his advantage.
Black has two main setups he can adopt against the Maróczy Bind pawn structure, depending on the chosen opening.
One of them is the Accelerated Dragon setup, in which Black will aim to fianchetto his Bishop on g7 and leave the Queenside pawns untouched from early on, before choosing to play with a6-b5 or a5-a4.
Black will also try to exert control over the dark squares in the position, given that his Bishop will be perfectly placed for doing so.
Against this setup, White’s main ideas will be either to place a Knight on the d5 square, given that the exchange of Knights on this square may give him an immense pressure on the e-file, or to breakthrough on the Queenside with the move c4-c5.
White will often develop by castling Kingside, defending the e4 pawn with the move f2-f3 and place Rooks on c1 and d1.
On diagram 1d you can see a visual representation of these ideas.
The other setup Black can adopt against this structure is the Hedgehog formation, as we have seen in the previous section.
In this structure, Black aims for solid and consistent development, while White tries to increase his space advantage with the c4-c5 breakthrough. In this case, this can be especially strong since the b6 pawn is weakened.
It must be noted that in both setups, White can also try a central breakthrough with the moves f2-f4 and e4-e5, which can sometimes grant him a Kingside attack.
Black must, again, try to exchange pieces and aim for counterplay on the Queenside and control over the dark squares.
Take a look at diagram 1e for a clearer representation of ideas in the Hedgehog setup.
An interesting thing that can be said about this structure is that Black also has many chances to develop an attack against White’s King.
This can happen with the f7-f5 breakthrough, especially if Black has played the Accelerated Dragon setup and has a Bishop on g7. This Bishop grants Black’s King shield, but also has his eyes on the entire long diagonal across the board and can even help the attack by coming to the e5 square.
In a modern approach to the Accelerated Dragon setup, Black goes for an immediate Kingside attack with the moves e7-e6, Bg7-e5 and f7-f5. With the help of the light squared Bishop and Knight, there can be an uncomfortable pressure on the e4 pawn, as well as threats around White’s King.
While White still has a space advantage and central control, this example comes to show that things are not dull in this structure, and that Black will not simply sit behind and wait for White to do something – he will try to create his own threats in the position.
As you can see, there are many interesting ideas in this pawn structure. Let’s now take some time to summarize them before we move on to seeing them being put to practical tests.
White’s position
- Generally, White enjoys a space advantage;
- White’s pawns on c4 and e4 grant him control over the d5 square, in which often a White Knight will arrive;
- A typical breakthrough in the Queenside is c4-c5;
- A typical breakthrough in the centre is f2-f4 followed by e4-e5;
- White’s pawns limit his own light squared Bishop, and the fact that they are advanced to c4 and e4 weakens the d4 square;
Black’s position
- Black has two setups he can adopt against the Maróczy Bind: the Accelerated Dragon setup and the Hedgehog setup;
- Black must try to exchange pieces to counter for the fact he has less space in the position;
- In the Accelerated Dragon setup, Black will try to exert control over the dark squares in the position with the help of his well-placed Bishop on the long diagonal;
- A typical breakthrough on the Queenside is b7-b5, but plans with a5-a4 are also possible;
- A typical breakthrough on the Kingside is f7-f5, and this may lead to a Kingside attack;
Just the fact that we have such a long list of key points to this structure comes to show that the Sicilian – Maróczy Bind is rich and interesting. It is now time to see how to reach this pawn structure from the opening.
Then, we will move on to discussing what happens when top players employ this structure in their games, and how all of these ideas you have just learned look like when they turn into concrete plans.
How do you reach this pawn structure?
One of the reasons why the Sicilian – Maróczy Bind is such an essential structure in chess is the fact that it may arise from many different opening systems.
By learning how to reach the Maroczy Bind pawn structure, you can not only be aware of when it is occurring, but also lead your opponent towards or against it, depending on your preferred side of the structure.
As you might guess from its name, the main way to reach it is by playing the Sicilian defense. However, it is not the only way. This structure can also happen on the board coming from closed games, starting with the moves 1.d4 and 1.c4.
Let’s start by looking at the Sicilian defense move orders.
One of the most common ways to reach this structure is with the Accelerated Dragon variation of the Sicilian.
As you might have read in the Sicilian – Dragon pawn structure article, this variation of the Sicilian has one major idea: to avoid opposite-side castling attacks by saving the move d6 for later, and threatening to play d5 in only one move.
Many players consider this move order to be inferior, however, because it allows White to set up a Maróczy Bind kind of structure – but you will soon realize that this is no problem at all.
Since, as we will see later on in this article, Black has many arguments in its own favour in this structure, there are still many Accelerated Dragon players in the world, and this position comes up quite often on the board.
- e4 c5
- Nf3 Nc6
- d4 cxd4
- Nxd4 g6
- c4
Another variation of the Sicilian in which the Maróczy Bind pawn structure can commonly be found is the Taimanov Sicilian, one of the most popular and most frequently played variations.
We can find this structure after the following moves:
- e4 c5
- Nf3 e6
- d4 cxd4
- Nxd4 Nc6
- Nb5 d6
- c4
The Kan Sicilian is a variation in which, similarly to the Taimanov, Black plays 2.e6. In this setup, it is also possible for White to adopt this pawn formation by pushing c2-c4 very early.
- e4 c5
- Nf3 e6
- d4 cxd4
- Nxd4 a6
- c4

After this introduction to the many variations of the Sicilian defense in which this structure commonly shows up, let’s take a look at how it can also come from fundamentally different openings: closed games.
The Queen’s Indian defense is one of the most popular replies for Black to the move 1.d4. In the Petrosian variation White builds a Maróczy Bind kind of setup, which can be reached after the following moves:
- d4 Nf6
- c4 e6
- Nf3 b6
- a3 Ba6
- Qc2 Bb7
- Nc3 c5
- e4 cxd4
- Nxd4
The move 1.c4, known as the English opening, can also easily lead to this kind of structure, especially if Black adopts the Hedgehog system, which consists on developing the Bishop to b7 after the move b7-b6, as well as the Knight to d7 and advancing pawns to a6, d6 and e6.
This system is a rather universal one which can be played against many different openings, such as 1.e4, 1.d4 and 1.c4, and can almost always be met by a Maróczy Bind pawn formation by White.
An example move order is:
- c4 c5
- Nf3 Nf6
- g3 b6
- Bg2 Bb7
- Nc3 e6
- 0-0 a6
- d4 cxd4
- Qxd4 d6
- e4 Be7
- b3 Nbd7
As you can see, there are indeed many ways to find this position on the chess board, and chances are you have already met this structure in one of your games, either on the Internet or over the wooden board.
Now that you know exactly how to find your way to it, it’s time to start thinking deeply about what to do once the position is reached, and how the placement of pawns can impact the course of the game.
How do you play in this pawn structure?
Knowing the characteristics of a given structure is important, but it is not the only thing that leads you to fully knowing how to play it.
Over the chess board, ideas turn into plans, and plans are precisely what we are going to start looking into – and that’s what’s really going to get you those desired rating points.
To learn these plans, we are going to analyze some top-level chess games, played by some of the current theoretical experts in this pawn structure.
Let’s start by looking at White’s main plans in the Maróczy formation.
As you have read in the previous section, White’s pawn formation gives him an advantage in space.
During the course of the game, the player who has the White pieces may try to increase this advantage by expanding on both sides of the board.
White’s expansion
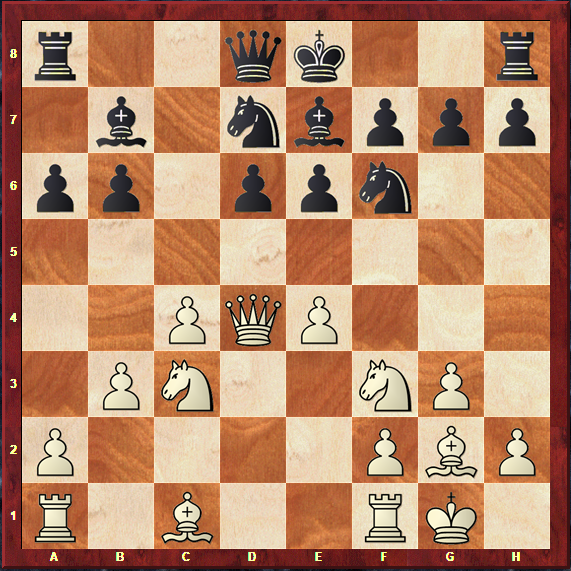
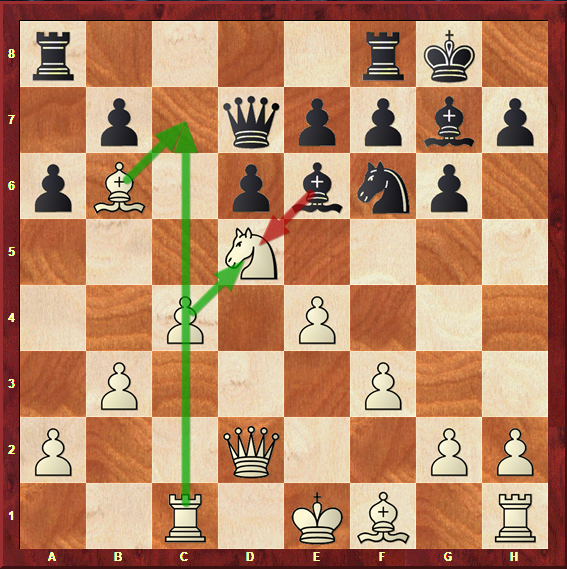
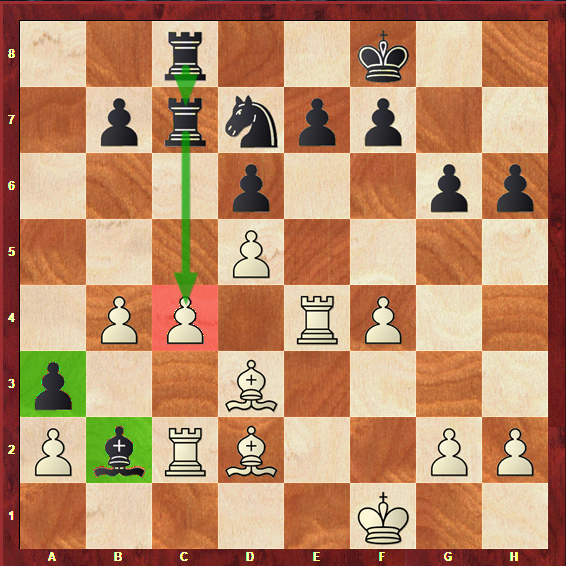
In the game between the two Grandmasters Yangyi Yu and Vadim Zvjaginsev, from the year 2017, we can see White slowly increasing his space advantage on the Queenside and Kingside, coming to a full control of the board.
We have a fairly normal Maróczy Bind setup on the board, in which Black has just played a6 in order to try the typical b7-b5 breakthrough. Queens have already been exchanged, which left each player with three minor pieces and two Rooks.
In the next few moves, we see the Chinese Grandmaster revealing his intentions very clearly…
- g4! Bc6
- b4! Be8
- g5 Nd7
- f4 Kf8
- h4 a5
- b5
At this point, White simply has an unbearably huge space advantage. If you look at Black’s Bishop on e8, you will realize that it does not have a single available square to move to at the moment.
This clearly demonstrates how White managed to tie Black down to barely any space in the position, and simply suffocated his pieces – Black would love to have the chance to exchange some pieces, ideally his bad light squared Bishop, but White’s control of the position does not allow him to.
Even if it may seem scary to look at this position from Black’s viewpoint, there are many things Black ought to have done not to get such a passive and cramped position.
We will look at Black’s counterchances soon – but before that, let’s see what other aces might be up White’s sleeve.
Another of White’s most interesting plans is to occupy the d5 square with a Knight, where it will stand on the centre of the board, supported by the c4 and e4 pawns.
Please note that this plan is only possible against the Accelerated Dragon setup, since with the Hedgehog setup Black will be able to control this square with the pawn on e6.
By doing this, White knows that Black might be able to exchange one of his pieces for this Knight d5, most likely the light squared Bishop or a Knight.
While this may sound counterintuitive, since White knows that Black is looking forward to exchange pieces, the truth is that a structural transformation will occur as soon as this exchange is carried out on the board – and this transformation is very likely to favour White, if played correctly.
There are two ways to recapture the Knight on d5 once it is taken: with the c-pawn or with the e-pawn.
Let’s take a look at how this happens in practice.
White recaptures with cxd5
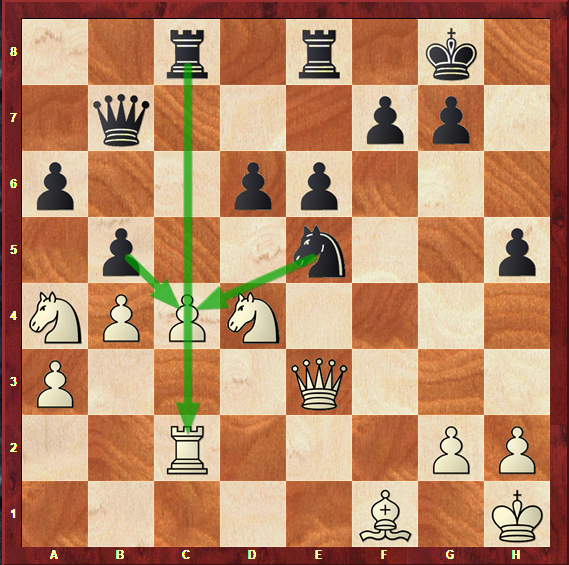
In the game between the two Dutch Grandmasters Jan Smeets and Sergei Tiviakov, from the Netherlands Team Championship of 2013, we see a great example of this structural transformation happening in practice.
The Knight on d5 undeniably exerts great pressure over Black’s position. It controls many key squares, such as e7, f6, c7 and b6. In addition to this, it is right in the middle of the board, which contributes to increasing White’s spatial advantage.
As Black is looking to exchange pieces as soon as possible, and this Knight is one of the strongest in White’s position, it is only natural that an exchange will occur on this square, sooner or later.
By playing the Queen to d7, Black is preparing to capture on d5 with the Bishop, since capturing with the Knight would leave the Bishop squareless. In addition to this, Tiviakov was certainly thinking about bringing a Rook to the c8 square, in order to fight for the control of the c file.
The game went on:
- Be2 Bxd5
- cxd5 Rfc8
- 0-0 Qe8
- Be3 Nd7
- g3 Nc5
- Rc2 a5
- Rfc1
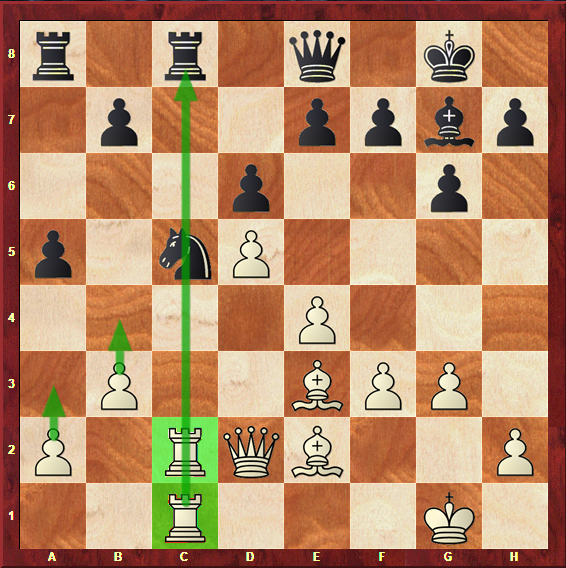
With this move, White prepares to fully control the c-file with both Rooks, and looks to expand on the Queenside with a3 and b4.
Black carried out a typical plan of bringing a Knight into c5, but White’s position is already so dominating that, only in a few moves’ time, we see it being kicked out.
21…b6
- Qd1 Qf8
- a3 Rcb8
- b4 axb4
- axb4
We now see the whole point of White’s plan. Capturing on d5 with the c-pawn gave him a strong control over the c6 square, where a Rook will land once Black’s Knight gets out of the way.
White’s pieces are simply well-placed and he already bears a huge advantage in this position.
However, recapturing with exd5 has its own interesting ideas…
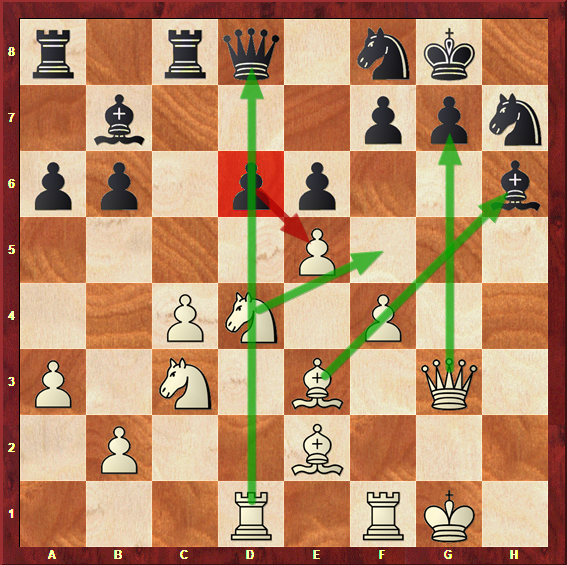
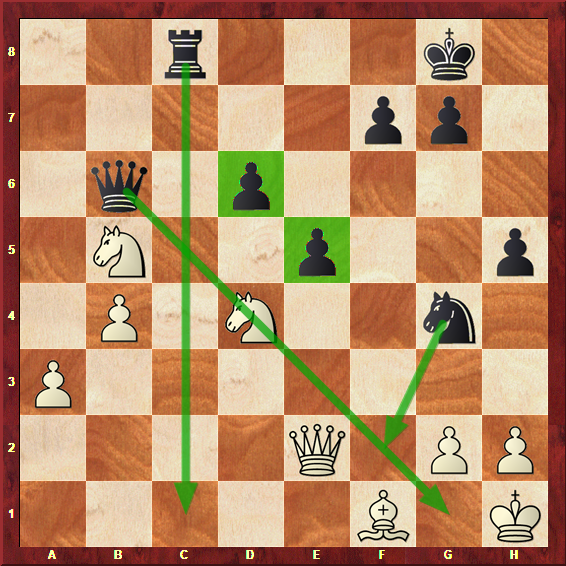
White recaptures with exd5
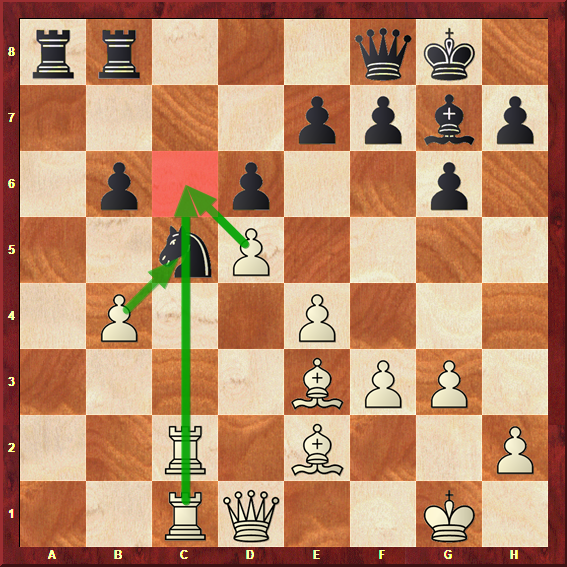
In the game between the American Grandmaster Sam Shankland and the Azerbaijani Grandmaster Gadir Guseinov, an exd5 structural transformation takes place instead.
In this position, we see that White has what looks like an extremely dominating position. That happens because the pawns have already been advanced to f4 and b4, which increased his space advantage.
It must also be noted that White’s Knights are extremely well-placed in the central area of the board, controlling many squares around them.
Since Black lacks space for his pieces, exchanging on d5 is an obvious solution, and that’s precisely what happened next in the game.
17…Bxd5
- exd5 b6
- Bf3 Qb7
- Rfe1 Nb8
- Bf2
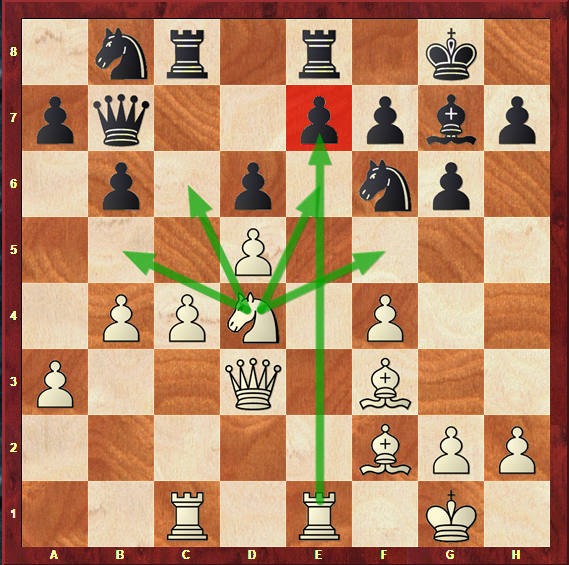
Diagram 1s: Shankland – Guseinov, 2014: Position after 21.Bf2.
Shankland’s position with White is what can be called an ideal setup in the exd5 structural transformation.
The main idea behind this recapture is, of course, to take over the e-file with the major pieces and attack the weakened e7 pawn. This pawn is terribly hard to defend with Black, and will often cause him a lot of trouble.
This sort of dominating play demands an energetic and accurate reply with the Black pieces, regardless of White’s chosen recapture on d5.
In these two examples, the only thing that allowed White to get such a great advantage was the fact that Black was too passive and decided to sit back and wait instead of creating his own threats – soon, you will see how to do much better when you find yourself playing with the Black pieces.
Since this plan is only possible against the Accelerated Dragon setup, let’s take a look at something more universal that White can do: breakthrough with either c4-c5 or e4-e5.
White’s e4-e5 breakthrough
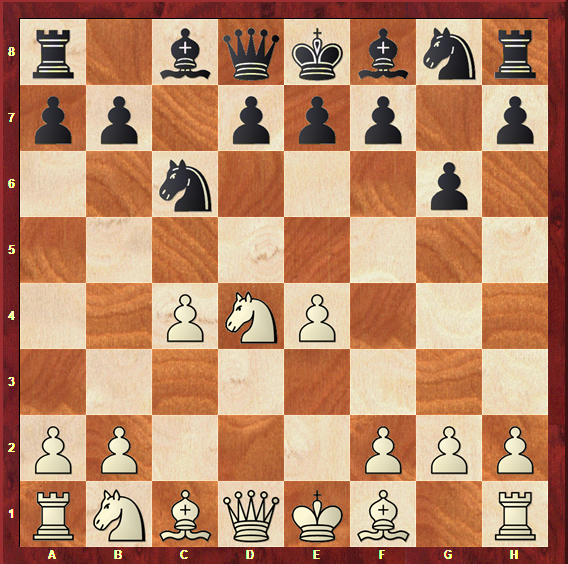
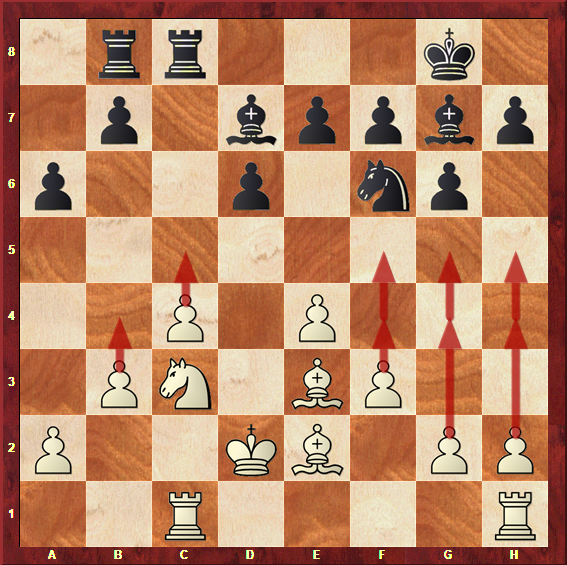
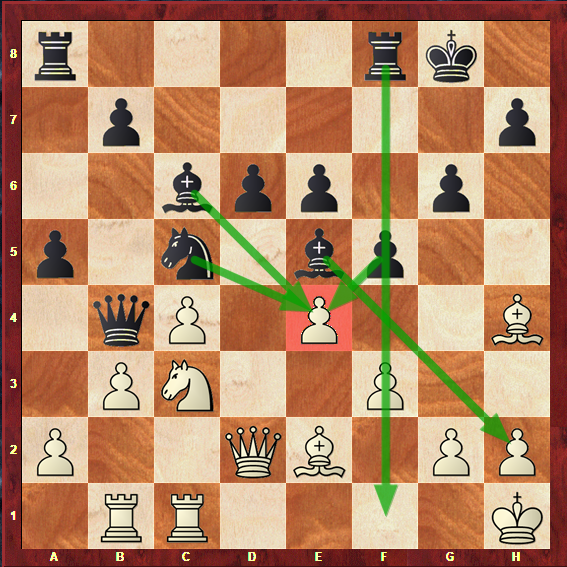
This diagram has been extracted from a game played in the World Junior Chess Championship of 2017.
Jorden Van Foreest, a young Dutch chess star, had the White pieces and managed to breakthrough in the centre with e4-e5 under ideal conditions.
This happened because he spent many moves preparing this: he played f2-f4, brought the Queen over to the open g-file and placed an ideal Rook on the d1 square, where it looks at the Black Queen from a distance.
If Black breaks the tension and takes on e5, White can place the Knight on f5, attacking both the h6 Bishop and the Queen, with the help of the d1 Rook.
Even if Black’s light squared Bishop is extremely well-placed on b7, on a long diagonal targeting White’s King, this position is a concrete advantage because White has simply way too many threats against Black’s King and Queen, and there is simply no time to explore the action of Black’s powerful Bishop.
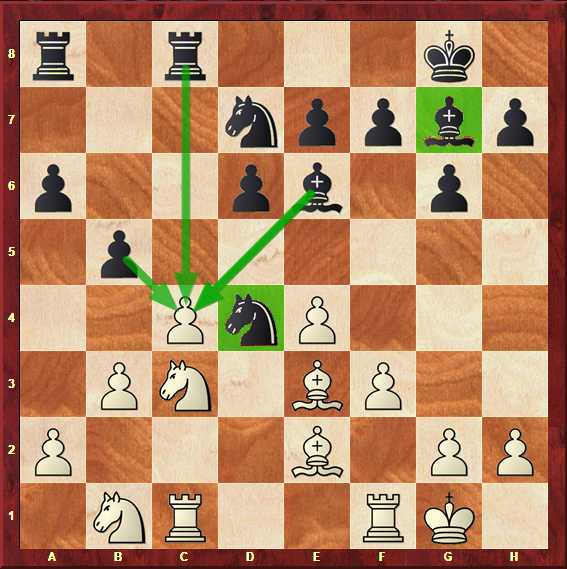
White’s c4-c5 breakthrough
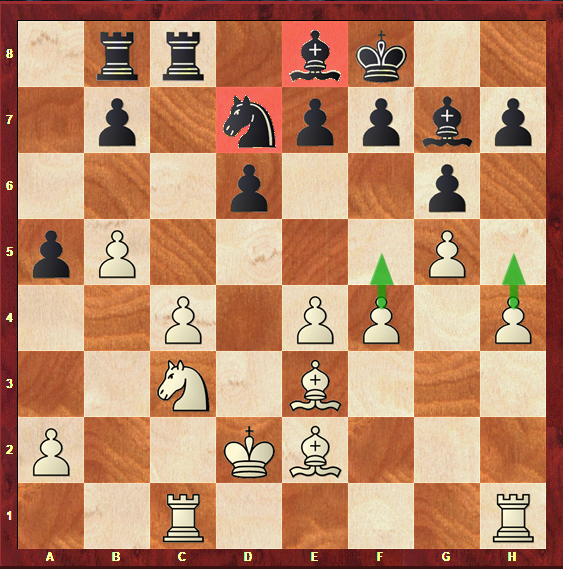
In this game between the Spanish Grandmaster Daniel Alsina Leal and the Georgian International Master Lela Javakhishvili, from the Kavala Open of 2010, White also managed to achieve an ideal version of a breakthrough.
This time, we are talking about the c4-c5 breakthrough.
In diagram 1u, you can see that White’s Rooks are very well-placed on c1 and d1, controlling the files that will be opened once this move takes place.
The Bishop on f4, even if it is most likely to go to e3 on Maróczy style positions, does a great job in this position. That happens because the e5 Knight is attacked by it – and, in turn, this Knight is only defended by the d6 pawn, which is now under fire with the c4-c5 move. The dark square complex of d6-e5 is terribly weakened with White’s idea.
In order to prepare for this breakthrough, you can see that White has pushed the pawn from b2 to b4 to give it more support. The Spanish Grandmaster has also chosen to manoeuvre a Knight to b3, where it also supports the c5 advance and is one step away from going into the central d4 square.
After reading all of these plans, hopefully you feel confident and excited to employ the Maróczy pawn structure with White’s army – but what about Black? Could it be true that this structure simply offers much better chances for White?
Of course not.
We are now going to start looking at what Black can do in order to create his own chances to win the game – and that’s what makes the Sicilian – Maróczy Bind pawn structure so interesting.
If Black carries out the most accurate plans and does not get into a position of passivity, it is very likely that he will be able to fight for the full point and not only for a draw in this structure.
As you know by now, there are two setups that Black can adopt, depending on the chosen opening. These are the Hedgehog setup and the Accelerated Dragon setup.
First, let’s take a look at the most common plans in the Hedgehog setup.
Black’s Hedgehog setup
When Black adopts a Hedgehog setup, he seems to be developing his pieces on the back of the board and not being very ambitious.
However, watch out, because this setup is venomous! Black’s main idea in this system is to breakthrough rapidly and under good conditions, with either b7-b5, supported with a7-a6, or d7-d5, supported with e7-e6.
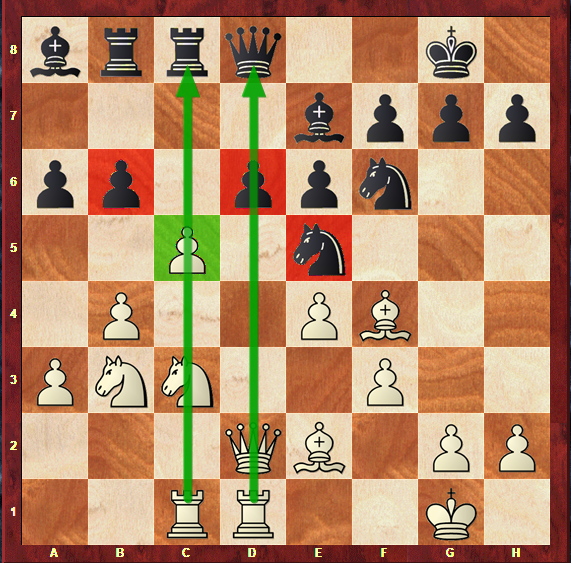
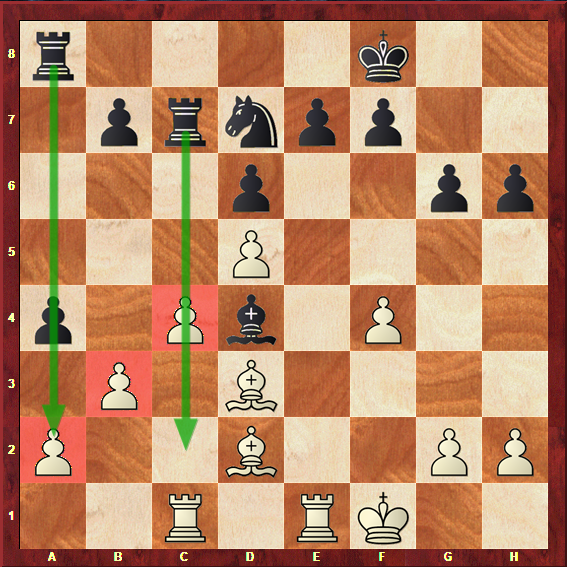
In 2015, a game played in the Plovdiv Bulgarian Open was the clear demonstration of how dangerous the d7-d5 breakthrough can be.
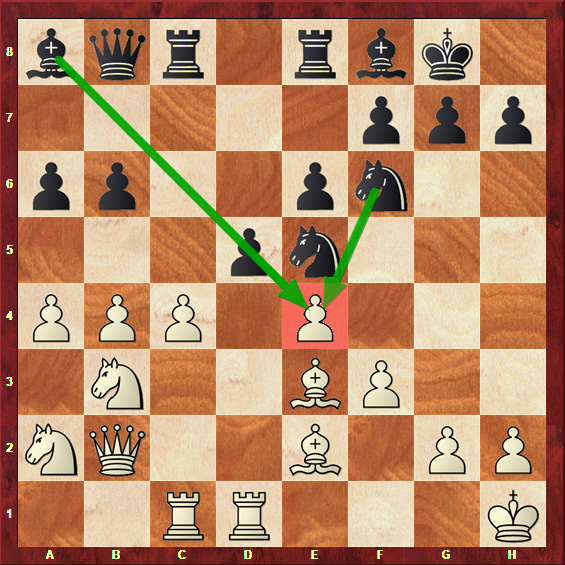
Diagram 1v: Petrov – Tosic, 2015: Position after 20…d5.
By pushing his central pawn, Black defies the whole idea behind White’s pawn setup on c4 and e4, which was to control the d5 square in such a strong way that Black would never be able to push a pawn to it.
With this move, all of Black’s pieces regain purpose: the Knight on f6 will be perfectly placed on d5 if the pawn gets taken, attacking the e3 Bishop, and the a8 Bishop has a whole new life on the nearly open long diagonal towards White’s King.
The d7-d5 move was so powerful that White was forced to resign in only a few moves’ time:
- cxd5 exd5
- Bxa6 Rxc1
- Naxc1 dxe4
- fxe4 Neg4
- Bg1 Nxe4
- Nd3 Ng3+ 0-1

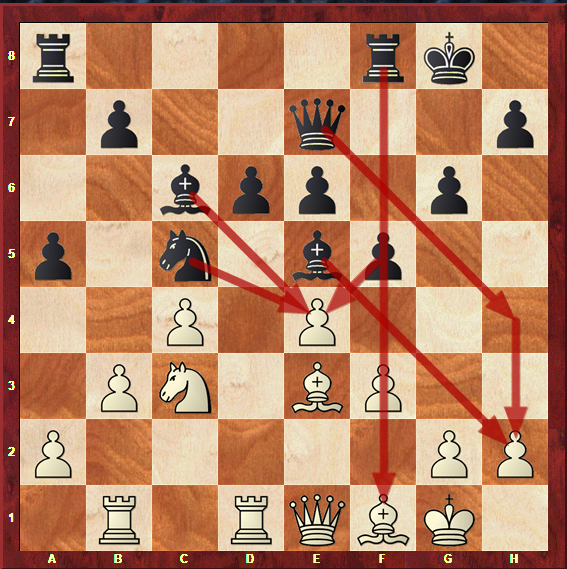
Black’s attack is deadly and checkmate is to come in only a few moves, hence White’s resignation. Looking at Black’s pieces, we can see the Queen and Bishop staring at the King from a distance, and the two Knights creating all sorts of threats around it – all of this was enabled by the d7-d5 central breakthrough.
As you have read before, another plan that can bring Black an enormous amount of activity is to breakthrough on the Queenside with the b7-b5 advance.
Take a look at diagram 1x, extracted from the game Shytaj – Smirin, from the European Chess Championship of 2010.
Black’s idea of breaking the position open on the Queenside was just right in this position. The Knight on e5 and Rook on c8 are perfectly placed to challenge the c4 pawn, and get very active once this pawn is exchanged.
In only a few moves, we see all of Black’s pieces getting into action – quite ironically, this time it is White that is condemned to eternal passivity.
- cxb5 Rxc2
- Nxc2 axb5
- Nc3 Rc8
- Nd4 Qb6
- Ncxb5 Ng4
- Qe2 e5 0-1
Black has central control and his Queen and Knight direct some very dangerous threats against White’s King. The Rook is also extremely active, having the exclusive ownership of the c-file.
The b7-b5 push gave Black such an active and controlling position that White was forced to resign on yet another Maróczy Bind game.
These are the two main ideas that players can adopt when using the Hedgehog setup – we will now move to the Accelerated Dragon setup, the one that shows up most often in practice.
Black’s Accelerated Dragon setup
By choosing an Accelerated Dragon setup, Black decides to fianchetto his dark-squared Bishop on g7 and adopt a straightforward strategy of controlling all of the dark squares in the position.
In the Accelerated Dragon setup, the d7-d5 breakthrough is not very common, as Black does not always want to move the pawn to e6 to support it. The reason behind this choice is that he has already moved g7-g6, significantly weakening the dark squares around the King, and e7-e6 would, for instance, leave the f6 square without any protection at all.
However, other ideas are common: the b7-b5 breakthrough is still a common theme, as well an a5-a4 advance in order to put as much pressure as possible on White’s Queenside pawns. A completely different but possible idea is, as mentioned earlier, to generate a Kingside attack with the f7-f5 breakthrough.
Let’s start by looking at yet another b7-b5 push idea, this time in the Accelerated Dragon system.
Diagram 1z was extracted from a blitz game, but its analysis is very valuable since the players were extremely strong and experts in the Sicilian – Maróczy Bind pawn structure.
Once again, this breakthrough proves itself essential for Black’s creation of counterplay and winning chances.
With the help of the light squared Bishop on e6 and the Rook on c8, as per usual, Black manages to exert an enormous pressure on the c4 pawn.
It must also be said that the dark squared Bishop on g7 does a wonderful job on controlling the whole long diagonal, as well as of supporting a very strong Knight on the mighty d4 square.
However, the most typical push of the Accelerated Dragon is a5-a4 instead of b7-b5. This advance invites White to come forward and expand with either b2-b3 or b2-b4, and Black’s idea will be to pressure the whole Queenside, looking to create a weak pawn in White’s field that could be exploited in a later endgame stage.
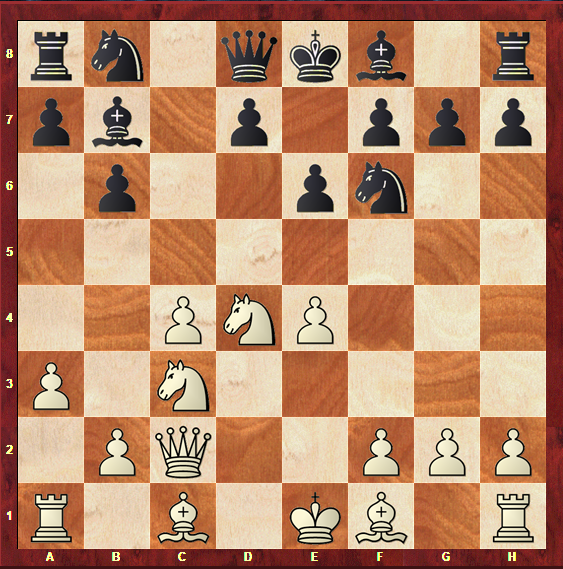
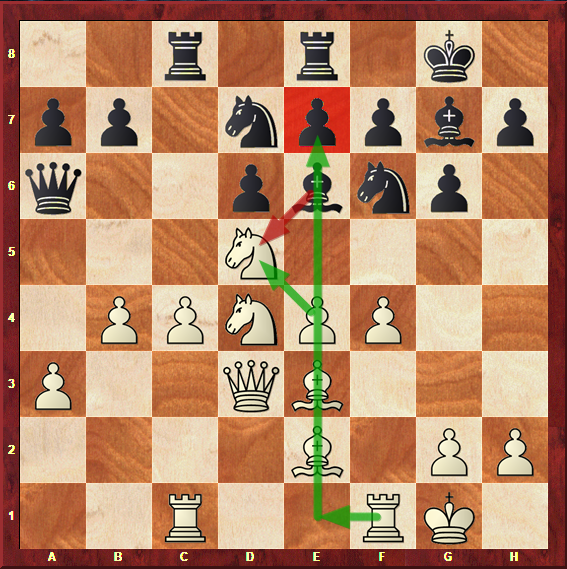
A model game in which Black showcases this plan is Rowson – Malakhov, from the Selfoss Milk Masters Tournament of 2003.
At this stage of the game, Black begins to make his intentions very clear. He has just pushed the pawn to a4 and placed the Rooks on the c8 and a8 files, the ones that are most likely to open with this breakthrough.
During the course of the game, we see Black expanding even further.
- b4 Rac8
- Re4 Bb2
- Rc2 a3
We can see that White’s b3-b4 push has significantly weakened the c4 pawn, and that Black has already re-routed his Rooks in order to attack it in the most efficient way.
Black has also managed to place a Bishop on b2, right at the heart of the enemy’s field, where it stands supported by the a3 pawn.
The game continued:
- Bc3 Nb6
- Bxb2 axb2
- Rxb2 Nxc4
- Rf2 Nb6
- Rd4 Rc1+
- Ke2 Ra8
- Ke3 Ra3

You can see it for yourself by looking at diagram 2c: Black’s pieces entirely dominate White’s. The Bishop is pinned to the King, and the Rooks are disconnected and purposeless on d4 and f2. The King is clearly unsafe in the middle of the board, and Black’s Rooks and Knight are perfectly placed to target it as soon as possible.
Last but not least, the f7-f5 breakthrough is also an ace up Black’s sleeve.
In the game between Kaidanov and Iturrizaga Bonelli from the American Continental playoff of 2017, we see how Black energetically creates an attack that seems to come out of nowhere.
Black has built an attacking setup by bringing the Bishop into e5, where it eyes the h2 pawn, and pushing the pawn to f5.
This breakthrough has both positional and tactical ideas: while the tactical part is to simply try and checkmate White’s King, the pressure on the e4 pawn is a strategic idea that Black can also deeply explore.
The game went on:
- exf5 Rxf5
- Bg3 Bxg3
- hxg3 Rh5+
- Kg1 Nxb3
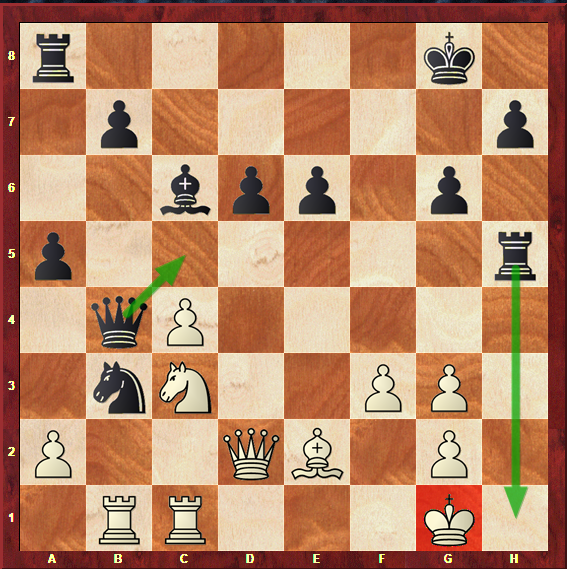
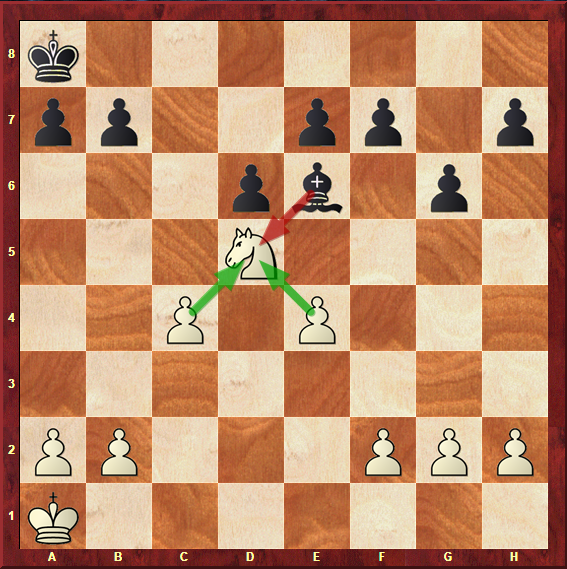
Diagram 2e: Kudainov – Iturrizaga Bonelli, 2017: Position after 23…Nxb3.
Nxb3 was a fine tactical trick. The Knight cannot be taken as Qc5+ followed by Rh1 will be mate, and Black picks up an important pawn that breaks apart White’s Queenside.
Kudainov still put up a tenacious fight, but Iturrizaga Bonelli ended up scoring a great win with the Black pieces, by generating this dangerous attack.
And that’s a wrap in which concerns plans in the Sicilian – Maróczy Bind pawn structure!
Let’s now take the time to write down the plans we should remember for both sides playing the position.
White’s plans
- Expand on the Queenside and Kingside, with the b2-b4 and f2-f4 advances;
- Place a Knight on d5 and expect a favourable structural transformation – choose between cxd5 or exd5, with the idea of putting pressure on the newly open file after that;
- Breakthrough with either c4-c5 or e4-e5;
Black’s plans
- Exchange pieces to alleviate the space problem;
- On the Hedgehog setup, breakthrough on the Queenside with b7-b5;
- On the Hedgehog setup, breakthrough in the centre with d7-d5;
- On the Accelerated Dragon setup, control the dark squares with the aid of the fianchettoed Bishop;
- On the Accelerated Dragon setup, breakthrough on the Queenside with b7-b5;
- On the Accelerated Dragon setup, advance a7-a5-a4 and try to create weaknesses on White’s Queenside;
- On the Accelerated Dragon setup, breakthrough on the Kingside with f7-f5, trying to generate an attack;
Finally, let’s summarize everything we have learned about this structure.
Conclusions
After an extensive coverage of games, ideas and plans, we have finally come to an end of our take on the Sicilian – Maróczy Bind pawn structure.
As you may now feel, this structure offers chances for rich and interesting play, where both sides will have the chance to dictate the final result and strive for accurate play when doing so.
The conclusions we can draw from this article are:
- The Maróczy Bind pawn structure offers chances for positional, rich play for both sides;
- This structure can be reached by the Accelerated Dragon, Kan and Taimanov Sicilians, the Petrosian Variation of the Queen’s Indian Defence, and the English opening;
- It was commonly believed that White had a clear edge in this structure due to the space advantage and lead in development;
- However, modern theory and practice have shown that Black also has excellent chances in this structure;
- White will try to expand on both sides of the board and place a Knight on d5, with the help of some breakthroughs, to increase his advantage and tie Black’s pieces down;
- Black will try to breakthrough in the centre, Queenside or Kingside, trying to generate weaknesses in White’s field with active and precise play;
With these conclusions, it is fair to congratulate you for reaching the end on yet another pawn structure article.
Your dedication will certainly soon show in your results and overall improvement – be ready for many more thrilling chess articles coming your way!