
Welcome to one more exciting chess structure: today’s theme is the Boleslavsky hole in the Sicilian defence.
If you are a fan on actively fighting for equality right from the beginning of the game, then the Sicilian Defense is probably for you: this opening provides us with games full of tactical resources and rich in strategic themes.
The Boleslavsky hole is a typical Sicilian structure, named after the soviet Grandmaster Isaac Boleslavsky, as this formation appears in the Boleslavsky variation of the Sicilian. This variation was his most important contribute for chess theory. You might feel like this is not the first time that Boleslavsky’s name appears on a chess structure: his legacy also includes the King’s indian – Boleslavsky wall structure, whose article you can check here.
This structure is many times referred as the typical Najdorf pawn formation. However, it should be noted that many variations of the Sicilian can ultimately lead to this pawn structure.
In the Open Sicilian, Black often moves his pawn to e5, creating a hole in his structure: the d5 square. The d6 pawn is left backwards. Why would Black willingly create a hole in is own pawn formation? The most interesting thing about this structure is that, by creating this structural weakness, Black often equalizes the game.
In this structure, it often happens that an entire game is played around one single strategic goal: the control of the d5 square. Although this may not seem very exciting, you shouldn’t think that these games will be slow , or with little chances for both sides: opposite flank attacks often appear in the board when playing this structure, as well as central breaks and tactical resources.
Without taking any longer, let’s now get to the real matter, so that you will be able to master this crucial pawn structure.
What does the Sicilian – Boleslavsky hole structure look like?
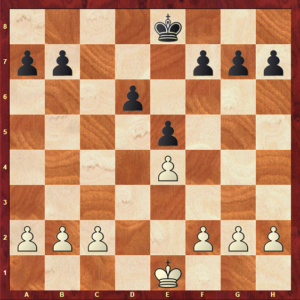
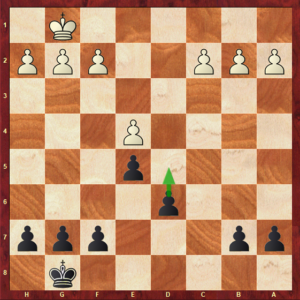
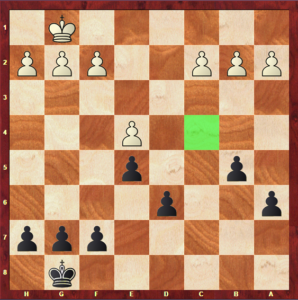
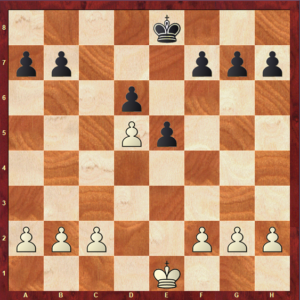
Take a good look at the diagram above: this is the pawn formation which we will study in this article. The so called “Boleslavsky hole” is the d5 square on the Black’s position, caused by the exchange of Black’s c-pawn and the advance of the e-pawn to e5, leaving the d5-square unprotected.
The first thing to note in this position is that, as in every Open Sicilian, Black’s c-pawn was exchanged for White’s d-pawn. This leaves Black with an extra central pawn, which can be an advantage: as you know, central pawns are very important and usually play a more significant role in the game than other pawns. However, this pawn exchange also leaves White with a majority on the Queenside, that can be important: for example, it allows White to castle on this side of the board.
The d5-square is the most important feature of this structure: gaining control of it can be responsible for a successful or even winning position. It is crucial to understand that this square is theoretically weak because Black has no pawns to defend it. However, this doesn’t mean that having this hole on his structure makes Black’s position worst: if he manages to control it, he can fight to win the game, as in these positions Black almost always manages to accomplish equality from an early stage.
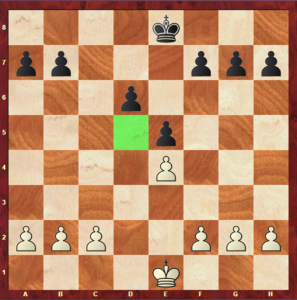
Another thing that should be stated is that the advance of the e-pawn caused not only an hole on d5, but also a backward pawn on d6. Black will have to be extremely careful and make sure White cannot attack this pawn, otherwise it might become a decisive weakness.
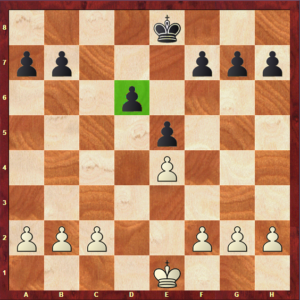
By now, you probably already know that backward pawns are structural weaknesses, however, in practice, they are only a disadvantage if they can be attacked. As usual, attacking them is a lot easier in a endgame. During the middlegame, it is unusual for White to be able to take this pawn, as Black has a lot of pieces to defend it.
As you can easily conclude, in this structure, there are a lot of imbalances to take into account. A lot of them are caused by Black’s advance of the e-pawn to e5. This advance might cause some structural weaknesses, but it does give Black some more control of the centre. Also, with this move, Black gains some important space, and can also kick out a piece (usually a knight) from the important d4-square.
It is usual on this structure for White to place a knight on d5. However, it sometimes happens that this knight is exchanged, and White is forced to take back on e5 with his d-pawn. In result, we have a transposition to the following structure:
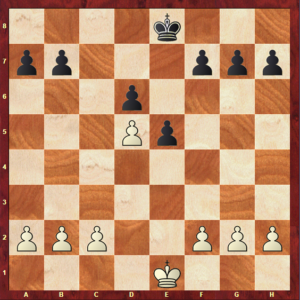
In this structure it is a lot harder for White to take advantage of the d6-pawn, and there is no longer a hole on d5. On the other hand, the Queenside majority has been reinforced, which could be an advantage for White.
It is important to understand the pros and cons of this transposition in order to make good decisions in your games. Depending on the position, this could be better or worse than the original structure.
However, White often prefers to have the opportunity to take back with a piece on d5, in order to maintain the control of this square. Because of this, he has to make sure that he has an extra piece defending this square, and so it is not always easy for him to find a way to securely place a piece on d5, controlling it.
Moving on, let’s get to the next section and discuss the most important characteristics of the Sicilian Boleslavsky hole pawn structure.
What are the characteristics of this pawn structure?
In this section, we will cover the most important features that characterize this pawn formation. These are very important in order to understand the possible plans when playing this kind of positions.
The character of this game is dynamic. It could be fatal for both sides to waste time, once their major plan is the same: to control the d5-square.
Besides this plan, it is usual for White to develop a kingside attack, whereas Black’s play will be more concentrated on the Queenside. Opposite side castling often happens in this structure, and when it does precision and accuracy are extremely important, as minor errors could lead to your opponent’s attack being quicker than yours. Balancing defending the side of the board where your opponent is attacking you with attacking on the other side and, at the same time, fight for the control of the centre, in not easy. This is why this structure leads to so exciting games: there is a lot happening at the same time.
As stated before, the main characteristic of this structure is the hole on d5. However, we also referred that it is hard to take advantage of it in an immediate way, because of the following reasons:
- Black will also try to defend this square in order to prevent White from placing a piece there.
- Even if White manages to place a piece in this square, if Black can exchange it, it might lead to a structural transposition after White takes on d5 with a pawn, in which White’s possibility to explore the hole and the backward d6-pawn is eliminated.
Because of this, both White and Black have to explore some indirect ways to control the d5-square. For example, a common theme for White is trying to kick out Black’s defenders of the d5-square by attacking them, in order to leave this square more vulnerable.
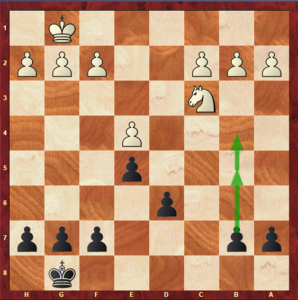
White’s dream in this position is to place a knight on d5 (usually the knight on c3), one idea for Black is to attack this knight before it is safe for it to go to d5. In this way, White would have to move his knight away from the control of this square.
Besides that, we shall not forget that we are talking about a Sicilian Defense, and when the name Sicilian is referred, the themes that instantly pop in our heads for Black are the control of the c-file, and the central breakthrough on d5.
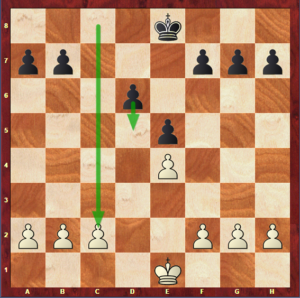
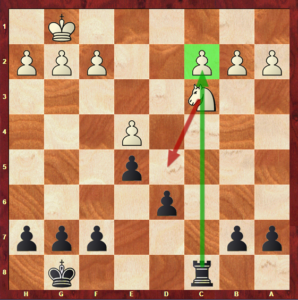
The control of the c-file in these positions is usually related to the control of the d5-square. Although this might seem senseless at first sight, in chess, everything is connected, and this is not an exception: controlling the c-file often makes it harder for White to move his c3-knight to d5, as it would leave the c2-pawn unprotected or vulnerable.
The d5-break would obviously completely solve Black’s structural issue: the d-pawn would no longer be backward and the hole would disappear. Black would probably get at least an equal position, gaining control of the centre.
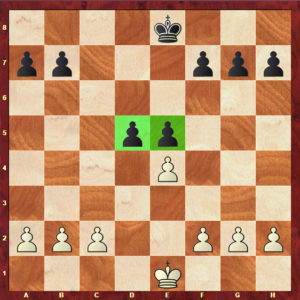
White can stop all of this going c2-c4. However, this would give Black the possibility of a counterattacking on the Queenside with …b7-b5.

It was mentioned before that this structure usually leads to attacking games. As you know, an attack can only be secure if the side that is attacking has the control of centre, or if the centre is closed. Once Black has an imminent threat of breaking the centre with …d6-d5, White has to make sure that the centre is fixed and stable in order to start a pawnstorm. This is the main reason why the control of the d5-square is such a big deal in this structure: it is not only a weak square for White to take advantage of and place pieces, but also the square where Black wants to disrupt White’s centre, release himself of his structural problems and fight for an advantage.
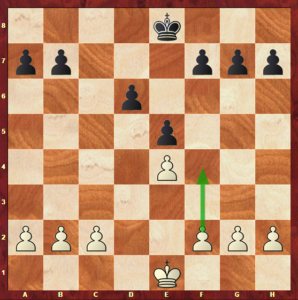
Although the most important break in the centre in these positions is …d6-d5, White can also try to undermine his opponent’s pawn formation with f2-f4 (or f3-f4).
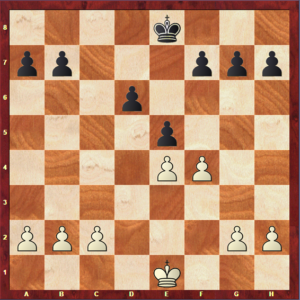
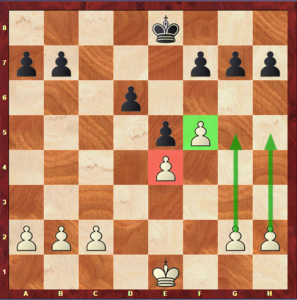
The f2-f4 break often results in a further advance of the f-pawn to f5. This gives White more chances to build a strong and successful kingside attack. However, this advance leaves the e4-pawn backwards, and therefore more vulnerable. Because of this, White has to take into account Black’s possibilities of exploring it before advancing the f-pawn.
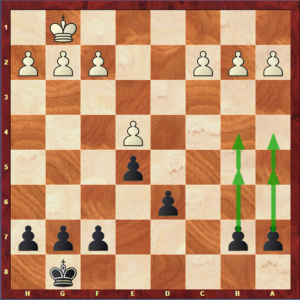
When we looked at the original structure for the first time, it was also referred that White has a majority on the Queenside. Now, it’s time to think a little more about the consequences of this imbalance : Black’s minority on the Queenside can be used to create a minority attack on this side of the board. This often happens while White is attacking on the kingside.
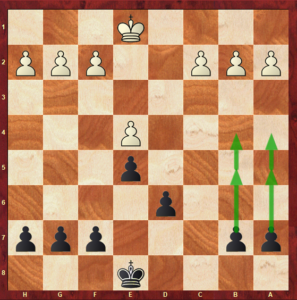
Although it is clear that in this structure the square with most relevance is d5, Black can also try to explore some squares, like the c4-square. This is sometimes an important square for the attack on the Queenside.
Let’s now sum up the characteristics of this structure:
White’s position:
- semi-open d-file
- pawn majority on the Queenside
- possibility of a break on f4, or even of advancing the f-pawn to f5
- control of the d5-square
- possibility of a kingside attack
- possibility of playing c2-c4 in order to control d5
- possibility of castling Queenside due to the pawn majority
Black’s position:
- semi-open c-file
- pawn minority on the Queenside
- possibility of breaking the centre with …d5
- an extra backwards central pawn on d6
- possibility of a Queenside minority attack
- the d5 hole
- possibility of trying to control the c4-square
As you can see, there are a lot of different characteristics present in this position. This is quite a complex structure, however, the games with this formation won’t bore you, for sure.
With all of this in mind, you are now ready to learn how to play in this pawn structure. All the characteristics mentioned are very important in order to understand the possible plans, and how to react to them.
How do you play in this pawn structure?
We finally got to the most important phase of learning a new pawn structure: here we will see what are White’s and Black’s plans in this structure, followed by model games in which these plans are put in practice.
Now that you know the most important features of the positions that arise from this structure, it is time to learn how to use them, play against them, and how they influence the game.
Let’s start by stating what each band can do to improve their positions.
White’s plans:
Placing a knight on d5, making sure he is always able to take back with a piece, and not a pawn
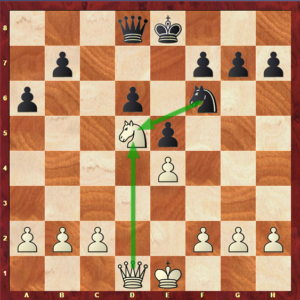
- f2-f4 break
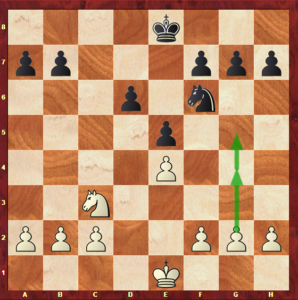
- Expel Black’s defenders of the d5-square:
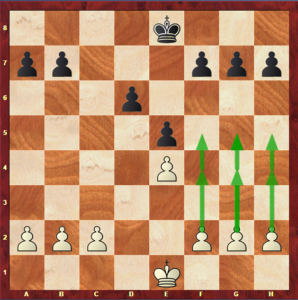
- advancing g2-g4-g5 in order to kick out the f6 knight
2.Play Bg5 and Bxf6 in order to eliminate the f6 knight
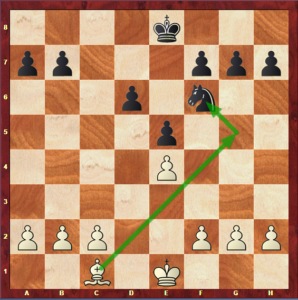
3.Play f2-f4-f5 in order to prevent the Black’s bishop from going to e6, or to expel it if it is already there.
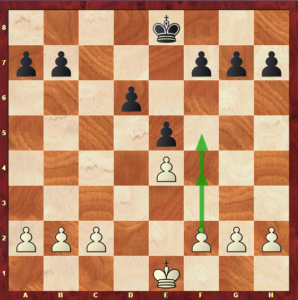
- Attack on the kingside
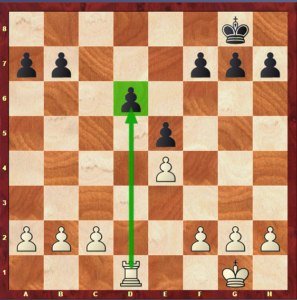
- Explore the d6 backwards pawn and the d-file
Black’s plans:
- Break the centre with …d6-d5 in order to solve the structural issues and fight for and advantage in the centre
- Preventing White’s c3-knight from going to d5:
- Playing b7-b5-b4 in order to expel the knight before it can go to d5
2. Pressure the c-file so that White is unable to take the knight away from c3 because the c2-pawn would be attacked
- Minority attack on the Queenside
- Explore the c4-square
In the first game we will see an example of White’s control of the important d5-square. It was played between Robert James Fischer and Julio Bolbochan.
- e4 c5
- Nf3 d6
- d4 cxd4
- Nxd4 Nf6
- Nc3 a6
- h3 Nc6
- g4
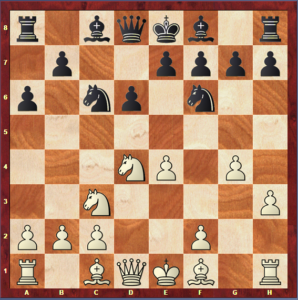
Fischer starts to expand on the kingside right from the beginning. It is logical to conclude that his king wouldn’t be safe on this side of the board, and therefore we will have opposite side castling.
- … Nxd4
- Qxd4 e5
- Qd3 Be7
- g5 Nd7
- Be3 Nc5
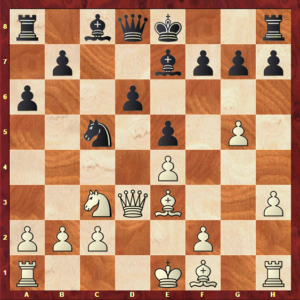
Black placed his knight on the strong c5-square. White does not want to exchange his bishop on e3 for this knight, once it is a very strong piece that will be needed in the attack. Because of this, White simply removes his Queen from the attacked square.
- Qd2 Be6
- 0-0-0 0-0
- f3 Rc8
- Rb1
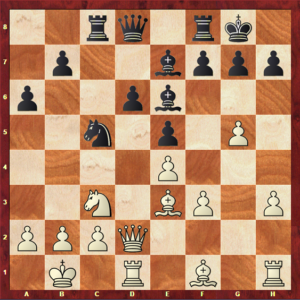
An important typical prophylactic move when castling on the Queenside: it is important for White to remove his king from the dangerous c-file, in order to prevent possible tactical resources.
- … Nd7
- h4 b5
- Bh3 Bxh3
- Rxh3 Nb6
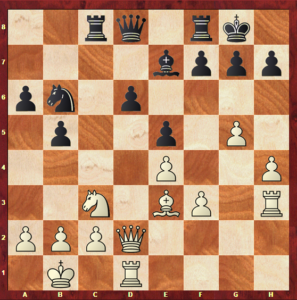
Black has lost too many tempi, and White’s position already looks a lot better with the following continuation:
- Bxb6 Qxb6
- Nd5
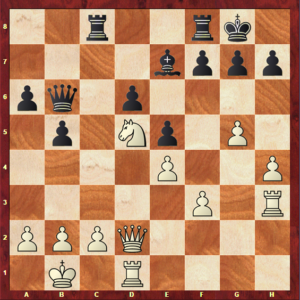
White’s knight on d5 in an extremely powerful piece. On the other hand, Black’s bishop on e7 doesn’t look so good, since the d6 pawn is blocking it. Once Black’s bishop is the dark-colored square bishop, and d5 is a white square, Black is unable to kick out White’s knight from this square. With this, White has managed to control the crucial square, fix the centre and the d6 weakness.
- … Qd8
- f4 exf4
- Qxf4 Qd7
- Qf5
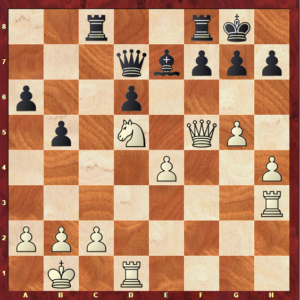
Attacking White’s Queen. Black cannot exchange Queens due to: 23… Qxf5 24. Nxe7+ Kh8 25. Nxf5, winning a piece.
- … Rcd8
- Ra3 Qa7
- Rc3 g6
- Qg4 Qd7
- Qf3 Qe6
- Rc7 Rde8
- Nf4 Qe5
- Rd5 Qh8
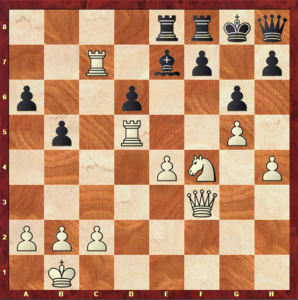
White has full control of the game, which he will now convert into a winning attack.
- a3 h6
- gxh6 Qxh6
- h5 Bg5
- hxg6 fxg6
- Qb3
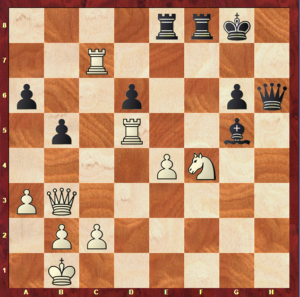
This move is full of serious threats. The best defence would be to take the king out of White’s powerful diagonal, playing Kh8, though this position is still completely lost for Black.
- … Rxf4
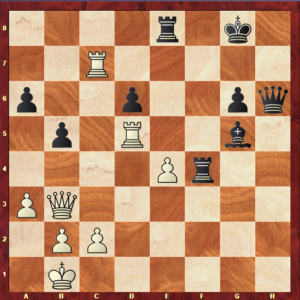
The final decisive mistake: take a good look at this position and see if you can find out how Fischer won the game! It ends with a beautiful combination:
- Re5+ Kf8
- Rxe8
1-0
Bolbochan resigned in this position, once we would be checkmated very soon with:
- … Kxe8
- Qe6+ Kf8
- Qb8+ Bd8
- Qxd8++
In this game, the d5-square was crucial for White to be successful with his kingside attack, since it allowed him to control and fix the centre, and stopped Black’s initiative.
Black must not allow this, and has to take control of this square and to be quicker with his Queenside attack, as we will see in some of the next examples.
We will now see a game between Alexander Kovchan and Denis Khismatullin in order to learn more about Black’s plan of breaking the centre with …d6-d5 and taking over the initiative.
This game will illustrate not only the …d6-d5 break, but also a lot of other typical plans in this structure.
The game starts with:
- e4 c5
- Nf3 d6
- d4 cxd4
- Nxd4 Nf6
- Nc3 a6
- Be2 e5
- Nb3 Be7
- Bg5 Be6
- Bxf6 Bxf6
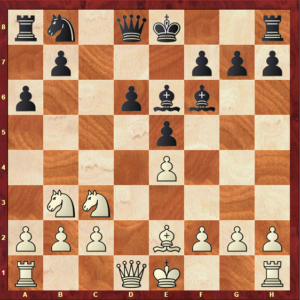
White has exchanged his dark-square Bishop for the f6 knight, in order to eliminate this defensor of the d5-square. Black has placed his bishop on e6, trying to control d5.
- Qd3 o-o
- 0-0 Nc6
- Nd5 Bg5
- Rad1 Rc8
- c3 Ne7
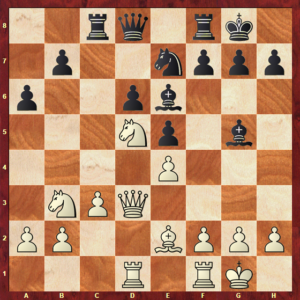
Challenging White’s control of the d5-square. In this position, White doesn’t want the transposition after taking with a pawn on d5 and, because of this, feels forced to take his knight out of this square.
- Ne3 Rc6
- Nd2 b5
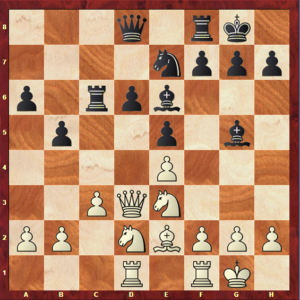
Black starts the expansion of his minority on the Queenside, gaining space and fixing the c4-square.
- Nf3 Bxe3
- Qxe3 Qc7
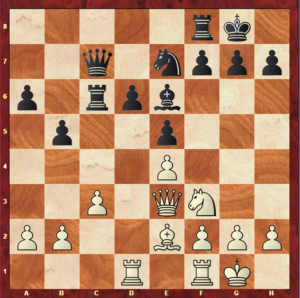
Black managed to exchange the only minor piece that was controlling the d5-square, preparing the central break carefully.
- a3 f6
- Ne1 d5
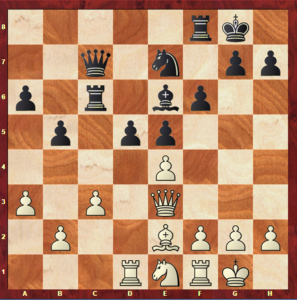
Finally reaching the so well-prepared …d6-d5 breakthrough. Black’s position looks better as his pieces are better placed and he has now won the control of the centre.
- f4 exf4
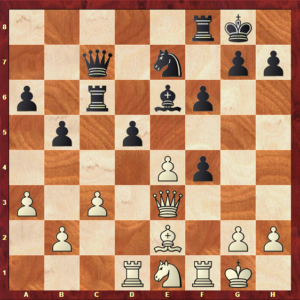
White feels the need to fight for the centre and f2-f4 is the right move to do so.
- Rxf4 Ng6
- Rf2 dxe4
- Qxe4
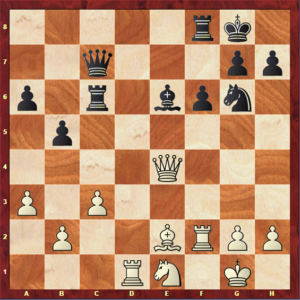
Every pawn in the centre was exchanged, leaving us with a position in which Black managed to release himself from all the structural struggles.
- … Bb3
- Rd4 Re6
- Qg4 Ne5
- Qg3 Qe7
- Nf3 Nxf3+
- Qxf3 Re8
- Bf1 Re1
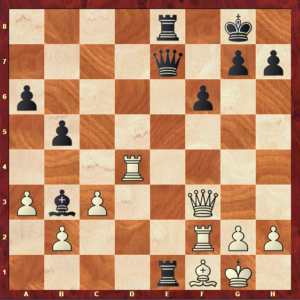
Black’s pieces on the d-file are very active, and now that he is controlling the 8th rank he is definitely better.
- h3 Bc4
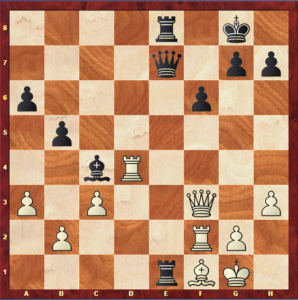
The move h3 was an imprecision since it allowed Bc5. Black enjoys a great advantage in this position since White’s f1 Bishop cannot move.
- Rd1 Qc5
- b4 Qg5
- Rxe1 Rxe1
- Kh2 Qe5+
- g3 Bxf1
- Rxf1 Re3
- Qa8+ Kf7
- Rf3
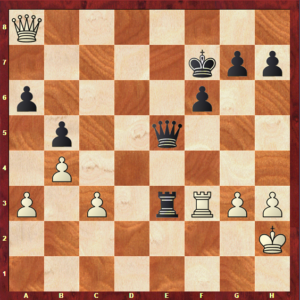
A mistake, though it is hard to find anything good for White in this position. This move allows Black to explore even more the weak 1st and 2nd White ranks.
39… Re2+
- Kg1 Kg6
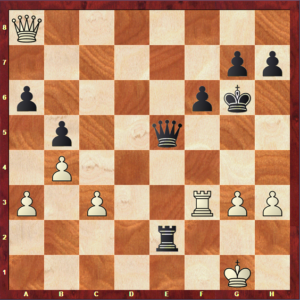
A strong move that stops all of White’s possible counterplay on the 7th and 8th ranks. Now Black is free to explore White’s exposed King, as he is threatening to play Rd2 and enter with the Queen on e1
- Qa7 Re1+
- Kg2 Qe4
- g4 Re2+
- Kg3 Qe5+
- Kh4
0-1
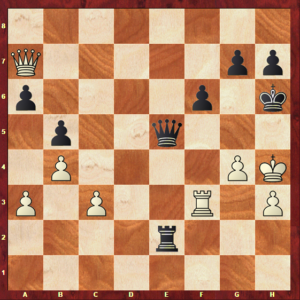
White resigns, as it is impossible for him to get rid of the …g7-g5++ threat.
In this game there was a lot going on, and almost all the plans that we stated in the beginning of the section were used: we saw the …d6-d5 break, but also other important themes. The elimination of the d5-square’s defensors played an important role in White’s attempt to control this square. Also, the move f2-f4 was very important for White not to lose the control of the centre. Besides that, we also saw Black’s expansion on the Queenside and the control of the c4 square, which was very important in this particular game, functioning as an outpost to Black light-squared bishop, a crucial piece in this game.
All of these plans combined resulted in a very complex game, with a lot of possibilities for both sides. However, in this game, Black managed to gain a better control of the d5-square, which was very important and in some way responsible for the final result.
Let’s now see a game in which White uses the move c2-c4 in order to control the d5-square, and succeeds at doing so. Hopefully, this game will illustrate that Black cannot remain passive when White chooses to play c2-c4, and must react with the key move b7-b5. Also, it is an example of how White can convert the total control of the d5-square into a winning position.
This game was played between Sergei Tiviakov and Viswanathan Anand in 2012.
- e4 c5
- Nf3 d6
- Bb5+ Nd7
- d4 cxd4
- Qxd4 a6
- Bxd7+ Bxd7
- c4 e5
- Qd3 h6
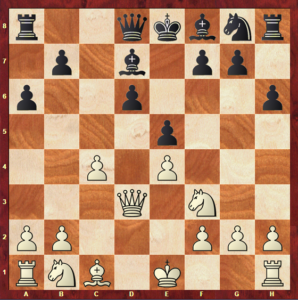
This move is nowadays considered to be too slow. Although it has a good point, preventing White’s plan of going Bg5 and then BxNf6, it doesn’t fight directly against the move c2-c4. Because of this, …b7-b5 instead is considered to be a good option in this position.
- Nc3 Nf6
- 0-0 Be7
- a4 b6
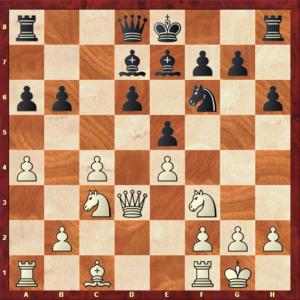
This move was an imprecision, since the b-pawn is more vulnerable now than he was on b7.
- b3 Ra7
- Rd1 Bc8
- Ba3 Rd7
- Nd2 0-0
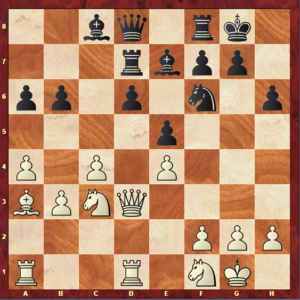
White starts to maneuver his knight so it can reach the d5-square. Black’s pieces are tied up because his own pawns are blocking them. Black has lost the control of the d6-square and lacks space to correctly place his pieces.
- … Bb7
- Ne3 Re8
- Ncd5 Nxd5
- Nxd5 Bxd5
- Qxd5 Qa8
- Qxa8 Rxa8
- Rd5
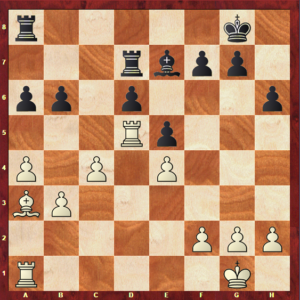
White has reached a position in which he has total control of the d5-square. The fact that he managed to always take back with a piece was very important, and that is why the occupation of this square had to be so well-prepared.
Now that so many pieces were exchanged, Black has reached an endgame in which is d6 backwards pawn is a real weakness, as it oblies the Bishop to be defending it at all times.
- … f6
- Rad1 Rad8
- g3 g5
- f4
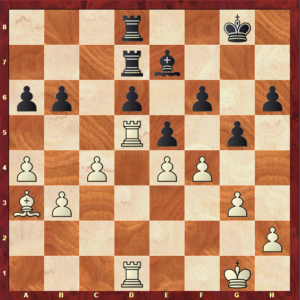
Breaking Black’s structure in order to create even more weaknesses for White to explore.
- … gxf4
- gxf4 Kf7
- Kf2 exf4
- Kf3 Ke6
- Rc1 Rc8
- Bxf4 Bf8
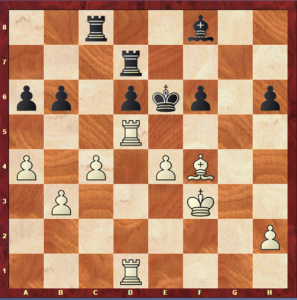
White is in a dream position: all of his pieces are perfectly placed in order to control everything in Black’s position. It is important to note that White’s isolated e4-pawn is not a weakness: actually, it is very strong in the way that it helps with the control of the d5-square, creating the two important outposts, d5 and f5. Besides that, Black can’t do anything in order to attack this pawn, and because of this it can’t be considered weak.
- h4 Rc6
- h5 Rb7
- Be3 Rb8
- Bd4 Rc7
- Rg1 Bg7
- Rg6
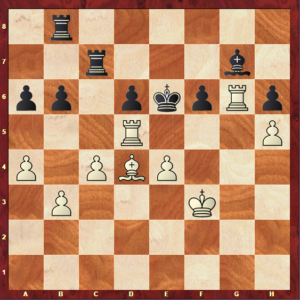
White keeps improving his position, since there is nothing Black can do to try to find counterplay.
- … Rf7
- Be3 Rd7
- Rf5 rF7
- Kg4 Bf8
- Bxh6 Bxh6
- Rxh6
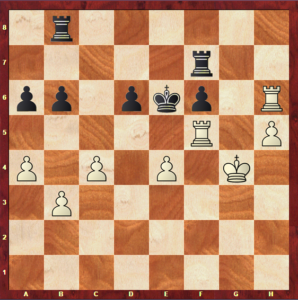
White finally wins material and reaches a winning endgame. It is now a matter of time:
- …Rg7+
- Kf4 Rf8
- a5 Rg1
- axb6 Rb1
- b7 Rxb3
- e5 dxe5+
- Rxe5+ Kd6
- Rf5 Ke6
- Rh7 Rd8
- Rd5
1-0
Black resigned, as the endgame is completely lost.
Hopefully, in this game, it was noticeable that Black must react quickly to the direct threat of controlling the d5-square with c2-c4. Remaining passive in this position leads to the loss of control of the centre: always keep in mind the key move …b7-b5.
Now that we saw the typical plans in this structure in motion, let’s see how you can reach this structure in your games in order to apply all that you have just learnt.
How do you reach this pawn structure?
Let’s find out what are some of the most common ways to get a position in which this structure is present.
As you already know, this structure is typical of the Open Sicilian. We will see what are some of the variations in the Sicilian that can lead to this pawn formation.
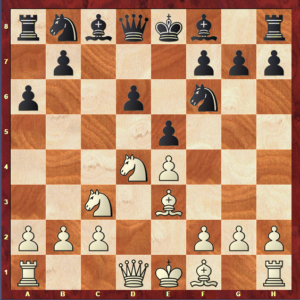
The sicilian Najdorf is probably the most common way to reach this structure:
- e4 c5
- Nf3 d6
- d4 cxd4
- Nxd4 Nf6
- Nc3 a6
- Be3 e5
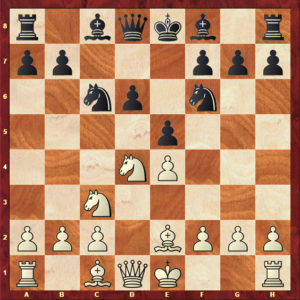
Another common way of reaching the same pawn structure is the Classical Sicilian:
- e4 c5
- Nf3 d6
- d4 cxd4
- Nxd4 Nf6
- Nc3 Nc6
- Be2 e5
The Sveshnikov variation often leads to this kind of positions as well:
- e4 c5
- Nf3 Nc6
- d4 cxd4
- Nxd4 Nf6
- Nc3 e5
- Ndb5 d6
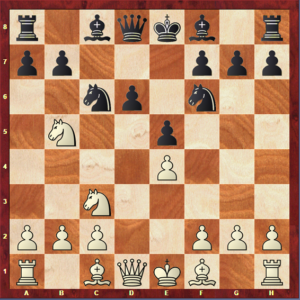
The Kalashnikov variation, closely related to the Sveshnikov, leaves us with the same structure:
- e4 c5
- Nf3 Nc6
- d4 cxd4
- Nxd4 e5
- Ndb5 d6
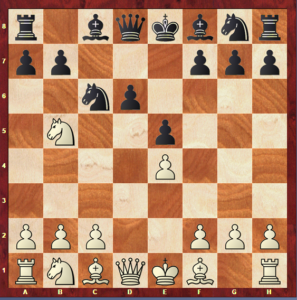
Finally, the Sicilian O’Kelly is also a possible way of reaching this structure, though not as common as the ones mentioned before:
- e4 c5
- Nf3 a6
- d4 cxd4
- Nxd4 Nf6
- Nc3 e5
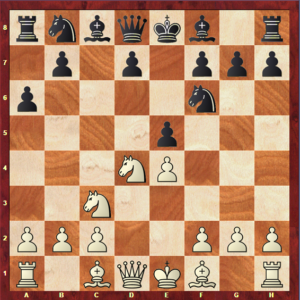
These are just some of the possibilities of getting into this structure with the Sicilian Defense. However, this pawn formation can appear on your board in many other variations, once Black decides to advance his pawn to e5, creating our famous Boleslavsky hole on d5. Because of this, even if you don’t play any of this lines (or if you don’t play the open sicilian at all) it is important to keep this strategic themes in mind, since they can apply to many other positions.
Conclusions
You have just reached the final section of this article! It is now time to sum up everything that you have learnt so that you won’t forget to apply this knowledge in your games.
Let’s point the most important things about this structure:
- This structure has a lot of imbalances, therefore it is very complex and there are a lot of strategic themes to take into account when playing it.
- The Boleslavsky Hole is the name given to the hole left on d5 due to the advance of Black’s e-pawn. Black advances this pawn in order to gain initiative, but this square could end up being a serious drawback if White manages to control it
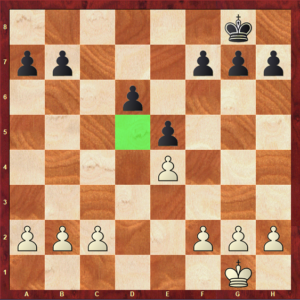
- A lot of the plans in this game will be connected to the control of the d5-square, as this is a crucial feature of this structure
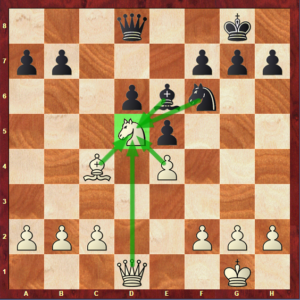
- Besides the intense fight in the centre, this structure often leads to opposite side castling, and therefore to opposite side attacks. It is important to remember that, in order to succeed in an attack, the centre must be stable.
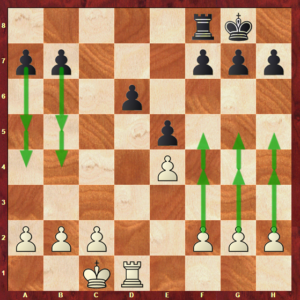
- The main plans for White are to attack on the kingside when opposite side castling occurs, playing the break f2-f4, playing c2-c4 in order to control d5 and placing a piece on d5, making sure he is able to take back with a piece
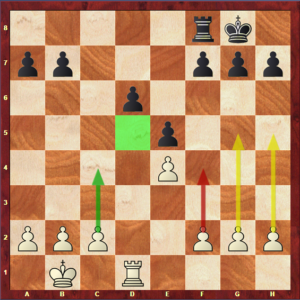
- Black’s plans consist in the expansion on the Queenside, the control of the c-file, the …d6-d5 break and the control of the d5-square.
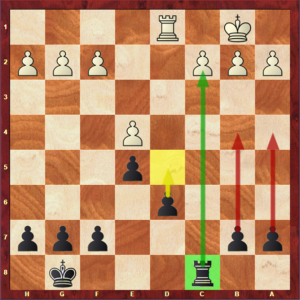
- When White manages to place a piece on d5 and this piece is exchanged, sometimes White feels forced to take back with a pawn. When this happens, we have a transposition to a different pawn formation. Although whether this transposition is good or bad for both sides obviously depends on the position, this is usually not something that White wants to do, since the d5-hole and the d6 backward pawn would be a lot harder to exploit.
- This structure is typical of the Open Sicilian, therefore many variations of this opening can originate it.
Congratulations on mastering another pawn structure: you are now definitely ready to play games in which this structure appears and be very successful with it. Keep reading all our Pawn Structure articles so that you will be able to understand every chess position that appears on your board!