
As we continue our journey through the fundamentals of pawn structures, we reach yet another interesting stopping point: the d5 chain pawn structure.
In chess, as ironic as it may sound, things are rarely black and white in terms of being easy to define. However, there is something you can be certain of: by studying the 17 different pawn structures and their characteristics, you will know what to do in the majority of chess positions you encounter.
The d5 chain pawn structure is one of the most common and complex ones. Given its closed centre, as you will soon see in diagram 1a, play is generally driven by opposite-side attacks and active plans with pieces. Closed positions can certainly be more complex than open ones in terms of piece maneuvering and choosing precise plans – but who doesn’t fancy a challenge?
Much like in the Maróczy pawn structure, in the old times it was commonly believed that White held an advantage by simply having more space and better development.
If you have been studying these articles carefully, you might see a pattern between these two structures: while these are important elements, alone they are not enough to fully define a given structure, and there is a lot more to it than these simple statements.
Grab your chessboard and take a comfortable seat – let’s get ready to learn some more about this structure!
What does the d5 chain pawn structure look like?
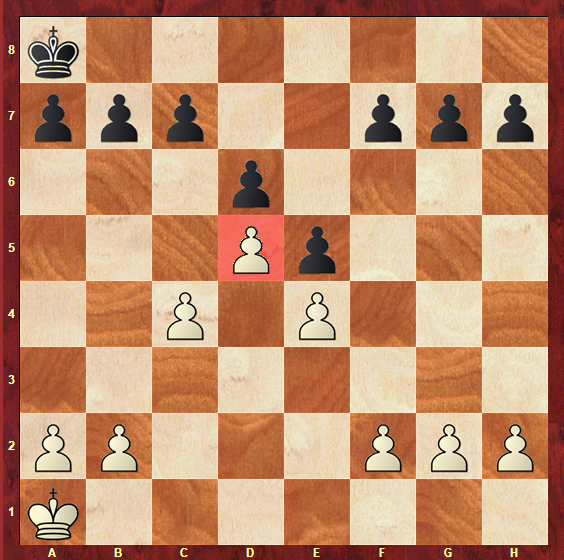
Here is our fundamental position. This is one of the most common and essential pawn structures you will find in your chess journey. By learning this, you will know how to handle a large portion of chess openings and positions.
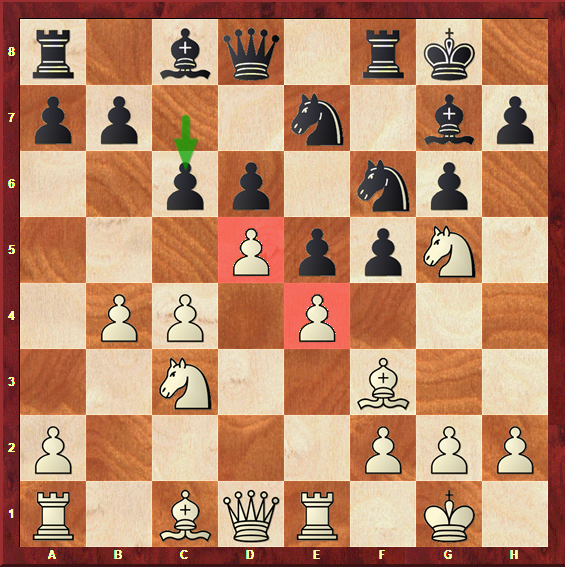
As you might guess, the name of this structure comes from the fact that White’s d-pawn has advanced to d5, which creates a pawn chain – it will be backed up from the pawn on e4, and quite possibly, later on in the game, the chain will be strengthened with the f2-f3 move.
Oppositely, Black’s central pawns stand on e5 and d6, creating their own dark-squared chain.
Since this structure is one of the backbones of chess strategy, you will find it if you decide to search around in chess books and internet pages.
As a disclaimer, you might find a variation of it with White’s pawn standing on c2 instead of c4 – but it does always go to c4 later on in the game, hence it being presented this way in the current article. The c4-c5 advance, which you will get the chance to hear about soon, is one of White’s fundamental plans in this structure.
Looking at diagram 1a confirms one of the basic statements we introduced earlier: White does have a space advantage.
The d5 pawn acts as a “leader” for the army behind it, being the one who is further advanced into the enemy ground.
However, is this really so important?
It depends. A space advantage is only worth as much as a chess player manages to achieve with it – and as much as White will try to increase it, Black will fight back with tenacity and creativity in order to diminish this so-called advantage.
When we have a closed position with pawn chains, a basic principle of chess strategy is that we must try to attack the base of this chain, its foundation.
And what exactly is the base of a pawn chain?
Well, it’s the one pawn that stands further backwards than all of its other fellow soldiers.
Take a look at diagram 1b for a better representation of this concept.
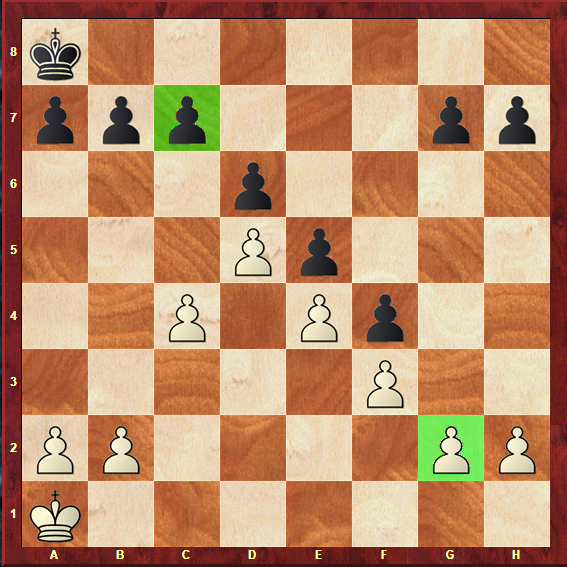
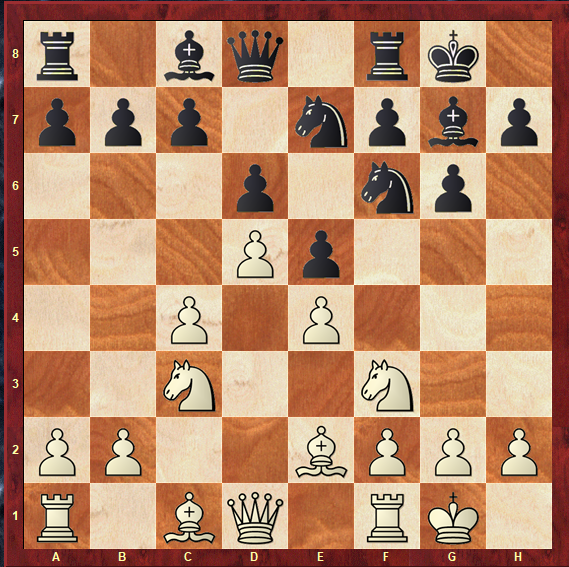
Diagram 1b presents us with a variation of this structure, where Black has advanced a pawn all the way up to f4 (hint – you’ll see this a lot!) and White has blocked it by playing f2-f3, also a typical reply.
In this situation, the base of White’s pawn chain is the g2 pawn, and Black’s is the c7 pawn.
In the most basic and fundamental terms of chess strategy, all of White’s play should be directed towards attacking the c7 point, while Black must do the same concerning the g2 point.
This happens because this pawn is a steady defensor of the chain, and attacking it may lead to creating long-term weaknesses – therefore, it is a good idea to do so.
From this idea, you can already figure out that Black will play on the Kingside, looking at g2, whereas White will play on the Queenside, eyeing c7 – we can call this a “chain-battle”.
Please note that while the foundation of Black’s chain will always be the c7 pawn, if White chooses not to support the centre with f2-f3, his foundation will be the e4 pawn instead, and that’s the one Black must chase.
Now that you have a rough idea of what will happen in the game and what you must be looking to achieve, let’s move on and make this a little bit more concrete, so that you can outplay your opponent whichever side of this structure you find yourself on.
What are the characteristics of this pawn structure?
In the previous section, you have learned what the d5 chain looks like – this knowledge will allow you to identify it on any chess board in the world and instantly know what to do.
In addition to this, you have also learned the concepts of pawn chain and base of the pawn chain, which have significantly increased your strategic knowledge of the game.
All of this was valuable, but stick around – this section is crucial for your full understanding of this structure, since we start asking ourselves all of the real questions and putting some cards on the table.
First of all, we are going back to the concept of attacking the base of the pawn chain, as this is very relevant in this particular pawn structure.
You now know that White’s play will take place on the Queenside, whereas Black will mainly focus on the Kingside.
White’s main goal will be to generate long-term weaknesses in Black’s field. However, Black will be more direct than this – he will try to generate a dangerous attack against White’s King.
If this attack is successful, of course, Black will emerge victorious. If he doesn’t manage to get anything out of it, on the other hand, he might be left with a very bad position on the other side of the board.
As you might figure out from this description, games in which the d5 chain pawn structure will rarely be dull!
They will most likely be filled with rich ideas, dangerous attacks on both sides and tactical themes peeking around the corner.
In addition to the most direct ways of playing, as this is a closed position, both players will try to maneuver their pieces slowly but surely, as they bring them forwards to help them reach the main goal – be successful in the attack.
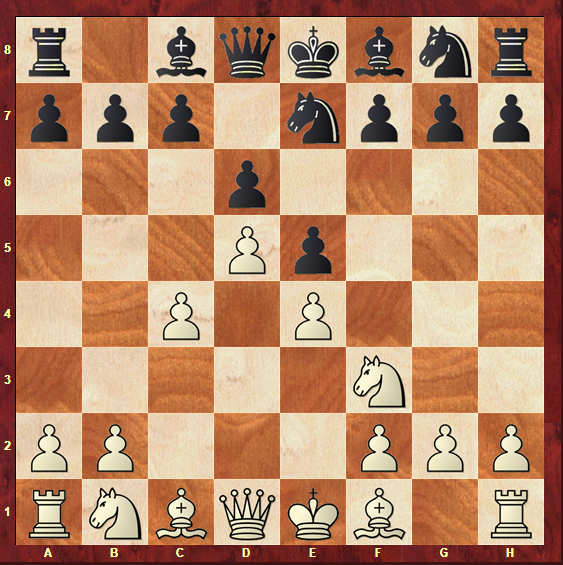
Take a look at diagram 1c to see things in a clearer way.
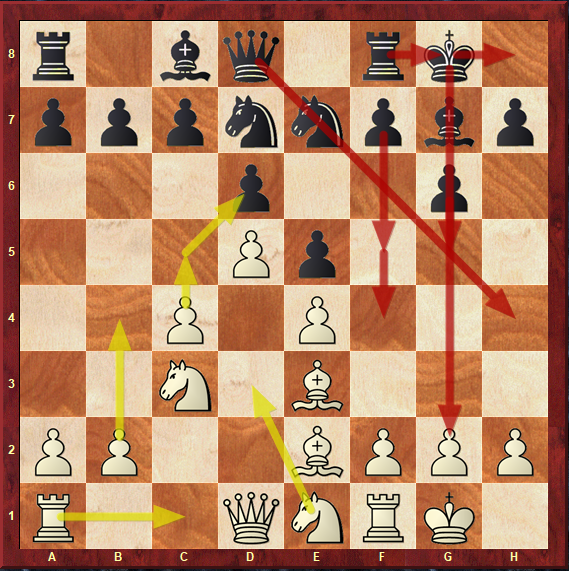
White’s main ideas all gravitate around the c4-c5 advance. In order to do this, he will also advance b2-b4, bring the Knight to d3, open the c-file for a Rook – one of his goals is to get his Knight to the c7 or d6 squares, completely mining the base of Black’s pawn chain.
All the way across the board, Black’s first take on the attack will always be with the f7-f5 advance. Before White’s pawn is on f3, e4 is the base of the chain, so this makes perfect sense in structural terms. After this, Black will be faced with an important choice: either to take on e4 and play with the open f-file, or try to push f5-f4 and generate an attack by enjoying a space advantage in the Kingside.
Another important concept of chess strategy that perfectly applies to many opposite-side attacking positions, namely closed ones, is that if you can limit your opponent’s activity on your weaker side, you might have a free hand to attack on your strong side.
For instance, this means that White will often move on the Kingside, in order to staunch Black’s attack, and Black can also make his move on the Queenside, to minimize White’s pressure.
While this might not seem logical, if you can control your opponent’s counterplay, you are one step closer to the win – even if you have not started your attack yet!
The following diagrams will help you realize how this idea can be carried out.
For instance, one of White’s ideas could be to close the position on the Kingside by playing the move g4 at an adequate moment of the game.
This has its pros and cons: while it does postpone Black’s threats and reduces the amount of breakthroughs, it also exposes the King a bit more – and in the meantime, White did not achieve anything significant on the other side of the board.
The same can be said about the idea behind the c7-c6 breakthrough on diagram 1e: Black tries to challenge White’s strong central pawn chain instead of sitting and waiting on the Queenside. It can also be said, though, that this may lead to even more weaknesses and that Black did not achieve anything relevant regarding his own attack: it all depends on the moment of the game.
By reaching this point in the article, you are surely starting to feel confident in your abilities to take on this pawn structure and apply it in your games. Let’s now try to summarize the ideas we have just looked at, in order to make it easier for you to remember them later on:
White’s position
- Generally, White enjoys a space advantage;
- White will have a light-squared pawn chain. If he plays f2-f3, the base of the chain will be g2. If he doesn’t, the base of the chain will be e4;
- In general, White will try to play on the Queenside in order to create weaknesses in Black’s field;
- White’s typical ideas are the c4-c5 breakthrough, together with bringing the Knight to d3, the Rook to c1, and the pawn to b4;
- White may try to close the position with f2-f3 and g2-g4 on the Kingside, to stall Black’s attack;
Black’s position
- Black will have a dark-squared pawn chain, whose base will be the c7 pawn;
- In general, Black will try to play on the Kingside in order to generate direct threats against White’s King;
- Black’s typical ideas are the f7-f5 advance, together with bringing the Queen and Knights to join the attack, and the pawn to g5;
- Black may try to breakthrough with c7-c6, with the idea of controlling White’s counterplay on the Queenside and defy the stronger central pawn chain.
Those are the basics you must instantly think of whenever you see this structure in one of your games.
However, at this point you must be asking yourself: how exactly can I reach this structure with the White or Black pieces? Which opening must I play?
Fear nothing, as that’s exactly where we’re headed next.
How do you reach this pawn structure?
Knowing what a given pawn structure looks like and the main ideas behind it is not worth much over the board if you have no idea how you will come to find it.
Don’t worry, though, because this section has you covered. By its end, you will know precisely how to reach it in a chess game of yours, regardless of what color you wish to play it.
The most common way to reach this opening is by tracing the path of one of the most heavily analyzed variations in chess: the Classical Variation of the King’s Indian Defense.
Just the fact that it comes up in such a popular and frequently played line comes to show how theoretically important this structure is.
We find our familiar setup after the following moves:
- d4 Nf6
- c4 g6
- Nc3 Bg7
- e4 d6
- Nf3 0-0
- Be2 e5
- 0-0 Nc6
- d5 Ne7
Another opening in which this structure is commonly found is the Benoni defense, namely its Czech Variation that is characterized by Black pushing an early e7-e5.
- d4 Nf6
- c4 c5
- d5 e5
- Nc3 d6
- e4

As you already know, the d5 chain pawn structure leads to fundamentally closed positions, and that is why it most commonly derives from closed openings (openings which start with 1.d4).
However, you also already know that chess is a deeply rich game, and that closed openings can sometimes lead to open, attacking games, as frequently as open games (starting with 1.e4) can lead to closed positions.
That being said, we can also reach this structure with openings that start with 1.e4 – and one of them is also from another of the most popular openings in chess, the Ruy Lopez.
- e4 e5
- Nf3 Nc6
- Bb5 Nf6
- d3 d6
- 0-0 Bd7
- Re1 g6
- d4 Bg7
- d5 Ne7
- Bxd7+ Nxd7
- Be3 0-0
- c4

While this setup is not the most usual in the Ruy Lopez opening, it does come up every once in a while, and with the White pieces you may desire to get into a position that is familiar by playing this way.
However, the Ruy Lopez isn’t the only opening that starts with 1.e4 and sees this structure in certain situations.
In the Scotch Opening, namely when Black plays an early d6 instead of taking on d4, this structure can also frequently occur.
- e4 e5
- Nf3 Nc6
- d4 d6
- d5 Ne7
- c4
Now that you have heard of four entirely different ways of finding this structure as an outcome of your chess openings, it’s time to get real – how exactly should this position be played? There is no better way to learn this than through the careful analysis of games played by the true experts.
How do you play in this pawn structure?
Here the real deal starts – stay focused, as absorbing the knowledge that comes next is what is going to make you truly outplay your opponent in this pawn structure.
From the section in which we covered the main ideas behind this structure, two main ideas were given:
- This structure is characterized by an opposite-side attacking position;
- Both sides will try to attack the base of each other’s pawn chain;
While this isn’t much information, it is our starting point as we approach a different level of knowledge and depth in the d5 chain pawn structure.
As you might remember from before, much like other pawn structures that allow White an advantage in space, it was commonly believed that this structure was simply worse for Black’s side.
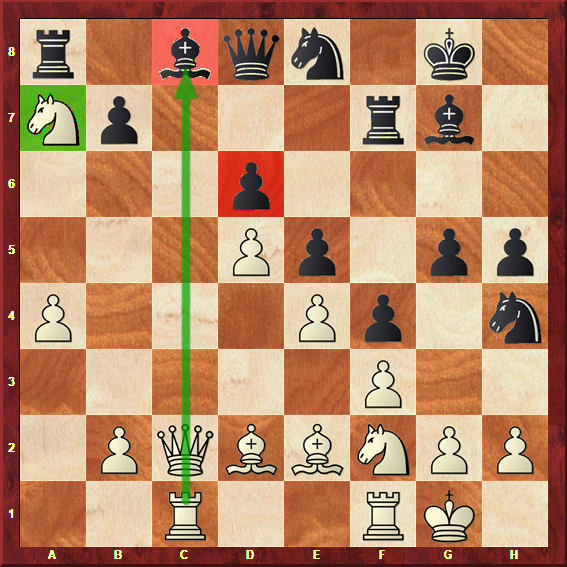
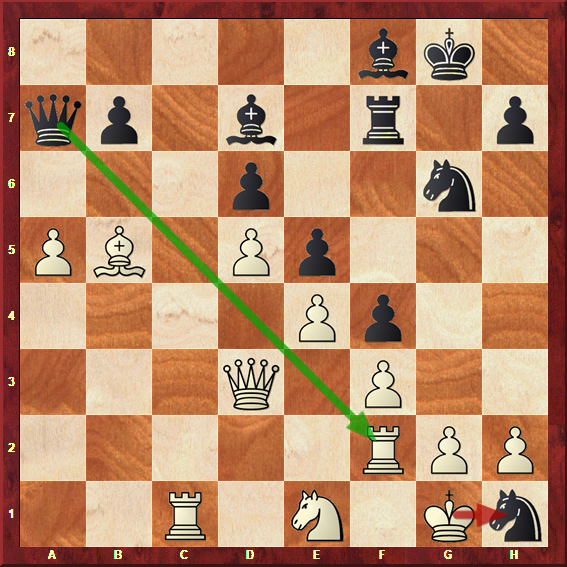
Before we dig into the plans for both sides, let’s begin by proving this theory wrong – technically, it was the legendary Polish Grandmaster Miguel Najdorf who managed to do that.
On his game against Mark Taimanov from the Candidates Tournament of 1953, he introduced some of the most famous ideas for Black in this structure. Scoring a brilliant win, he stunned the chess world and proved wrong all of those who blindly claimed an advantage for White in the d5 chain.
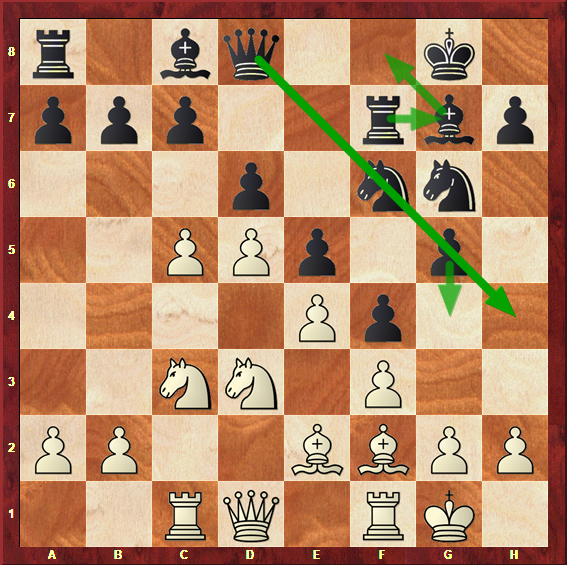
The move that has just been played by Najdorf, 15…Rf7, has the idea of bringing the Bishop to f8 in order to make room for the Rook on g7. From there, it will support the g5-g4 advance, which, in turn, will make room for the Queen to take on the dark squares of g5 or h4 and seriously threaten White’s King.
This idea is currently one of the most famous plans for Black in this structure, but this game was where it all started.
Take a look at how things quickly turned dangerous:
- Rc2 Bf8
- cxd6 cxd6
- Qd2 g4
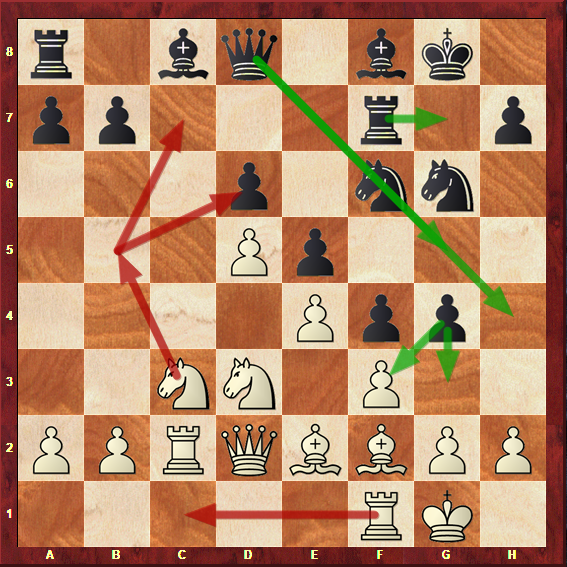
As soon as he could, Najdorf launched a terrible attack with the g5-g4 push. The Rook is ready to jump to g7 to back it up in just one move, and the Queen is also closer to joining the party, as well was the Knights.
In the meantime, White did push c4-c5 and take on d6, which weakened Black’s pawn chain – but there is still a lot left to do to turn this pressure on the Queenside into something serious. Black has clearly won the race in this situation, and went on to triumph.
It must be said, however, that Taimanov had never encountered this idea over the board before, which is the justification behind his less precise play.
So that you don’t get discouraged by looking at this position from White’s point of view, it must be noted that theory has massively evolved, and this attack may not work as well for your opponent as it did for Najdorf – as long as you know exactly what you must do.
Let’s now flip the board and look at this position from White’s point of view, study the main plans and find some interesting examples of how the Queenside attack may also triumph over Black’s onslaught on the Kingside.
White’s plans
As mentioned before, White’s play gravitates around the c4-c5 push and the idea of progressing on the Queenside in order to provoke a weakness in Black’s field.
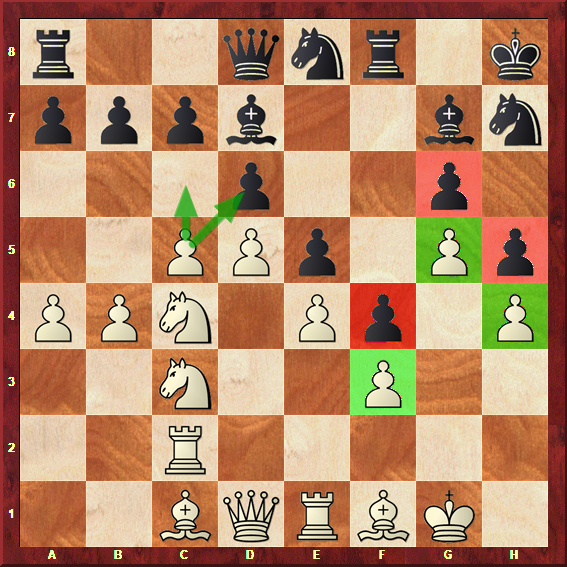
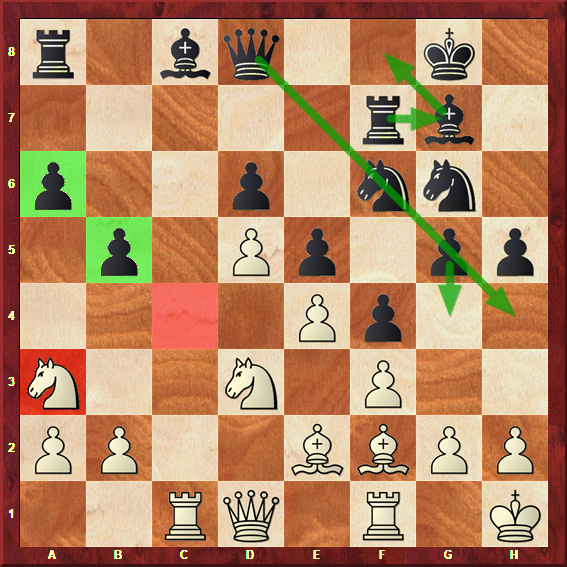
In the following game, played in the year of 2007 between Sergei Azarov and Karsten Volke, in the European Chess Championship, we see the perfect example of White winning the race and creating problems for Black that were far more worrying than the Kingside attack for White.
Curiously, this game derived from a Ruy Lopez opening, and precisely the position that you can find on diagram 1h.
A few moves after the position on diagram 1h took place, we reached diagram 1l, in which White had just pushed b2-b4.
This is a typical idea, in order to support the c4-c5 advance and gain space on the Queenside.
Also, as you can tell from taking a careful look at the position, Black is also making some progress on the Kingside, having played f7-f5-f4 and g7-g5.
This position is a typical and common one on this structure – let’s see a few moves ahead.
16… Nf6
- c5 Rf7
- Nc4 Bf8
- a4 Rg7
- c6

As you can see, Black’s progress on the Kingside was not as evident as White’s on the Queenside. He followed Najdorf’s plan of playing Rf7-Bf8-Rg7, but he has not pushed g5-g4 yet, or brought the Queen over to join the attack.
In the meantime, White is very much ahead. Azarov pushed a2-a4 with the intention of gaining even more space, and the c-pawn has gone all the way to c6.
This is an interesting way of playing – the idea is to provoke Black into advancing b7-b6 and then breaking through with a4-a5, creating a great amount of tension on this side of the board.
Let’s keep on following the game.
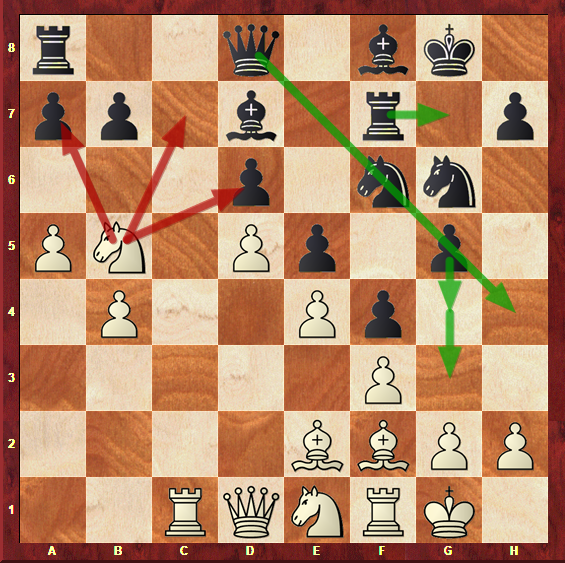
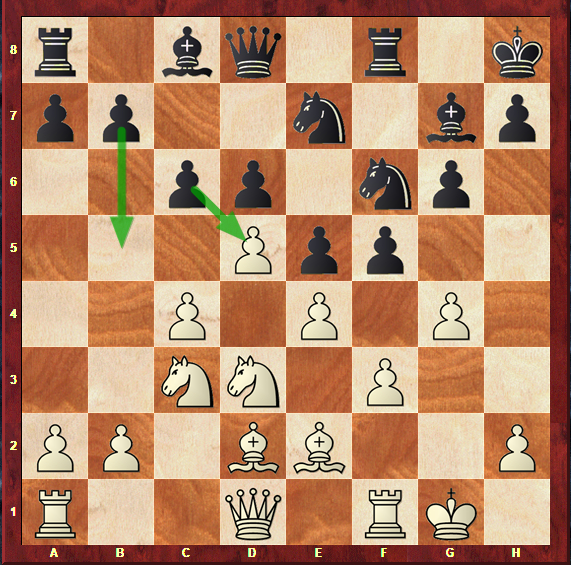
20… b6
21. a5 Rb8
- axb6 axb6
- Nb5 Qc8
- Ra7
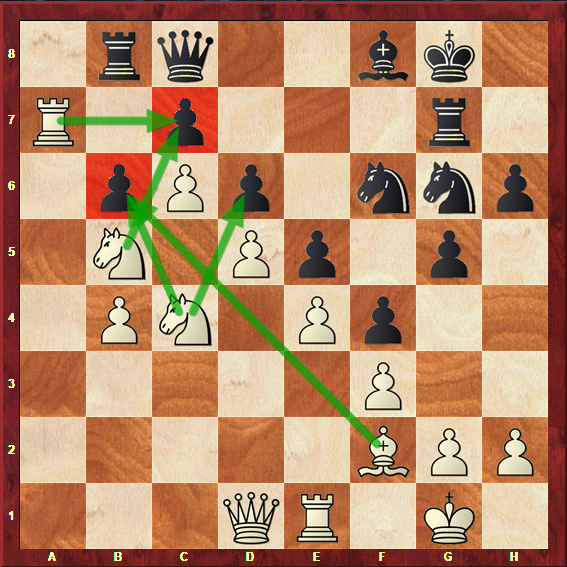
White’s army is in full control of the Queenside, and the c7 pawn, the base of Black’s chain, is under fire by the Knight on b5 and Rook on a7. Once this pawn succumbs, the c4 Knight is in the perfect place to target the b6 and d6 pawns, which will lose their trusted defender.
Take a brief moment to compare diagrams 1m and 1n. While White invaded the a-file with a4-a5-Ra7 and played Nb5 – constructive moves for his plan – Black has only made defensive moves: b6, Rb8 and Qc8.
If you take a careful look, you can understand that this position is already unbearable for Black and that the attack has not been timely carried out – and, indeed, White won in only a little over ten moves’ time.
Let’s take a look at another game.
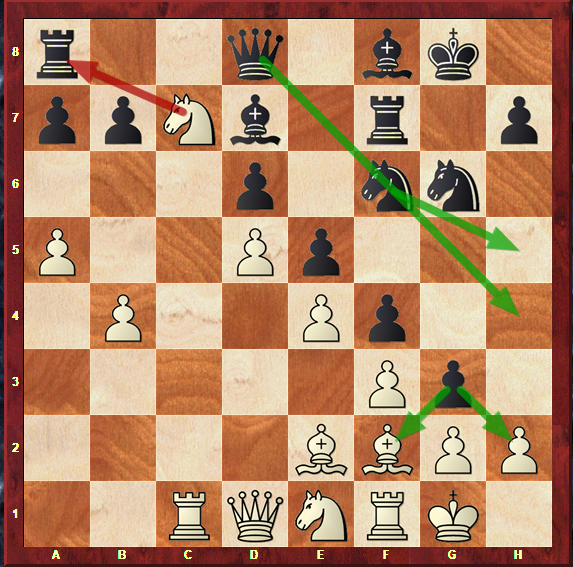
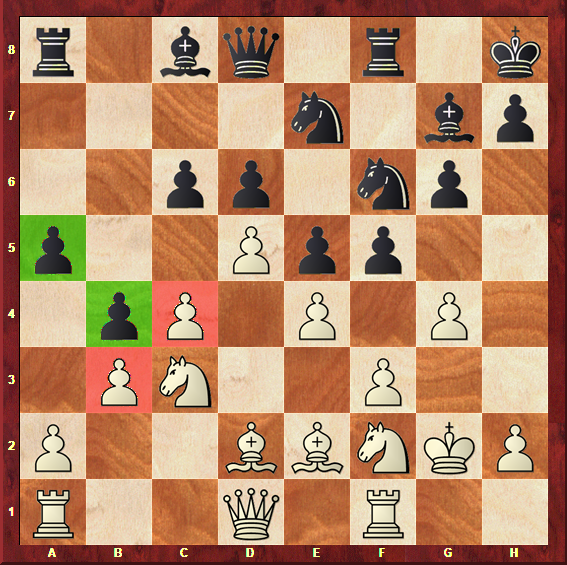
The above position still belongs to fairly well-studied opening theory territory, but we will follow the game Azmaiparashvili – Rabinovich, played in the Ponferrada open tournament of 1992.
While in the previous game we saw White push c5-c6, a very interesting and threatening idea, you might be wondering if it doesn’t make more sense for White to play cxd6 instead.
Since this plan directly targets the base of the chain, it is indeed another common idea that White employs, as we will now see.
- cxd6 cxd6
- Nb5 Rf7
- Qc2 Ne8
- Nf2 h5
- a4 Nh4
- Nxa7
With the aid of a tactical trick, White has managed to take a pawn for free, seriously pressure the c8 Bishop with the heavy pieces on the c-file, and create two weaknesses on the Queenside, those being b7, an isolated pawn, and d6, the new base of Black’s chain.
In the meantime, again, Black has tried to make some progress on the Kingside. However, Rabinovich was neither precise nor fast enough to create anything worrying in particular for White – and things are already seriously compromised on the other side of the board.
Now that we’ve covered the two most frequent plans for White, let’s go back to an idea we have mentioned on the section “What are the characteristics of this pawn structure?”.
One of the things you may remember from that section is that it is often wise to play on your weaker side with the aim of limiting the opponent’s play, before continuing to pursue your major goal on the stronger side.
In the game van Wely – Krylov, from the Calvià Olympiad of 2004, the perfect demonstration of this idea’s value is found.

Again, we have a typical opposite-side attacking formation. White has got the c4-c5 advance in, and Black has f5-f4.
Instead of continuing with c6 or cxd6 as in the previous examples, the Dutch Grandmaster Loek van Wely decided to postpone this plan until he had extinguished all of Black’s chances on the Kingside.
The game went on:
- g4 Nhf6
- f3 h5
- g5 Nh7
- h4
If you carefully analyze the last four moves that White has made, you will realize that they were all played with the intention of closing the Kingside.
Since, of course, an attack loses its strength when there are no breakthroughs, because pieces increase their activity upon them, this idea was strategically well thought by White.
Now that the Kingside does not worry White so much, it’s time to choose between c6 and cxd6 as a follow-up, and calmly continue the plan in an accurate way. A few moves later, White went for the c6 plan, and achieved a fair triumph by the end of the game.
Black’s plans
If you intend on playing this position on the darker side of the board, this is certainly the section of the article you were looking forward to reading the most.
Let’s start in the most fun way possible, in order to work up an appetite.
In diagram 1s you can find a position extracted from a game played by no other than the former World Champion Garry Kasparov. Kasparov is seen by many as the greatest chess player of all times – and even though many will beg to differ based on personal preference, no one will deny that he had a very unique eye for sharp, tactical positions, and played them with brilliancy and mastery.
At this point in the article you must know this by heart: White expands on the Queenside, Black expands on the Kingside.
This position is no different from any of the others we have just looked at from White’s point of view: the difference is on how Kasparov handled it, knowing he had to be as fast and accurate as possible to be successful in his attack.
Therefore, no other response made as much sense as his next move:
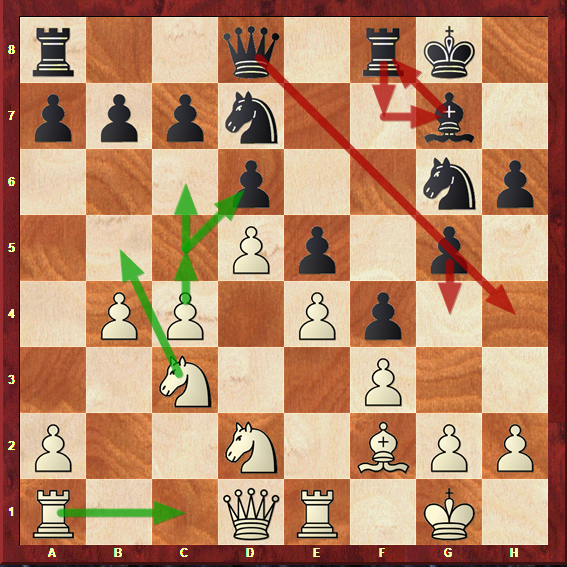
19…g4
- Nc7 g3
Kasparov was not afraid to sacrifice a whole Rook in order to gain time to attack: if you think that this Rook is cornered and doesn’t really contribute to the attack, it makes sense to trade material for attacking potential in this position.
This happens because White will have to spend at least two moves to capture this Rook: Nc7, the last move that has been played, and Nxa8.
In the meantime, Black will keep on building the attack.
- Nxa8 Nh5
- Kh1 gxf2
- Rxf2 Ng3+

The Knight cannot be taken, as when Black recaptures with the f-pawn, Qh4+ followed by Qh2 is a deadly threat.
As dangerous as the attack looks, this position is still not winning for Black – and if he does not manage to achieve anything in concrete, White will be an exchange up (the a8 Rook was exchanged for the f2 Bishop).
Now is where the best part of the game comes, and, again, we recall the principle we have learned before: to minimize your opponent’s counterplay.
- Kg1 Qxa8
- Bc4 a6
- Qd3 Qa7
- b5 axb5
- Bxb5 Nh1 0-1
Certainly the game ended in fine Kasparov style, with a beautiful tactical idea of placing the Knight on h1, where it attacks the Rook and can’t be taken as the King is overloaded with the defense of the same Rook on f2.
However, let’s carefully analyze what led to this position.
Instead of carrying on with the attack, Black shifted sides and took the Knight on the corner with his Queen.
Then, he played a6, a move whose main idea is to block White’s Queenside counterplay – with some venom, of course, as Kasparov had surely foreseen that the a7 square would be free for his Queen, from where it could attack the King over the diagonal.
There is rarely an example of a game, either for White or Black, in which an attack simply triumphs with no account being given to the opponent’s ideas: as well as it takes two to play a game, it takes two to build a victory.
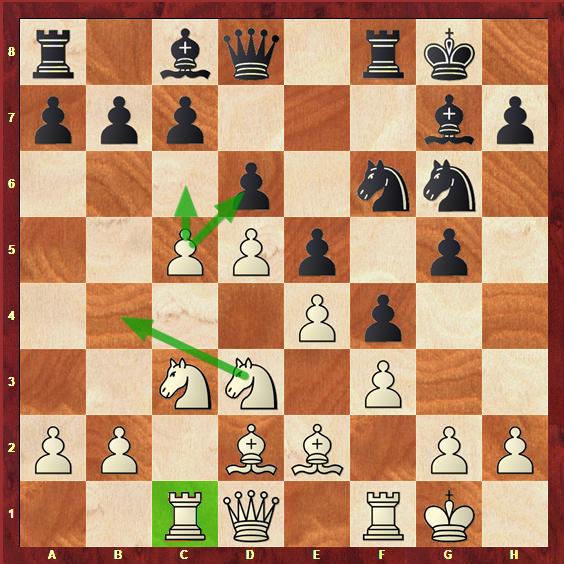
For instance, take a look at this position, extracted from the 2015 game between the two North-American Grandmasters Wesley So and Hikaru Nakamura, who currently are at the very top level of competitive chess.
Nakamura is an expert in this structure, as he often plays the King’s Indian Defense with the Black pieces.
Therefore, he has a keen eye for defensive and attacking themes in this pawn structure – and in diagram 1w, you can see how he followed the principle of limiting his opponent’s play before launching the attack forward.
He played a6-b5, which seems counterintuitive – expanding in the weaker side. However, there is a very specific idea behind this: to limit the Knight, which now stands on a3, and prevent it from getting into c4.
Previously, you have seen how dangerous a White Knight can be on the c4 square, eyeing d6 and b6 at the same time. With this idea, Nakamura reduced White’s Queenside options and went on to win a great attacking game all the way across the board.
Another way to do this is, as mentioned earlier, to push c7-c6. This move simultaneously challenges White’s central pawn formation and reduces their options on the Queenside, as the c4-c5-c6 push is no longer an available plan.
We have just looked at a game from a former World Champion, so let’s take a look at a diagram taken from a game played by the World Champion at the time of writing, the Norwegian Grandmaster Magnus Carlsen.
In this game, dating from 2010, he had the Black pieces against another top-level Grandmaster, Levon Aronian.
From an early stage of the game, both players applied this idea of playing on their weaker side, as can be seen from White’s g2-g4 and Black’s c7-c6.
- Kg2 b5
- b3 a5
- Nf2 b4
Similarly to what happened in Loek van Wely’s game from the previous section, in which White had spent four consecutive moves dedicated to the purpose of closing the Kingside for Black, Magnus Carlsen has also focused on closing the side in which he was likely to find more problems, before pursuing the attack on the opposite side.
While Aronian, playing White, tried to fight fire with fire and apply the same idea on Kingside, there is a main difference: Black has not closed the position with f5-f4 yet.
This leaves his options out in the open: he could close if he found it advantageous later on, or he could take on g4 or e4, or keep the tension alive for a little longer.
Congratulations! You have reached the end of this section and are now fully prepared to play the d5 chain pawn structure and even choose from a variety of plans. Let’s now take the time to assimilate everything we have just learned:
White’s plans
- Break on the Queenside with c4-c5xd6 and later invade down the c-file, with the aid of the Knights coming into b5 and c4;
- Expand on the Queenside with c4-c5-c6, and if Black chooses to retaliate with b7-b6, breakthrough on the a-file with a2-a4-a5xb6;
- Block the Kingside with g2-g4 and f2-f3, and only then proceed with the above plans.
Black’s plans
- Create a kingside attack with the f7-f5-f4 push and later g6-g5-g4-g3, or gxf3 attacking the f3-pawn, which becomes the new base of the chain.
- Maneuver the Rook to f7, Bishop to f8 and Rook to g7, and then proceed with the above plan with the idea of bringing the Queen to join the attack;
- Play c7-c6 to challenge White’s central pawns and aim to block the Queenside with b7-b5-b4, before proceeding with the above plans.
Conclusions
We have now approached the end on yet another pawn structure article: as you know, there are 17 of them, and knowing them by heart will allow you to find your way in any chess position that comes up during your life.
The d5 chain pawn structure is truly unlike any other in terms of richness and potential for creative, attacking setups for both sides.
If you have carefully read this article and analyzed the positions in the diagrams, you are now ready to face it over the board – but it might be clever to conclude with yet another checklist of the most important things to keep in mind.
- The d5 chain pawn structure offers chances for tactical, rich play for both sides;
- This structure can be reached by the King’s Indian Defense, the Benoni Defense and some openings that start with 1.e4, such as the Ruy Lopez or the Scotch;
- It was commonly believed that White had a clear edge in this structure due to the space advantage and central control;
- However, modern theory and practice have shown that Black also has excellent chances in this structure;
- The concept of pawn chains and its bases is extremely important in order to fully understand this structure;
- White will try to expand on the Queenside and create weaknesses in Black’s field, eyeing the base of the pawn chain which is c7;
- Black will try to expand on the Queenside and attack White’s King, eyeing the base of the pawn chain which is g2;
- Both sides may consider inhibiting their opponent’s counterplay before carrying out the plans.
If you have read this far – congratulations. You can be certain that your hard work will pay off.
In the meantime, why not practice what you have just learned, or maybe take a look at yet another pawn structure article?